We are building a swimming pool in our backyard. How to build a pool in the country with your own hands - a complete step-by-step instruction
An artificial reservoir can serve not only as an ideal place to relax, but also as a real decoration of the site. For its construction, it is absolutely not necessary to invite specialists - you can make a small concrete bowl for the pool and reliable waterproofing for it yourself.
Choosing a place for the pool
Before starting construction, you should carefully consider the filling systems (it is more convenient to place the reservoir closer to the water supply), cleaning and water drainage. When choosing a place for a pool, you should be guided by the following rules:You should not place it next to trees: their roots will tend to water and can damage the waterproofing; in addition, fallen leaves will fall into it, and the heating of water in a shaded area will be slow;
So that when frozen wet soil is heaving, it does not damage the pool bowl, the pit should be placed in the area with the deepest groundwater; it is better if it is a clay area: clay does not pass water well, and in case of partial damage to the waterproofing, the water from the pool will not leave so quickly;
In order to get as little dust, dirt and fallen leaves as possible into it, a place should be chosen for it so that the prevailing wind direction goes along it; moreover, pipes for overflow and water purification should be located in the direction opposite to the direction of the wind - in this case, the accumulated dirt will immediately merge.
It is not recommended to locate a reservoir next to large trees.
Advice. Maintenance of structures of complex shape, with many bends and angles, is much more difficult. In the absence of a quality filtration system, it is better to choose a rectangular or oval pool.
Optimal depth artificial reservoir - 105-170 cm. If there are children in the house, you should take care of their safety. To avoid accidents, a 50 cm deep bathing area should be fenced off with a net.
Pit preparation. Waterproofing
The main stages of the construction of the pool are:laying a pillow of sand and crushed stone or gravel (in areas with sandy or rocky soil, you can do without it);
installation of expanded polystyrene on the bottom of the pool to compensate for ground pressure;
double waterproofing of the bowl (on the outside and inside concrete structure);
laying of cleaning and removal systems;
installation of formwork and reinforcement;
pouring concrete;
application of a waterproofing film (concrete milk);
building decoration.
1. The marking of the pit is carried out using pegs and a nylon string stretched between them. When calculating its width, the size of the formwork is taken into account. The depth of the pit should also be greater than planned: the heights of sand and foam pads, concrete pouring and finishing should be taken into account in the calculations.


Marking the place for the pool
2. To protect against soil shedding, the walls of the pit are made with a slight slope. After leveling the bottom and walls, all loose soil is removed from the pit. The earth in it should be spilled with water and carefully compacted.
3. Its bottom is covered with a layer of sand 10-12 cm, and then crushed stone or gravel and compacted again.

Drainage cushion device
Advice. In order to accumulate as little dirt as possible in the pool, it should be located just above the surface of the earth. Otherwise, rainwater, along with dirt, will constantly enter the tank.
4. If the design provides bottom water outlet, pipes for it should be laid before backfilling with rubble. At the same time, the pit is made with a slight slope towards the drains. Such pipes are packed in protective sleeves that protect them from freezing, laid at a slight slope of 5 ° and brought to a pre-prepared pit. At the other end of the pipe is installed valve. For a small pool, one pipe is enough. In the construction of a larger area, one drain will not be enough: it is better to provide for 2-3 of them.
6. The simplest waterproofing are roofing material on bituminous mastic or PVC film (the polyethylene film will collapse very quickly). The film, like the roofing material, is rolled out with an overlap of 15 centimeters. The waterproofing agent is laid over a layer of rubble at least in two layers. It should protrude beyond the sides of the pool by 15-20 cm.

Waterproofing and formwork installation
Hanging formwork for walls. Pouring concrete
Not only heaving of the soil, but also the weight of about a dozen tons of water will exert pressure on the walls of the pool. Therefore, the concrete frame should be constructed from high-quality cement. stamps from M300-350 proven manufacturers with mandatory gasket double layer reinforcement with cells of 20 cm. To increase the service life, it is advisable to add an additive to it - plasticizer. The thickness of concrete walls is 15-20 mm. When pouring, concrete should be laid gradually, layer by layer, and each one carefully compacted manually or with a vibrator.Important! If the filling is carried out in layers and the subsequent seams are laid only after the previous one has hardened, a cold seam, which will be problem area, "weakness" in concrete. When the soil moves at the junction, damage can occur. That's why it is desirable to fill the walls and bottom of the pool at the same time.

cold seam
1. For simultaneous pouring of the bottom and walls of the pool formwork for walls can be "hung": lay the boards across the pit, on which the formwork will be attached. It bursts with boards every 50 cm, and the places of its joints are fixed.

Formwork for the pool
2. First, the floor is poured a couple of centimeters above the bottom edge of the formwork. So that when pouring the walls it does not lead, it should grab a little (the setting time is not more than 4 hours). If, when the reinforcement bar is immersed, it pushes through the concrete by only 3-4 cm, you can start pouring the walls. In this case, the mixture should fill the formwork evenly from all 4 sides.
3. If a concrete pump is used during pouring, it is set to minimum power. In order not to damage the floor that has not yet fully strengthened, its hose is parallel to the ground. When pouring, 5-10-minute pauses are periodically made to vibrate and set the concrete.
4. If it is not possible to fill the walls and the floor at the same time, the structure should be strengthened: fill the place of formation of a cold joint with any elastic sealant: mastic, polymer, rubber cord, non-shrink cement or liquid glass. Before laying such compensation materials, the concrete surface must be thoroughly cleaned of contamination.
5. After removing the formwork, the concrete walls and floor are covered with waterproofing film: cement mortar (concrete milk).

Applying a waterproofing film
Penetrating waterproofing
Before finishing the walls of the pool, the concrete walls are waterproofed. For this, as well as before pouring concrete, you can use PVC or roofing material. A fairly effective, but more expensive method is the use of penetrating compounds such as Ceresit or Penotron, which are applied to slightly dry concrete. Processing is carried out in 2 layers.
PVC film waterproofing

Coating with penetrating waterproofing
Water purification systems (pool filter)
Without filtration systems, the water in the pool will very quickly begin to emit an unpleasant odor, and its surface will become covered with a slippery coating. There are several ways to clean the reservoir:periodic pumping and use of heated water for watering beds, fruit bushes and trees; however, with the complete removal of water from the pool, the new one will heat up for a long time;
with filtration systems; the simplest devices are installations filled with coarse sand; next to the pool, a small pit is arranged for a pump equipped with such a filter; two pipes are run into the pool: one for water sampling, the second for draining purified water; in this case, the cost of electricity will be minimal, you will only have to spend money on the purchase of a pumping station;

Swimming pool water treatment device
By using chemical reagents(used as an additional cleaning system); water bloom can be eliminated not only by chlorination or the addition of bromine, but with the help of an inexpensive and environmentally friendly rehydrol.

Rehydrol for water purification in the pool
Advice. Without water, a concrete bowl can crack in frost, so it is not recommended to drain water from it for the winter. It is enough to remove only part of the water, and to compensate for the pressure of ice on the walls of the pool, throw several plastic 5-liter bottles into the water, to which a load is suspended. To prevent too much debris from accumulating in the pool during the winter, it can be covered with any covering material.
Pool Finish
You can finish the bottom and walls of the pool with mesh-based mosaic tiles, propylene coating or acrylic paint for pools with the addition of color. Mosaic tiles should only be glued to an adhesive that can withstand significant temperature changes. When using mesh, the mosaic will hold well on any bends.Advice. It is undesirable to use porous rubber-based paints for finishing the pool: it will be very difficult to wash them. Moreover, algae are very quickly attached to such surfaces.


Acrylic painting and tiling
Which of the owners of dachas or country cottages does not dream of own swimming pool Location on? And do not think that this is an extremely expensive and requiring great effort in the construction and operation of the structure. With minimal skills in building materials and some expenses, you can build an inexpensive pool.
In this article, we will tell you how to make a pool in the country with your own hands from various materials (concrete, frame, film), and also demonstrate videos and photos.
Pools may vary. For some, an inflatable tank, installed in a suitable place and filled with water from a hose, will be enough. If you want to build a solid stationary reservoir that can serve for many years, you will have to work.
First of all, you need to choose a suitable place. It should be removed from beds and trees. The less debris will fall into the water, the less maintenance effort will be required. In addition, it is necessary to think about the supply of water and its discharge. It is better to choose a simple shape of the pool, without sharp corners: in the form of an oval, circle, square or rectangle.
The easiest and cheapest way to build a pool is to cover the recess in the ground with a special film. However, this structure cannot be called reliable and durable. More often, owners prefer to build pools of concrete or polymer materials.
A fairly simple structure, quite suitable for self-construction, is considered a frame pool. Its feature is the design, which consists of a frame "skeleton" of metal pipes. The bowl is lined with three layers of PVC film. Inside it has a special nylon mesh, which gives the material additional tensile strength. The metal frame holds the water pressure.
It is placed with some recess in the ground or simply on the surface. The area for the pool must be prepared: remove all vegetation, and level the bottom of the shallow pit and fill it with sand or gravel. In some cases, even a concrete pad is poured.
Then the entire surface is lined with a heat and water insulator. Penofol or folitep is best suited here. These are modern heat-insulating materials made of polyethylene foam covered with aluminum foil. The mats are laid end-to-end and the seams are glued with construction tape.
After that, the pool itself is assembled according to the instructions attached to the kit. The only tool required for the job is a screwdriver.
Concrete
When erecting a concrete pool, work also begins with digging a foundation pit. In this case, the entire bowl is sunk into the ground. When calculating the dimensions of the pit, do not forget to add about 0.4 m to the wall thickness. The shape of the pit should repeat the outlines of the pool itself. The optimal depth can be considered 1.4 m. To make the recess as reliable as possible, its walls must be given a slight slope to the outer sides, about 5 °.

The finished pit of the desired shape must be carefully leveled, the soil compacted and a sand cushion about 30 cm thick laid on the bottom. Then the pool is waterproofed, everything is covered with a waterproofing agent (roofing material with bituminous mastic) in several layers and formwork is installed. Liquid concrete is poured into the gap between the wooden shields and the earthen wall. Additionally, the walls are reinforced with a double metal mesh. It simultaneously counteracts the pressure of the water in the pool and the pressure of the soil.

Note! Concrete grade - not less than M350.
The bottom of the future pool is also reinforced with a mesh and poured with a concrete layer of at least 20 cm. When the solution hardens, the formwork is removed and the entire surface is rubbed with "cement milk" - a liquid solution of cement and water without adding sand. This process is also called ironing. It allows you to remove microcracks on a frozen surface and prevent their occurrence in the future.

At the final stage, the walls and floor of the pool bowl are finished with a decorative coating. Usually this ceramic tile. However, you must first install a ladder, nozzles, waterfalls and underwater lights, equipment that facilitates the care of the pool.
We offer you to see a photo report of the construction of a concrete pool:


Film pool

Due to its versatility, PVC film has been widely used for arranging swimming pools. It is used:
- to create a pool in the ground;
- for arrangement of frame pools;
- for sealing the concrete base of the pool bowl;
- as a repair kit for an old pool.
Note! PVC film has a thickness of 0.5–2 mm. The thinnest is only suitable for small pools with minimal load. It is best to use a film no thinner than 1.5 mm with a reinforcing layer of fabric.
Pool in the ground

If you want to make a pool quickly and relatively inexpensively, then in this case you can dig a foundation pit with sloping walls, which will be the base of the pool. Carefully remove the roots of the plants and tamp the soil. Make sure that there are no sharp stones anywhere, because they can damage the canvas.
The entire bottom of the pool is covered with sifted sand, with a layer of at least 3 cm and leveled. As a heat-insulating material, you can lay a layer of mineral wool, but it is better to spread roofing material, as it is not afraid of moisture. Spread a non-woven fabric over this cake and only then a film. After that, you can weld the seams.
Note! Before you start welding the seams, you need to practice on scraps of material so as not to spoil the canvas intended for sealing the pool.
In order to fix the edges of the web, you can use a special mounting bracket to which the film is welded. A simpler option is to drop the edges of the film. In this case, often a decorative stone edging is made around the pool.
concrete pool

We will not dwell on the creation of the structure of the pool itself - it should be a reinforced container. The main advantage of using PVC film is that no waterproofing is required. If the surface is not perfectly smooth, then it will be correct to use a substrate, which can be used as geotextile or the same roofing material. Actions with a film are similar when arranging a pool in the ground.
It remains to choose the method of fixing the film on the edges of the pool (it is better if it is a special mounting bracket) and you can use the product.
Repair of an old pool

It is no secret that the capital pool can lose its tightness over time or even crack. If the crack is constantly expanding, then no sealing, even application liquid rubber, will not help. In this case, it is possible, as well as for a concrete pool, to use a PVC film, having previously sealed the cracks and leveled the base.
Polypropylene
A polypropylene pool also requires a foundation pit and pouring a concrete bowl. The polymer allows you to solve the main problem in the construction of pools - to ensure reliable waterproofing. Polypropylene is an extremely durable material and is able to take any shape. Pools from it are made in two ways:
- a ready-made bowl of the desired size and shape is bought;
- sheet polypropylene is bought and a bowl is made from it.
Note! The cost of both methods is about the same.
Welding of sheets is carried out using a thermal welding machine - an extruder.

After mounting the polypropylene bowl and installing all communications, concrete is again poured from above and decorative material is laid.
It is polypropylene pools that are most suitable for installation on suburban area. They are not afraid of temperature changes and the vagaries of the weather.
Video
The full range of works on the installation of a polypropylene pool is presented below:
See how PVC pool film is welded:
Photo
Below in the photo you can see the various options for the construction and design of the pool:


Who wouldn't want to splash around and cool off in their own pool on a hot summer day? How much joy and endless pleasure an artificial pond would bring to the adult owners of the dacha and the restless younger generation. Imagine, this seemingly "rainbow" dream is quite feasible.
For those wishing to build a pool in the country with their own hands, we offer a number of proven methods for organizing it. Here you will learn how to make a temporary and stationary version. You can compare which of the methods is easier to implement for you personally, which is more acceptable in terms of price and device method.
This article has clear answers to all your questions. Construction technologies are thoroughly disassembled. Valuable recommendations are given for determining best place under the pool, the choice of the optimal type of material for the construction of the bowl, the implementation of waterproofing and finishing.
Even an inexperienced master is able to carry out the construction of a country pool. It is only necessary to follow the construction technology of the chosen design.
But first you need to choose a suitable place for the swimming facility and its type. Not every site will be able to arrange a large pond for swimming on long distances or jumping from a three-meter springboard.
To build a warm building for a swimming pool in the country house with a roof for swimming all year round expensive and difficult, but a light polycarbonate cover is possible
Structurally, pool baths can be performed:
- With deepening into the ground. The bowl of the pools is installed in the pit, it can be ceramic, fiberglass, monolithic concrete, built from foam blocks or bricks.
- Surface mounted. These are structures for temporary use, there are frame (collapsible) or inflatable. To install them, you will need a flat, rammed or concrete-filled area.
The shape of the bowl they can be round, rectangular, oval or complex geometry. The easiest option is a bath near the bath in the form of a large barrel. But it is difficult to call such a structure a full-fledged pool.
For a device in the country, most often they choose an outdoor pool in a stationary or mobile version.
Due to the lack of a roof, both options will be able to be used for their intended purpose only in the summer, but these structures will be quite enough for a country holiday on the weekends. Their device does not require too serious investments and is quite simple when done independently.
It is much more difficult to build an indoor pool with your own hands. For him, you will have to order a project of a full-fledged building in the form of an extension to a country house with the laying of pipelines, installation of equipment, and heating.
If the site is not guarded, and in winter the owners occasionally visit the dacha, then it is irrational to build such a structure.

Inflatable structures are inexpensive and quickly assembled, but any sharp object can quickly turn them into worthless rags.
To finish the walls and bottom of the stationary pool bowl from the inside, the following is used:
- Fiberglass.
- Polypropylene.
- PVC film.
- Mosaic or tile.
A thick PVC film is used both in frame and monolithic structures. And the rest of the materials are only for the installation of stationary structures with partial or complete penetration into the ground.
If the sides turned out to be uneven, then they will have to be plastered using a reinforcing mesh. It can be metal, but it is better to take a more expensive composite of polymer materials. The latter will cost more, but it will definitely not rust from exposure to moisture.
Without a mesh, the leveling layer of plaster in the structure under construction will not last long. The energy of wave impacts from a floating person will inevitably and quickly destroy it.
You can finish the formed bowl of the country pool:
- mosaic;
- PVC film;
- tiles.
The decorative layer should not only decorate the pool structure, but also reliably protect the concrete from the effects of water.
If at this stage you cheat and make mistakes, then concrete pool will soon need to be overhauled. In some cases, it will be necessary to completely disassemble the damaged structure, and then refill everything again.

The sides and bottom of a monolithic pool can be made without the use of formwork by spraying concrete, but this requires certain skills and special equipment
The easiest way is to decorate the bowl with PVC film. It only needs to be spread out and straightened, and then soldered into separate patches into a single hermetic canvas. On the steps, you should use a film with a ribbed surface, otherwise they will turn out to be too slippery.
The use of tiled decorative materials allows you to create country pool more attractive appearance. But doing such a lining with your own hands is much more difficult. And it is extremely important at the same time to take glue exclusively waterproof brands, and grout only with antifungal additives.
Option # 3 - from wooden shields
For the manufacture of a wooden pool in the country, you will need bars of 60x60 mm and planed boards with a thickness of 30 mm or more. The design will be in the shape of an octagon. First you need to knock down eight shields high in the depth of the bowl.

All wood must be treated with antiseptics, otherwise the lumber pool will have to be remade several times over the summer
A wooden pool structure can be partially buried in the soil or simply placed on the ground. In the first case, the bottom is best done according to the classical scheme with digging a shallow pit, laying reinforcement and pouring concrete. And in the second one, it will be possible to get by with thick boards knocked down tightly to each other.
After assembling all the shields into a single structure, the necessary technological holes should be made in them. Then a PVC film is laid in the waterproofing bowl. At the end of the work, it remains only to install the stairs and ennoble the upper edge of the sides.
In addition to the three options given, a country pool can be built from bricks or polystyrene foam blocks with concrete poured inside them, as well as from plastic bottles or oversized tires. There are a lot of ways, the choice here depends on the wishes of the owner of the cottage and his financial capabilities.
How to improve the area around the pool?
The main thing in the design of the pool structure in the country is the shape and color of the bowl. Intricate shapes with curves always attract the eye.
And in order for the pool to visually look deeper than it really is, its inner surface should be made white. In this case, the adjacent area must, on the contrary, be performed in dark brown shades.

A frame pool towering above the ground with a small platform next to it, surrounded by a garden, does not look as cumbersome as it is alone in an open area
To decorate the area adjacent to the bath, it is enough to arrange garden figurines and flower vases nearby. Planting any ornamental plants directly into the pool, as in the case of an artificial pond, is strictly prohibited.
When a country house appears, many people think about how to build a pool with their own hands. Often there is not enough money to hire specialists. Therefore, the owners are interested in how to build a pool with their own hands cheaply, reliably and in an original way.
The plan of how to build a pool with your own hands directly depends on the purpose of the future artificial reservoir. For children, a small and shallow artificial reservoir of a round or oval shape is enough. The absence of sharp corners will protect babies from accidental injuries.

An artificial pond for swimming is better to make an elongated shape. During construction, it is necessary to observe the main parameters:
- depth not less than 150 cm;
- length 3-4 m;
- width not less than 2 m.
If desired, you can put a springboard, but in this case, the depth of the bowl should be at least 250 cm. If you determine the location of the springboard in advance, this will make the diving site deeper, while the main depth can be normal.
When arranging separate areas for bathing children and adults, the bottom is made stepped. The area for children must be separated by a partition. To build a pool with your own hands, you can select projects in the photo.

A slight slope on the site will facilitate the digging of the pit and help to equip a multi-level pool with separate areas for swimming for children and adults.
How to choose a site for an artificial reservoir
Before you build a pool with your own hands, you need to choose the right site for it.
In this case, the determining factors are:
- lack of green spaces in the immediate vicinity;
- soil type;
- finding groundwater;
- close location of the water supply;
- the absence of any buildings near the future pool;
- the main direction of the wind in the territory;
- natural slope of the soil.

The root system of plants can significantly damage the waterproofing of the pool. Falling leaves from trees, falling into the water, will cause its "bloom", the growth of algae, and an unpleasant odor. Inevitably, small animals will appear.
Clay soil on the site will greatly facilitate the digging of the pit. In the future, clay soil will serve as additional waterproofing.
The plumbing will speed up the filling of the bowl with water and facilitate its regular cleaning. A constant wind direction on the site will help remove foliage and small debris from the surface of the water. Therefore, the pool must be positioned so that foreign objects are nailed by the wind to the narrow wall of the bowl.

Materials for the construction of the pool
You need to choose the material before you build a pool with your own hands, the technology of its construction directly depends on the material chosen.
It could be:
- concrete pouring;
- concrete block masonry;
- polystyrene blocks.

You can use ready-made containers. They are very easy to install and do not require much maintenance. The main disadvantage of such a capacity is simple form. If she does not like it, you can build a pool from the above materials.
A concrete screed is poured onto the bottom and walls of the pit. For decoration, various facing tiles are used.
Concrete blocks are laid in the usual way. The main thing to remember is that every 3 rows it is necessary to lay a reinforcing mesh.

Required Tools
To build a pool, you will need the following tools and fixtures:
- shovel;
- construction roulette;
- level and plumb;
- sharp knife;
- saw or hacksaw;
- capacity for mixing concrete;
- construction mixer;
- work clothes and rags.

Filtration equipment
When deciding how to build a pool in the country with your own hands, special attention requires a cleaning system. As a rule, for water purification it is equipped:
- overflow system;
- skimmer equipment;
- floating filters.

An overflow system is best suited for pools with constant water circulation. A special grate installed around the perimeter ensures the overflow of water into the cleaning tank. Purified from impurities and small debris, the water is returned to the pool. The process is cyclical.
The advantage of the overflow system is the possibility of filling the bowl to the top edge and a visual increase in size. The main disadvantages are the high cost of the overflow system and the complexity of maintaining it during operation.

The skimmer type system is better suited for smaller pools. Water is poured into a bowl with such a cleaning system a little below the upper edge of the rim (12-15 cm). The skimmer-type cleaning device gradually sucks in water, cleans it and distills it back into the bowl.
The main advantages of this system are simple installation, simple maintenance and low cost. Among the minuses is low efficiency and the need to frequently change the water in the bowl.
Important! The easiest and cheapest way to clean a pool is a floating filter.

How to make a floating filter
To make a floating filter, you need to prepare the following:
- electric drill;
- wrench;
- plug;
- nuts;
- Styrofoam;
- aquarium pump.
You will also need a cartridge (replaceable), a polypropylene pipe, a swivel corner assembly. The diameter of these parts is 0.5 cm.

The filter and the corner assembly must be drilled with an electric drill. On the one hand, the structure is fixed with a nut. At the other end, you need to connect the pump for the aquarium.
To keep the filter on the surface of the water, you need to attach a piece of foam to the end of the pipe. The cleaning efficiency in this way will increase significantly if there are several cartridges.
How to make a pit
Before you build a pool with your own hands, you need to dig a foundation pit. The marking of the site is done in advance. To mark the place of the future pit, it is necessary to use small pegs with a stretched cord.
To get a pool of the required size, the pit must be made deeper by 0.5-0.6 m. Along the perimeter, the pit should be 0.7-0.9 m larger than the bowl of the future reservoir.
Important! When digging a pit, the selected soil must be left in order to subsequently fill the structure along the edges.

The bottom of the finished pit must be strengthened. To do this, the soil must be leveled and carefully compacted. Then pour a pillow 25-30 cm thick from crushed stone of various calibers. It is necessary to ram the crushed stone in a wetted state. The best option is to do it with a special machine.
For manual ramming, you will need a piece of log or thick timber. Pieces of plywood must be nailed to the ends and pieces of plywood vertically strengthened between them.
Pouring concrete
Concrete for pouring the pit is prepared in the usual way. The required thickness of the concrete screed is from 25 to 30 cm. The main thing is to fill it in 1 time. For a small pool, you will need a small concrete mixer. If the pool is being built large, you will have to order a large machine with concrete mortar.

Important! When thinking about how to build a pool with your own hands, you should remember that you need to place a reinforcing mesh inside the concrete screed on the bottom of the pit.
To do this, on top of the crushed stone pillow at the bottom of the pit, you need to lay out polystyrene cubes or install segments of reinforcing bars vertically. A reinforcing mesh is fixed on top. It should be raised above the crushed stone layer by at least 5-7 cm.
Air bubbles can be removed from the finished screed with a special vibration machine or a metal rod. It must be poke into the solution over the entire area of \u200b\u200bthe screed.

After removing the air, it is necessary to level the screed. It will dry for about 1 week. During this time, it is necessary to moisten the surface of the concrete with water so that it does not subsequently crack. It is convenient to spray water with a spray bottle.
Pool waterproofing
A waterproofing layer is laid on top of the hardened concrete, which must be spread on the bottom so that the edges are bent 20 cm above the top edge.
The following materials are used as waterproofing:
- construction rolled polyethylene (thickness not less than 150 microns);
- geotextile;
- ready-made waterproofing solution;
- bituminous roofing material;
- liquid rubber.

An expanded polystyrene (extruded) substrate is laid on top of the waterproofing agent. To fasten individual plates, construction tape is used. In the process, polystyrene foam is easily wrinkled, so you need to be especially careful.
Styrofoam pool
The assembly of expanded polystyrene walls begins with marking on a concrete base. This will help to assemble the walls evenly and neatly. Expanded polystyrene blocks are considered one of the most convenient and inexpensive materials for laying out pool walls. They are easy to mount according to the existing markup.
The size of the expanded polystyrene blocks is selected in accordance with the size of the bowl. Between themselves, the material is fastened with the help of special grooves. You can cut the blocks with a hacksaw or a saw with fine teeth.

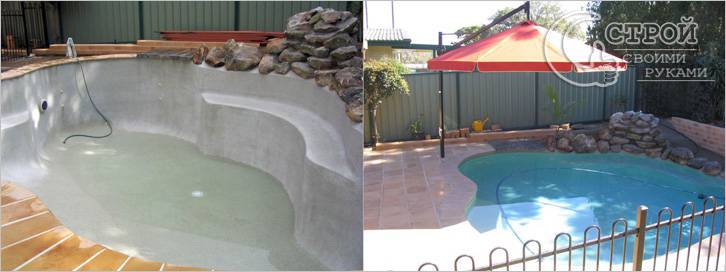
Dacha is a place where we rest from the bustle of the city. Perhaps the most relaxing effect is water. Having built a swimming pool in the country, you “kill two birds with one stone”: give your backyard a luxurious look and enjoy swimming in clean water.
Peculiarities
The construction of an object can be ordered from companies directly involved in this type of service, but it will be much more interesting and more budgetary to solve the problem on your own. Moreover, building a pool with your own hands is not as difficult as it seems at first glance.


Depending on service life allocate temporary and stationary pools. Each of them has its own characteristics that must be considered when choosing one or another option. Stationary are durable structures that do not move from one place to another. Their bowl is a monolith made of concrete, brick, etc. Moving such an object will cause it to collapse.


Temporary pool can be removed if it's over summer season, and use it again next year. This category includes inflatable pools and frame structures. Their service life is 2-4 years.


For a pool that will only be used in the summer, any location will do. Inflatable pools- This is a cheap option that does not require drastic changes on the site.

If you opted for a stationary pool, before you dig it out, you need to choose the right location on the site. After all, it will not work to move such a structure after the completion of all work on its creation.

There are several important points to take into account:
- Trees. They should not be near the pool for two reasons. The first is the root system, which negatively affects the waterproofing of the pool. The second is foliage that pollutes the water surface. If the leaves are not removed in time, the water "blooms" and the pool loses its attractiveness.
- Soil type. Ideal if your site has clay soil. It does not let water through, which is important if damage to the waterproofing suddenly occurs.

- Direction of the wind. The pool one way or another will be clogged with debris brought by the wind. It will be nailed to a certain board. Therefore, make it so that it is there that cleaning the pool is as convenient as possible and you can quickly remove the brought leaves, blades of grass, etc. The drain system should also be placed here.
- Water pipes. By placing the pool close to the water supply, you will ensure the ease and speed of filling the bowl.


If you decide to install a frame pool, try to make sure that the surface reserved for it is absolutely flat. Potholes, bumps, dents, remnants of tree roots - all this should not be. Ideally, the site is concreted, creating a smooth base for the pool.
Varieties
The monolithic pool is a one-piece hermetic structure with its own drainage system. Created by yourself, it will not only save money, but also allow you to equip the site in the best possible way.


The advantages of a monolithic design are obvious. Compared to all possible pool options, monolithic is the most durable. Its service life exceeds 50 years. Designs are not afraid of temperature changes, mechanical influences. If the soil on the site is “problem”, a monolithic pool will be the only option that can be used in the country.
Another advantage of a monolithic pool is the variety of shapes. The bowl can be made both in the correct form and unusual, which will look very impressive. Using different finishing materials (mosaic, tile, stone), you will turn the pool into a real masterpiece.


After the end of the swimming season, the water is drained, part of the equipment is removed. If the dacha is left without owners for the winter, nothing threatens the pool, it is simply impossible to steal it.


For beginners who do not have enough experience in the field of construction, it will seem difficult to make such an object. Certain financial costs will be required. It is not recommended to save at the same time, as this can cause breakdowns and repairs will bring serious losses. Therefore, we use only high quality materials.


Construction is carried out step by step. Initially, a foundation pit is dug, then a drainage system is created, thermal insulation is equipped. The structure is sealed and reinforced, the bowl is poured. The last step is finishing.


A monolithic pool can be created in two ways: pouring concrete formwork or using polystyrene foam blocks.


Let's consider the first option. Initially, we determine the size (large, medium, mini) and the shape of the future pool. Of course, the larger the design, the more building materials and funds will be required. The pit should be slightly larger than the intended dimensions, since the bottom and walls will take about 50 cm in thickness.

A project for a pool water supply and drainage system is being developed. This is a necessary condition for the correct functioning of the object.

So that the walls of the dug pit do not crumble, they are made at a slope of 5 degrees. After the pit is ready, we proceed to backfilling the bottom, tamping and waterproofing. Sand is poured to the bottom (layer thickness - 15 cm), then crushed stone (thickness - 15 cm). The layers are carefully compacted, a waterproofing double layer of roofing material is laid on them. Its edges should go on the walls by 20 cm.

Before proceeding with pouring the bowl, it is necessary to make a metal frame structure from class A3 reinforcement. Only wire is used to fasten the reinforcement. Welding work is unacceptable, as the joints will rust over time. The distance between the horizontal ones varies from 10 to 50 cm, vertical - from 20 to 30.

Reinforcement in one run is considered ideal. This method makes the structure as strong and stable as possible. However, in reality, such a process is difficult to implement. Therefore, the bottom of the bowl is first poured, and then the walls. It is important to note that the bottom does not have to be completely flat. It is necessary to make a slight slope of 3 degrees and fix it on the lowest point pool drain pipe.


The solution hardens for 1-1.5 weeks. To prevent cracks from appearing during the drying process, wet the pool with water. While the pool dries out, you can start arranging communications: dig a trench for the drain pipe, lay it at an angle.


When pouring mortar walls, it is required to build a wooden formwork. It is desirable to fill the solution with the help of special vibrators. This is what will make the pool durable.


After the solution has dried, proceed to finish the pool: the joints between the seams are sealed, the surface is covered with water-repellent impregnations. In order for the water in the pool to cast blue, a PVC film of the corresponding color is used. This will not only make the pool incredibly beautiful, but also provide additional sealing.


The final stage is the installation of equipment that will supply, purify and disinfect water. The pool can be decorated with beautiful and useful accessories: stairs, ladders, lights, etc.

The pool can also be made using polystyrene blocks. The first stages are identical to those described above: we dig a pit, create a drainage system, stretch a drain line, fill the bottom with concrete mortar.

After the bottom of the bowl has dried, blocks of expanded polystyrene are laid around its perimeter. The material is light and easy to connect. The height of the block is standard - 25 cm. Calculating the amount of consumables is simple: the height of the pool is divided by 25. This is how we find out how many rows will be required in order to build the walls of the bowl. The blocks have vertical holes for reinforcing bars. Concrete is poured after rebar is installed


The walls, lined with blocks, are covered with a layer of plaster, which has water-repellent properties. After it dries, proceed to finishing. As in the first case, you can use PVC film, tiles.

At the last stage, we install equipment that fills, purifies and disinfects the water in the pool. The pool can be made indoor if you build a canopy. To keep the water warm enough, use special equipment to warm it up.

Building from polystyrene foam blocks is much easier than concrete reinforcement of both walls and bottom. However, you can't call it economical.

A multi-level homemade pool not only looks very impressive. Its walls look like steps, smoothly turning into the bottom. This design is ideal if there are children in the family. They will enjoy splashing in the water, sitting on the steps at a safe depth.


After you have decided on the shape and number of levels of the pool, we begin to dig a foundation pit. Steps are excavated gradually. We dig the next step only after the previous one is concreted. Be sure to do a test flood of water, which will let you know if the structure is airtight.

Installation additional equipment not required. This is the easiest and cheapest option. Periodically, water is pumped out with submersible pump and change to fresh.
multilevel swimming pool can be made not only from concrete. There are many materials for its creation. No less reliable is the design of polypropylene.

We choose a place for the future pool, carry out all the necessary marking measures and proceed to dig the pit. The bottom of the bowl is formed by several layers. The first is formed by geotextiles. This is followed by crushed stone (layer thickness 30 cm). The layer of poured concrete should be 20 cm. Before pouring the concrete, we create a mesh of reinforcement with cells of 25x25 cm. The mesh cannot be placed directly on the concrete. We put bricks under it.

Filling the bottom must be done at a time. You will need a lot of concrete mix, so the ideal solution would be to order the mix in a mixer. Polypropylene is available in different thicknesses: 5 mm and 8 mm. The first is more plastic, easily bent. Therefore, we will use it for the construction of stairs. Polypropylene parts are connected using a welding extruder. Welding of the bottom is carried out in the pit itself.

When welding the walls to the bottom, make sure that they do not move. For fixing, use wooden bars. The ladder is attached last. Coming from outside stiffeners are attached to the structure (we use eight-millimeter polypropylene), the distance between which is 60 cm. These 60 cm are filled with foam insulation.

After the pipeline system is laid, the pool around the perimeter is poured with concrete from the outside in several stages. One stage - a layer 30 cm high. In this case, the formwork should be placed both from the outside and from inside pool. Thus, polypropylene is not deformed by concrete. It is also necessary to draw water into the bowl in stages, the level of which will be equal in height to the level of the concrete layer located outside.

To decorate the finished pool, use improvised tools and objects: chairs with cozy pillows, sun loungers, beach umbrellas, etc.

The decorative pool differs in the small sizes. It is often compared to a pond. It is not difficult to make such an object yourself, the cost of its creation is minimal. It will become a real highlight of your suburban area. And since you will ennoble and decorate it at your own discretion, the pond will be exclusive.
The place for ornamental pond choose in such a way that the sun illuminates its surface for only half a day. Too much sun will negatively affect the state of the entire ecosystem of the reservoir. The shape of the pond and the design style of the site should be one. The circle is ideal for English style landscapes, the oval is used for Chinese and Japanese style.

Initially, we dig a pit that matches the size and shape of your reservoir. Its minimum depth is 1 meter, the area is 4 square meters. m. If you are making a pond from a bath, then the shape of the pool must match it. Don't despair if finished bowl you do not have. You can build a decorative pool of any shape, even the most incredible.


Please note that the bottom of the pit should be flat: no stones, tree roots, sharp objects. We use sand as a drainage layer. Next, a composite material is laid - a durable film. Ordinary polyethylene is not suitable for such needs, since it does not differ in strength. Ideal Options- polyvinyl chloride or butyl rubber. Butyl rubber has different thicknesses, which allows you to optimally choose such a coating for your pond.

The edges of the film should extend beyond the edges of the pit so that they can be fixed with large stones and covered with rubble or pebbles. The pond needs a device that circulates water. Otherwise, the water in your reservoir will quickly “bloom” and the pond will lose its attractiveness. The pond will not interfere with the lighting system, which will effectively highlight it at night.


To give the pond a natural and aesthetic look, the bottom is laid out with beautiful stones. Along the perimeter we place plants (creeping and shrubs are ideal) and a variety of decorative elements: garden figurines, plastic flower vases, lanterns.

In order for the pond to always be beautiful, it must be monitored. In the spring we make the first inspection of the reservoir. We check how the plants overwintered, whether the shore of the pond crumbled, we remove the leaves that have fallen since autumn. With the advent of heat, we supplement the area around the pond with new plants.

In summer, it is necessary to carefully monitor the water level in the pool, since evaporation occurs intensively during the heat. The area adjacent to the pond is rid of weeds. In autumn, we prepare the pond for winter: we remove the dried grass, we transfer the flowers in pots to the warmth of the home.

Cleaning system
The arrangement of the pool is impossible without a cleaning system. If you do not use a special device, the water in the pool will become dirty, an unpleasant odor will appear. A specific plaque will appear on its surface.

The most budget option is to use a pump for pumping water. You make a complete drain of polluted water and fill the pool with clean water. But in this method there is one minus: it will take time for the water to warm up again.
You can install a special installation with a filter for cleaning. Two pipes are connected to the pump. One of them drains the water, the second supplies the purified and passed through the filter back to the pool. Filters are sand, cartridge, diatomaceous.

Chemical reagents are also used for cleaning and disinfection. These include chlorine, bromine, rehydrol, or agents designed specifically for this. Be sure to read the instructions before use.

Clean the debris brought by the wind manually with a net.
Beautiful examples and options
A frame outdoor pool is a good solution for a summer cottage. It is durable and easy to assemble and dismantle. This is a budget and easy way to please yourself and your family with a great vacation on fresh air. Distinctive feature such a pool has high sides, which does not always look aesthetically pleasing. But it gives limitless scope for imagination to hide the sides and give the object a beautiful look.

Create a surface of light stones around the pool. A touch of greenery will be added by flowers located in pots. different size. At the same time, observe the unity of the color scheme. Brown flower pots look appropriate, in harmony with the outer skin of the pool and the wooden staircase.

If the frame pool is completely immersed in the pit, the perimeter is trimmed with mosaic or stone, planted with plants, then you get a very beautiful option for any suburban area.

For a small frame pool, you can build a canopy. Thanks to this, you can enjoy swimming in any weather, even in rainy weather. The similarity of a tent looks especially interesting.

The frame does not have to be closed. Build a platform inside which there will be a pool. Perform the edges of the platform in the form of a lattice fence. lower part hide from prying eyes with an abundance of flowers and plants.

The pool with glass walls looks especially impressive. Of course, its creation will require special knowledge and skills.

Illumination of various colors turns the pool into a fabulous and romantic place, which can be enjoyed even at night.

outdoor pools striking variety of forms. The violin pool will be appreciated by creative and creative people.


