How to make a pool with your own hands in the garden. How to build a pool with your own hands - we make a concrete pool in the country (detailed instructions)
Not every summer resident is lucky to have his own house near a pond, where after physical work you can relax and enjoy cool water. The rest have to either get into the car and go in search of the nearest river, or make a pool with their own hands in the country. More often they choose the second option, because in addition to relaxation, the pool also provides side benefits:
- warm, settled water, which can be used to water flower beds and a garden (if you did not add chemical disinfectants to the pool!);
- the ability to switch children who are passionate about tablets, mobile phones and laptops to a healthier vacation;
- improvement of the body, etc.
It remains to choose from the many options for stationary pools the one that is suitable for the needs of the family and the landscape of the site.
To simplify the care of the built pool, consider the following points already at the planning stage:
- It is better if the pool area has clay soil. It will stop water leakage in case of breakdowns of waterproofing.
- Choose a place with a natural slope of the soil. So you make it easier for yourself to dig a pit and immediately decide where to put the drain system.
- Tall trees should not grow near the future pool, because their root system, sensing the proximity of moisture, will stretch to the walls of the structure and can ruin the waterproofing. The most "aggressive" are poplar, chestnut, willow. If trees are already growing on the site, then you will have to part with them in advance. It's cheaper than repairing a damaged pool.
- Low-growing trees are also undesirable, because you will have to constantly remove the leaves from the bowl, and during the flowering period, the water turns yellow with pollen.
- Pay attention to which direction the wind blows most often in your country house, and try to place the pool so that the air moves along the bowl. Then all the dirt and debris will be nailed to one wall, along the edges of which it is recommended to install a drain system.
- Try to locate the pool closer to the water supply to make it easier to fill.
Preliminary calculations - sizing
Width and length are determined based on the purpose of the pool. If it is intended for swimming, then a rectangular shape is chosen, making the bowl elongated. If for relaxation, splashing and rest of the whole family, then it is more convenient to communicate in round bowls.
More important criterion- depth. It is believed that in order to feel free, swim easily, turn around under water and jump from the side, you need a one and a half meter depth (and no more!). But ski jumping requires a deeper bowl - at least 2.3 m. True, it is enough to make such a depth in the diving zone, creating a smooth transition from the main size (1.5 m).
If the construction of a pool in the country is intended exclusively for children's recreation, then the depth of the bowl should not exceed half a meter. That's enough for fun games and floundering without health risks.
The most complex design is a combined pool in which everyone will swim. In this case, different depths are created for the children's and adult zones, and both zones must be separated by a solid partition that starts from the very bottom. So you insure against accidental entry of children into the adult zone.
Important! In any pool that has several different depths, it is necessary to make the bottom flat and smoothly transition from one size to another. Sharp jumps in depth are unacceptable for safety reasons. A person, walking along the bottom, can gape and miss the border, beyond which another depth will begin, and in a panic, when the legs instantly go down, the risk of choking is very high.
Choosing a bowl: buy ready-made or make it yourself?
The most time-consuming work is associated with the preparation of the pit and the pouring of the bowl. But manufacturers have figured out how to build a pool in the country faster and easier. They created ready-made bowls that only need to be dug into the ground and fixed. In addition to the obvious plus in ease of installation, ready-made structures are also beneficial in that they are produced in various shapes and colors, which cannot be said about concrete. In addition, during operation, concrete bowls can crack if soil movements begin.
Types of finished bowls: plastic and composite
There are two types of ready-made bowls on sale: plastic and composite. The principle of their installation is absolutely the same. Only differ specifications materials.
The plastic bowl requires additional insulation of the pool walls from the outside
In plastic structures, polypropylene is the main material. It is not afraid of burning out, does not require draining water for the winter, is environmentally friendly, resistant to mechanical stress. A smooth surface prevents the formation of plaque and sediment on the walls and bottom. Such bowls do not require additional interior decoration, because they look aesthetically pleasing. The only negative: if the pool is installed in a place where there is no shade, then polypropylene can expand in the heat, which is why the bottom and walls “go in waves”. But as soon as the temperature drops, the bowl returns to its normal form.

Composite bowls are made of fiberglass, which is not afraid of either frost or heat.
Composite structures do not have this problem. The main material in them is fiberglass, which is bound with polymer resins. All the advantages characteristic of plastic bowls are also characteristic of this material. But there is a small "but": the composite is quite expensive.
DIY bowl options
And yet, some summer residents still prefer bowls that are created on the spot, because it is not always possible to find a container with a size and shape that is ideal for a particular landscape, and very large pools (about 10m in length) cause difficulties in transportation. The vast majority of owners make pools for summer cottages with their own hands from concrete. This item is always on sale. If it is impossible to deliver it to the site in the form of a liquid solution, an ordinary concrete mixer is installed, and a mixture is created on site with the addition of sand.

The bowl made of polystyrene foam blocks is easy to install due to the lightness of the material and keeps the water temperature perfectly
It is possible to create the entire bowl from concrete, including the walls, but this requires a long time and a lot of work to install the formwork and pour.
Resourceful summer residents came up with a simpler arrangement of the pool in the country: they kept only the bottom concrete, and the walls began to be made of polystyrene foam blocks or steel sheets. In the first option, the pool turns out to be warm, since polystyrene foam has low thermal conductivity. Steel walls are very easy to install, as they are sold ready-made with everything additional equipment in the form of a facing film and fastening fittings.
Installation of a pool with a finished bowl
Consider how to make a pool in the country using a factory bowl.
Site marking
- We carefully measure the bowl delivered to the site.
- We mark the place of the future pit on the ground using pegs and a rope. We drive the pegs into the corners of the future bowl, and we stretch the rope between them. The more non-standard shape of the pool, the more often drive in the pegs.
- We retreat from the stretched rope by a meter and make outlines around the entire perimeter (cut off the ground, hammer in new pegs, etc.). It is from this markup that you will begin to dig a pit. Such a margin is needed to make it easier to lower the bowl, insulate its walls and create a solid foundation.
- We remove the internal markings and proceed to dig the pit.
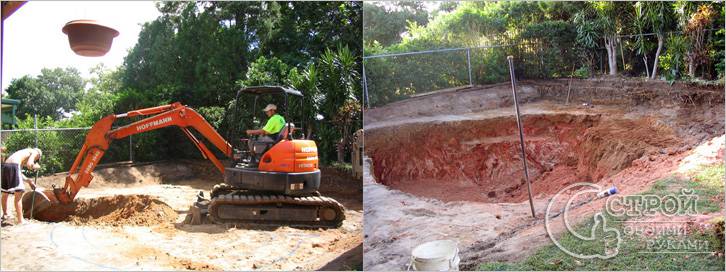
Excavation

The pool pit must have a flat and stable bottom, so it is concreted
The pit should be half a meter deeper than the size of the bowl itself. Now we create the base on which we will put the bowl:
- Pour the bottom with a 20-centimeter layer of coarse sand and tamp.
- We lay out a metal mesh for the fortress along the sand and pour a concrete solution over it, 25 centimeters thick. We wait until dry.

The concrete layer with which the bottom is poured must be reinforced so that it does not crack when the soil moves.
After that, we insulate the pool:
- We lay geotextiles over the entire concrete base, and three-centimeter slabs of expanded polystyrene over it. They will insulate the bottom of the pool from the cold ground.
- On top of the insulation, lay a thick, durable film.
- While the bowl is at the top, its walls should be insulated. outer surface walls are “packed” in expanded polystyrene and insulated with polyethylene.

The outer walls of the bowl are insulated with polystyrene foam to isolate from cold ground
Installing the bowl and connecting communications
- We lower the prepared bowl to the bottom of the pit.
- We connect to the bowl all the necessary communications. We put a protective sleeve on the pipes and fix it with adhesive tape so that it does not move during concreting.

Spacers will not allow the bowl to bend when the concrete reinforcement of the pool is poured; And all pipes must be packed in a protective sleeve so that they do not freeze in winter.
- We concrete the remaining voids between the soil and the walls of the pool as follows:
- We install spacers inside the bowl so that the plastic or composite does not bend under the pressure of the concrete mass;
- We put the formwork, and lay reinforcement along the perimeter;
- The solution is not poured all at once, but in layers: we fill 30-40 cm of water into the pool and raise the concrete to the same height. We are waiting for solidification, then water again - and after that concrete. Thus, we bring the concrete layer to the surface of the soil.
- We wait a day until the pour solidifies and only then we remove the formwork.
- We fill the voids from the formwork with sand, spilling it with water and ramming it.
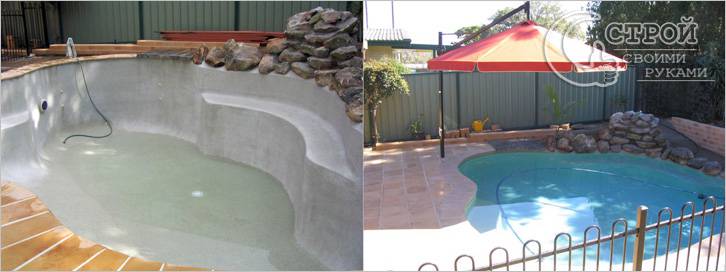
It remains to ennoble the pool area and let water into it.
For outdoor pools, it is desirable to create a hinged roof that will protect against dirty precipitation, or at least sew an awning with which you will cover the structure when you leave the dacha.
If the arrangement of pools in the country seemed to you a difficult task - buy an inflatable or frame version. These pools are perfect for water recreation, and for the winter you can easily disassemble them and hide them in the attic.
A do-it-yourself pool in the country house brings not only satisfaction from a well-done complex task. This is a useful building in every sense. Rest near a small man-made reservoir will be especially pleasant in the summer heat. Such a facility is also necessary for lovers of bathing in the sauna. Always at hand will be a source of water needed for watering beds or lawns. Provided, of course, that the water was not treated with various chemicals. outdoor pool- also an important element of the country landscape, one of the main centers of visual perception of the site.
The pool, in principle, cannot be cheap, it is a rather complex and costly structure. But, having worked with your own hands, you can significantly save on the following components:
- performance of certain types of construction works;
- creation of the project and drawings;
- design creation;
- purchase of materials.
Features of choosing a place for construction
 To build a pool correctly, you must be responsible for choosing a site for it. There is a certain set of rules that, if possible, must be followed:
- Preference should be given to a place with clay soil. It has good waterproofing properties, which will help to reduce water leakage if necessary.
- Some soil slope will also be helpful. With it, it is easier to equip the drain system, and there will be less work with the pit.
- The pool, if it is not covered, should be away from tall trees. Their roots often reach for moisture, and this is dangerous for the foundation of the building.
- Low trees will also have to be avoided so as not to add work to yourself when cleaning.
- If it is possible to determine the main direction of the wind, the pool should be located along it. This arrangement will make cleaning easier, and it will indicate the place for draining.
- The closer the source of water, for example, a water pipe, the easier it is to fill the pool bowl with it.
Definition of geometric parameters
Before you build a pool, you should decide on its shape and size. The shape is up to preference. For those who like to swim, an elongated design is more suitable. Those who like to soak in the water in the company of family members or friends should stop at a round bowl.
If the pool is intended for adults only, its depth must be at least one and a half meters, provided that jumping from a tower is not provided for. If there are such jumps, you need to add at least another meter.
For safe bathing of children, the depth should be limited to 50 centimeters. This is quite enough for playing on the water. The construction for bathing children and adults at the same time does not cancel the rules for choosing the depth. You just need to separate the different areas with a partition to ensure the safety of children. The partition must be strong enough to support the weight of the child, and high enough so that it cannot be overcome.
What you should definitely pay attention to is the flatness of the bottom. There should be no sudden changes in depth, this is quite dangerous for the swimmer, who may panic, suddenly losing his footing. And in a panic state for a short time and choke.
Finished bowls
 You can also build a pool with your own hands using a purchased bowl. This device is not a shortage on the market, it is produced by many manufacturers. The bowl, of course, to some extent will increase the cost of the structure, but, on the other hand, it will save the owner of the cottage from the most difficult stage of work on the construction of the pool. After all, the biggest problem that has to be solved is waterproofing. It is quite difficult, long and expensive. In addition, the home-made concrete version has only one color, and the purchased bowl has a color of your choice.
The most common bowls for swimming pools are made of plastic and composite. Their installation is absolutely identical, but they differ significantly in some consumer properties.
Plastic bowls for the pool are made mainly from polypropylene. They are not afraid of some expansion, if the water in the pool freezes, the polypropylene bowl will not be damaged. The color of the walls, even under the active influence of sunlight, remains stable for a long time. The surface of such a bowl is smooth, of course, does not require additional finishing, and even easy to clean. But polypropylene does not like heat; from too high an air temperature, this material can expand somewhat.
The composite, which is a material based on fiberglass and polymer resins, has practically no drawbacks. Except for one thing - it is significantly more expensive than plastic.
A bowl made by hand
Pool with bowl created with my own hands, if we ignore the issues of waterproofing, it has a number of undeniable advantages. The owner of the dacha is limited in choosing the shape of the pool only by technological capabilities, in choosing the size - only by the size of the site for construction. And a homemade bowl is much easier to harmonize with the surrounding space.
Usually they create a concrete or brick version of the pool bowl on their own. Concrete is a universal material, it is easy to make it at the construction site, bringing the necessary components and a concrete mixer. It is enough to make the formwork of the required shape and pour concrete there.
Building a bowl out of brick is not that difficult, but longer and more expensive. Yes, and it is difficult to create an ornate design from such material, which the frame version allows without problems.
There are also combined options for creating a pool bowl. For example, the bottom can be made concrete, and the walls can be closed with either polystyrene foam or metal sheets. But then there are many questions about how to achieve reliable waterproofing. Expanded polystyrene, as you know, the material is not very durable, even with a slight mechanical impact, it can get a hole. And the steel sheets must also be welded so that there is not a hole left.
Construction stage
 Regardless of which bowl option is chosen, homemade or purchased, it is necessary to prepare a foundation pit. It should be borne in mind that the pit must be larger than the pool bowl.
If the bowl is purchased, it is necessary to prepare a base under it in the form of a layer of coarse sand, metal mesh and concrete poured over it. Naturally, the concrete pad must dry. After creating the pillow, you should take care of the thermal insulation of polystyrene foam sheets and durable polyethylene film.
Do-it-yourself concrete or brick bowls are erected in accordance with the project, which must be prepared before construction begins.
It is important not to forget about the need to connect communications, without which the pool will remain an empty bowl. It is necessary to bring water and equip its drain.
You should also take care of the shelter for the pool. In the advanced version, you can build a retractable or stationary roof, in a more modest version, there is enough awning that will cover the bowl if necessary.
The pool area must be properly designed. Traditionally, it is laid out with multi-colored ceramic tiles. Benches, tables and other outdoor furniture that contribute to a good rest by the water will not be superfluous.
Possessing a set of special skills in construction, you can make a pool with your own hands, for example, a pit type. Frame structures are a single large container, so making them is much more difficult. The excavated variant implies the need for excavation in large quantities (an average of 16 cubic meters). This is the main complexity of the design.
Choice of location and size
It is important to correctly determine the location of the concrete bowl so that in the future there will be no difficulties during the operation of the pool:
- trees should be located at a certain distance from the selected site, because there is a high probability that the root system will begin to develop towards moisture, thereby damaging the waterproofing layer;
- it is recommended to build a pool with your own hands in that part of the yard where the wind blows to a lesser extent, otherwise you will have to regularly clean the water from debris;
- clayey soil is suitable for such a task; it will create additional moisture protection for the structure.
 Do-it-yourself pool construction begins with determining sufficient dimensions. It follows from age features person: for children, the optimal depth is 50 cm, for adults - 144 cm. If there is a springboard nearby (1 m high), the bowl becomes deeper - up to 230 cm. For swimming, a pool 5-6 m long is enough. As a rule, it equip with a width of 4 m, which corresponds to two tracks.
When deciding how to make a pool in the country, you also need to take into account its shape. It is better if it is rectangular, oval or square, because an unusual configuration is more difficult to implement, and in addition to this, it requires a more accurate calculation of the filter installation. 
Pit preparation
The pool on the site is located further from other buildings. The dimensions of the pit are always larger than the dimensions of the finished bowl. The stock is made within 40-50 cm in width, length and depth. This is due to the fact that the design provides for different layers:
- drainage;
- waterproofing;
- finishing.
 Excavation is a very laborious process if done by hand. For this reason, it is recommended to rent special equipment and invite assistants. At this stage, you need to make sure that the walls of the pit are at a slight angle (up to 5 °). Thanks to this, the soil will not crumble during the work. Further actions can be performed, focusing on the example circuit.
Drainage, waterproofing, reinforcing cage
The pool in the country house is equipped with its own hands so that in the future it would be comfortable to swim in it, and the design itself was reliable. For this purpose, the bottom of the bowl is covered with a layer of sand, and then crushed stone (15 cm thick for each layer). The sand and gravel cushion is compacted with your own hands.
Roofing material is used as waterproofing. It is laid in 2 layers, this is done with an overlap, and in addition to this, the roofing material must necessarily enter the side walls by at least 20 cm. At the same stage, communications are laid. Strengthening of the future structure is provided by a reinforcing cage, it is prepared from a metal rod with a diameter of 12 mm class A3. Only wire is used to fasten the reinforcement, since the welds are subject to corrosion. 
If you have to knit the rods yourself, the distance between them should be within certain limits:
- horizontally oriented reinforcement is located at a distance of 10-50 cm;
- vertically arranged rods are at a distance of 10-30 cm, not closer.
When laying the frame on the bottom, it should be placed clearly in the center, and additionally, the edges of the metal rods must be bent so that in the future it will be possible to connect them to a vertically oriented frame. 
pouring concrete
Pool on suburban area filled with concrete. But to do this immediately over the entire surface is extremely difficult at home and in the absence of sufficient experience. For this reason, the pool in the country with their own hands is poured with a solution in 2 stages:
- walls.
Through the bottom, the water will go into the sewer, therefore, when pouring with a solution, a slope is made (at least 2 ° in the direction of the drain). At this stage, a vibration unit is used to remove air from the concrete layer. Works can be carried out using shotcrete installation. 
When the base has dried well (at least 1 week), the concrete pool is poured with mortar with your own hands, only in this case you need to prepare the walls. The thickness of the walls should not be less than 40 cm. It is possible to build such a structure only using formwork. For this purpose, either boards or plywood are suitable. Concrete is poured in stages using the same vibratory unit. Then you need to leave the structure to dry for a longer time, given the significant thickness of the vertical walls. 
Finishing
Now it remains only to fill the connecting seams between the bottom and the walls of the pool. Further, all surfaces are insulated with moisture protective agents. It is better to use penetrating impregnations, as well as bituminous mastics. The last step is the installation of filtering equipment, finishing.
When deciding how to build a pool, many factors are taken into account: the type of soil, the direction of the wind in a particular area, the remoteness of buildings and trees. Excavation work is the most time-consuming part. It is equally important to fill the bowl correctly. If possible, it is better to invite specialists, since a monolithic concrete layer is stronger than a phased version. If the task is how to make a pool with your own hands, you can use PVC film as a finish, it has a blue tint, which will make the building more attractive. 
Photo gallery
Below you can view 44 more photo ideas for building pools with your own hands.
Ecology of life: Swimming pool in your backyard, provided that you have one. For this there are various ways allowing to arrange
It's nice to take a dip in a cool pond on a hot sunny day. We are looking for coolness around him in the summer heat. Well, if it is far away, and to get to it you need to spend time, and if you stay near the water for a short time, you need to go back. The best solution to this problem may be the construction of a pool in your backyard, provided that you have one. To do this, there are various methods that allow you to arrange temporary, cheap pools using various design solutions placed on the surface, or you can build a capital long-term structure with deepening into the ground. And in order to reduce the cost of building a pool, we do all the work ourselves, that is, with our own hands.
The main stages of building a cheap pool with your own hands.
We will carry out our cheap construction of the pool, as we decided, with our own hands using monolithic reinforced concrete and with a thorough and qualified approach to its creation, embodied in a developed competent project based on accurate calculations. The entire process of building a capital pool consists of separate stages, the first of which is the creation of a technical assignment for its design and the design stage itself. The terms of reference define all those ideas and desires that we would like to see in the embodied future pool. Its shape, dimensions, location, the nature of the interior decoration and landscaping of the area around it, the way it is filled, cleaned and removed from water, as well as the need for structural elements that allow you to create shelter from the weather.
Pool design.
Based on the drafted terms of reference, a do-it-yourself project for a future inexpensive pool is being developed. Based on the available characteristics of the soils lying at its location and the magnitude of the acting load from the weight of water, the thickness of its bottom and sides, as well as the characteristics of the material that will be used for their construction, is determined. Based on the results of the calculations, the final dimensions of the pool are determined, and the amount of necessary materials for its construction is determined, in the form of cement, sand, crushed stone, reinforcement and materials for the construction of formwork. If the preparation of concrete will be carried out directly at the construction site. When using ready-made concrete delivered from the factory, it is necessary to know the internal volume of the formwork in order to order the right amount.
Construction, installation of the pool with their own hands.
- At the second stage, the production of works on its construction is carried out.
- Initially, a foundation pit is dug with the required dimensions, taking into account slopes that exclude the shedding of its walls, the installation of a pillow under the bottom and a place for the construction of external formwork. If there is groundwater at the site of the pool construction, then a drainage device is necessary to facilitate their removal.
- Further, a leveling pad of sand is laid on its bottom, with its seal, on top of which a layer of crushed stone is laid. The thickness of the layers is carried out in accordance with the project.
- Formwork is constructed on the prepared base, from pre-prepared panel elements, into which reinforcement is laid. The reinforcing mesh is also laid on the base of the bottom of our pool.
- At the third stage, the formwork forms are filled with concrete mixture and the bottom of the pool is concreted. This process is considered the most responsible in the process of building a pool. The formwork must withstand the pressure of the concrete mixture, and the mixture itself must be subjected to vibration in order to better compact it and remove excess air from it.
- After setting and gaining concrete strength, the formwork is removed, restoration and elimination of irregularities on the inner surface of the pool.
- To exclude water filtration through the pores of concrete, it is waterproofed by applying polymer or cement compositions that penetrate into its pores and clog them.
Do-it-yourself interior decoration of the pool.
To give the pool a finished look, its interior decoration and landscaping of the surrounding area is carried out in accordance with design solutions.
- This can be finishing the inner surface with leveling mortars on a cement binder, or covering it with ceramic tiles.
- The area around the pool is concreted and covered with tiles that have a maximum coefficient of friction in the presence of water on it, or covered with a terrace board.
Pool equipment.
For efficient operation of the pool, it is equipped with additional equipment, with the help of which it is filled and removed from the water. Its filtration and heating, creating comfortable conditions when swimming in it. Ladders and handrails will be needed to get off and out of the pool, lamps should be installed in it to illuminate the water in the dark, and sun loungers should be placed next to it.
In such a completed form, it will bring joy to its owners, decorate the site and help create a pleasant stay around it on hot days. And a pleasant feeling of pride that the pool was built with your own hands will fill your heart and soul. published
Which of the owners of dachas or country cottages does not dream of their own pool on the site? And do not think that this is an extremely expensive and requiring great effort in the construction and operation of the structure. With minimal skills in building materials and some expenses, you can build an inexpensive pool.
In this article, we will tell you how to make a pool in the country with your own hands from various materials (concrete, frame, film), and also demonstrate videos and photos.
Pools may vary. For some, an inflatable tank, installed in a suitable place and filled with water from a hose, will be enough. If you want to build a solid stationary reservoir that can serve for many years, you will have to work.
First of all, you need to choose a suitable place. It should be removed from beds and trees. The less debris will fall into the water, the less maintenance effort will be required. In addition, it is necessary to think about the supply of water and its discharge. It is better to choose a simple shape of the pool, without sharp corners: in the form of an oval, circle, square or rectangle.
The easiest and cheapest way to build a pool is to cover the recess in the ground with a special film. However, this structure cannot be called reliable and durable. More often, owners prefer to build pools of concrete or polymer materials.
A fairly simple structure, quite suitable for self-construction, is considered frame pool. Its feature is the design, which consists of a frame "skeleton" of metal pipes. The bowl is lined with three layers of PVC film. Inside it has a special nylon mesh, which gives the material additional tensile strength. The metal frame holds the water pressure.
It is placed with some recess in the ground or simply on the surface. The area for the pool must be prepared: remove all vegetation, and level the bottom of the shallow pit and fill it with sand or gravel. In some cases, even a concrete pad is poured.
Then the entire surface is lined with a heat and water insulator. Penofol or folitep is best suited here. These are modern heat-insulating materials made of polyethylene foam covered with aluminum foil. The mats are laid end-to-end and the seams are glued with construction tape.
After that, the pool itself is assembled according to the instructions attached to the kit. The only tool required for the job is a screwdriver.
Concrete
When erecting a concrete pool, work also begins with digging a foundation pit. In this case, the entire bowl is sunk into the ground. When calculating the dimensions of the pit, do not forget to add about 0.4 m to the wall thickness. The shape of the pit should repeat the outlines of the pool itself. The optimal depth can be considered 1.4 m. In order for the recess to be as reliable as possible, its walls must be given a slight slope towards external parties, about 5°.

The finished pit of the desired shape must be carefully leveled, the soil compacted and a sand cushion about 30 cm thick laid on the bottom. Then the pool is waterproofed, everything is covered with a waterproofing agent (roofing material with bituminous mastic) in several layers and formwork is installed. Liquid concrete is poured into the gap between the wooden shields and the earthen wall. Additionally, the walls are reinforced with a double metal mesh. It simultaneously counteracts the pressure of the water in the pool and the pressure of the soil.

Note! Concrete grade - not less than M350.
The bottom of the future pool is also reinforced with a mesh and poured with a concrete layer of at least 20 cm. When the solution hardens, the formwork is removed and the entire surface is rubbed with "cement milk" - a liquid solution of cement and water without adding sand. This process is also called ironing. It allows you to remove microcracks on a frozen surface and prevent their occurrence in the future.

At the final stage, the walls and floor of the pool bowl are finished with a decorative coating. Usually this ceramic tile. However, you must first install a ladder, nozzles, waterfalls and underwater lights, equipment that facilitates the care of the pool.
We offer you to see a photo report of the construction of a concrete pool:


Film pool

Due to its versatility, PVC film has been widely used for arranging swimming pools. It is used:
- to create a pool in the ground;
- for arrangement of frame pools;
- for sealing the concrete base of the pool bowl;
- as a repair kit for an old pool.
Note! PVC film has a thickness of 0.5–2 mm. The thinnest is only suitable for small pools with minimal load. It is best to use a film no thinner than 1.5 mm with a reinforcing layer of fabric.
Pool in the ground

If you want to make a pool quickly and relatively inexpensively, then in this case you can dig a foundation pit with sloping walls, which will be the base of the pool. Carefully remove the roots of the plants and tamp the soil. Make sure that there are no sharp stones anywhere, because they can damage the canvas.
The entire bottom of the pool is covered with sifted sand, with a layer of at least 3 cm and leveled. As a heat-insulating material, you can lay a layer of mineral wool, but it is better to spread roofing material, as it is not afraid of moisture. Spread a non-woven fabric over this cake and only then a film. After that, you can weld the seams.
Note! Before you start welding the seams, you need to practice on scraps of material so as not to spoil the canvas intended for sealing the pool.
In order to fix the edges of the web, you can use a special mounting bracket to which the film is welded. A simpler option is to drop the edges of the film. In this case, often a decorative stone edging is made around the pool.
concrete pool

We will not dwell on the creation of the structure of the pool itself - it should be a reinforced container. The main advantage of using PVC film is that no waterproofing is required. If the surface is not perfectly smooth, then it will be correct to use a substrate, which can be used as geotextile or the same roofing material. Actions with a film are similar when arranging a pool in the ground.
It remains to choose the method of fixing the film on the edges of the pool (it is better if it is a special mounting bracket) and you can use the product.
Repair of an old pool

It is no secret that the capital pool can lose its tightness over time or even crack. If the crack is constantly expanding, then no sealing, even application liquid rubber, will not help. In this case, it is possible, as well as for a concrete pool, to use a PVC film, having previously sealed the cracks and leveled the base.
polypropylene
A polypropylene pool also requires a foundation pit and pouring a concrete bowl. The polymer allows you to solve the main problem in the construction of pools - to ensure reliable waterproofing. Polypropylene is an extremely durable material and is able to take any shape. Pools from it are made in two ways:
- bought finished bowl the right size and shape;
- sheet polypropylene is bought and a bowl is made from it.
Note! The cost of both methods is about the same.
Welding of sheets is carried out using a thermal welding machine - an extruder.

After mounting the polypropylene bowl and installing all communications, concrete is again poured from above and decorative material is laid.
It is polypropylene pools that are most suitable for installation in a summer cottage. They are not afraid of temperature changes and the vagaries of the weather.
Video
The full range of works on the installation of a polypropylene pool is presented below:
See how PVC pool film is welded:
Photo
Below in the photo you can see the various options for the construction and design of the pool:


