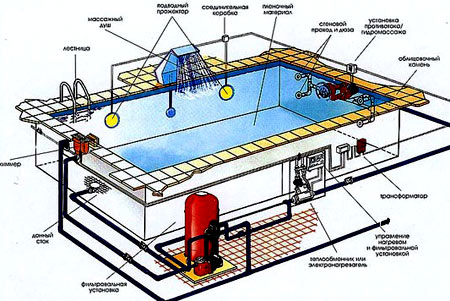
How to make a pool yourself from improvised methods. How to quickly make a pool in the country with your own hands from improvised means
The pool in the country is becoming an indispensable attribute. They can be large, small, concrete, inflatable, frame and so on. It often happens that you want to have a pool in a suburban area, but there is not enough finance. It is in this case that it is worth turning on the imagination to full force and figure out what improvised materials can be used to build it. Thanks to this, you can build a pond on your site without spending a cent.
How to make a pool in the country with your own hands from improvised materials
The use of a shipping container is one of the best options for building a swimming pool on suburban area. It will be large enough to swim in. For a small pool, as the main material, you can consider a huge bowl made of tires, which is used for heavy special equipment. A tree or an ordinary pit will fit the role of building material for a seasonal pool. The most optimal and durable option is concrete.
shipping container
Of course, not everyone has such a little thing, but still, for those who have it, you can breathe into it new life and build a pool out of it. Or you can buy it. Its price is small. Such a structure has many advantages:
- First of all, it is worth mentioning the price. This is a really cheap building option.
- Building a pool from a container will take a little time and will not cause any difficulties. There is no need to attract additional labor, everyone can handle all the work on their own.
- The metal frame of the container will make the future construction durable. The container will keep its shape and it is not necessary to dig a foundation pit under it. You can simply put it on the ground and build a ladder up. The simplest and most budget option is a regular stepladder. The ladder can be attached to the metal frame by welding.
- If it is nevertheless decided to deepen it, then this can be done halfway. Thus, you will not need to deal with complex earthworks.
- It is quite easy to embed all communications into the container. Connection of all necessary pipes can be done without using a welding machine.
- At any time, the container pool can be moved to another location. Dismantling the structure is easy.
For children, such a container will be too big. Therefore, you can build a “paddling pool” for them from a container from a car.
Porcelain stoneware will help make such a pool attractive from the inside, and if you build a formwork made of wood, from which steps are taken away and a place for changing clothes is made under them, then the design will turn into a real masterpiece.
The container can be customized to your liking. It all depends on the imagination of the owner. It can turn out to be a real swimming complex, if you try.
Check the container carefully if it is old. It may have cracks and holes. They need to be sealed. You also need to carefully examine it for rust. If such is found, the container must be thoroughly cleaned, coated with a primer and mastic, and also covered with waterproofing.
Tire
The wheels of heavy special equipment (tractor, harvester or truck) have large and heavy tires. Of these, you can build a wonderful pool for children. Financial investments for such construction are practically reduced to zero.
Such a pool has a number of advantages. For example, you already have the walls of the pool ready, that is, the water tank is almost completely ready. The thick rubber that makes up the wheel is able to perfectly hold water. In addition, the tire will last a very long time and it is not afraid of temperature changes.
The main disadvantage of such a pool is its small size. That is why it is most likely more suitable for children, because adults will not be interested in it.
Nitro paint dries very quickly. In order to transform the surface, it is enough to apply only one layer. The enamel is applied in two layers. Painting the surface with an aerosol, of which there are a large number of shades on the market, is also quite simple.
By choosing oil paint, you will get a opaque and durable painting. And if you add a little 40% laundry soap to it, then the surface can be made matte (0.1 kilogram per 3 liters).
Concrete
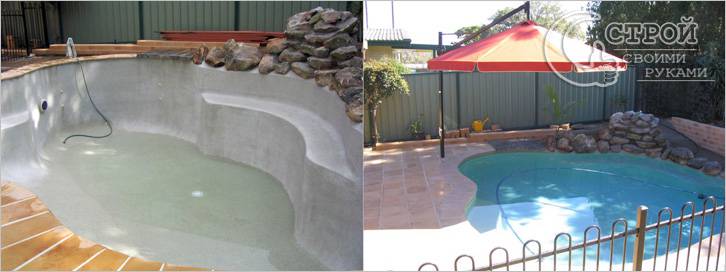
Concrete is one of the most affordable building materials. It is made from crushed stone, gravel, sand, cement and water. Using the tips described below, the construction of a concrete pool in the country will not be difficult. There are some economical options for such construction.
Experts recommend not starting construction of a complex big pool if you don't have any building experience. It is better to practice a little first and build a small simple reservoir or pond. For its construction, you will need to do the same work as for the construction of a large pool. Just on a smaller scale.
Benefits of a concrete pool
- Durability is one of the main trump cards of such a structure.
- If you use high-quality building materials during construction, then in the end the structure will turn out to be very durable.
- Such a pool can be placed both inside the house and on the territory near the house.
- Finishing work of a concrete pool can be done absolutely different materials: ceramics, mosaic or decorative plaster.
- Composite products that are sold on the market are much more expensive than a concrete pool.
Disadvantages of a concrete pool
- If the weir or water supply system is not properly installed, then the water supply will have to be completely redone.
- If the sealing is of poor quality or poor quality building materials are used, then water leakage may occur.
- If you do not follow the technology of finishing work, then the decoration elements may fall off.
- Mold can form in the pool if it is not maintained and cleaned regularly.
Before you start building a pool, analyze your strengths well. This process requires a lot of time and effort.
You can always turn to specialists for help.
Building a concrete pool
In general, there is nothing complicated in the construction work on the construction of a concrete pool. You just need to find time to study all the nuances and directly to the construction itself.
Wooden container or pit for a seasonal pool
At the end of the summer season, the water from the pool should be removed and the waterproofing material removed for the winter. A kind of tub or tub can be constructed with your own hands. The surface of the made tub must be covered with a waterproofing material and fixed at the edges.
There is an alternative. You can dig a pit. Thus, the pool can be made in any shape. To do this, the walls and bottom of the pit are well tamped and covered with waterproofing material. To do this, use a special film or tarpaulin. Cover the waterproofing with a margin of at least 50 centimeters. The material is fastened with wooden blocks or pebbles. To prevent the waterproofing from rising, sprinkle it with a 10-centimeter layer of sand.
If the angle of inclination of the pit is steep, then soil spillage cannot be avoided.
To clean such a pool when the season is over, first drain it, then sweep away the sand and remove the waterproofing.
Wooden pallets as pool material
Pallets made of wood can be an excellent improvised material for building a pool. Their size and shape are perfect for the construction of the walls of the reservoir. By increasing the number of pallets, the pool can be made more round. Most often, for its construction there are enough pieces. It can accommodate from one to six people. Such a pool has its advantages:
- It has fairly high sides, so the volume of water will be large enough.
- A ladder or slide can be attached to it without problems.
- The structure does not need to dig a deep pit.
- The pool is mobile. If necessary, it can be either removed at any time or moved to a new location.
- The main material of the structure is wood, which, as you know, is an environmentally friendly raw material.
- In case of damage to one of the sections, it can easily be replaced with a new one. To do this, simply drain the water.
If we talk about the shortcomings of this option, then they also have a place to be. The wooden structure of the pool needs to be strengthened. This can be done with a textile tie-down strap or stops. Another nuance of the construction of such a pool is its mandatory finishing. Well, after all, wood is a perishable material. It requires special treatment with special impregnations from the fungus.
To create such a design, purchase:
- Shovel and bayonet shovels.
- Hammer.
- Screwdriver.
- Concrete mixer machine.
- Containers where it will be possible to store garbage, water and concrete.
- Electric jigsaw.
- Sander or sandpaper.
- Roulette.
- Rope and pegs.
- Large square.
- Level and plumb.
- Pliers.
- Fasteners (screws and nails).
Construction works
Stock up on a sufficient number of pallets measuring 1.2x0.9 meters. First of all, it is necessary to treat all wooden elements with antifungal impregnations. Then dig a round pit, the diameter of which should be slightly larger than the future pool. Level the bottom of the pit and evenly cover with a layer of gravel of at least 200 millimeters. Inside the pit, construct the skeleton of the future pool, while turning the solid part of the pallet inside the pool. The pallets themselves are interconnected by boards that are attached to the side of the future reservoir. To strengthen the structure, fix the bars with self-tapping screws at the joints.
Make holes in the frame for the drainage system.
Insert pipes into them through which water will be supplied to the pool and drained from it. The finished structure must be additionally secured with two tie-down straps.
To further strengthen the frame, drive in wedges of wood at the joints of the pallets in between.
Now it is necessary to pour the concrete mixture to the bottom with a layer of 100 millimeters and give it 5–7 days to harden it. After that, you can do the waterproofing of the pool. For this, PVC film is used.
To hide not too attractive parts of the frame on the front side, you can trim it with OSB boards. Decoration is carried out depending on the taste preferences of the owner. The fastest way to do this is with rolls of reeds.
Plastic bottles as a building material
It would seem, how can such incompatible things be combined? It turns out that everything is possible. Skilled summer residents have figured out how to use plastic bottles to good use.
Pool out plastic bottles has its own advantages. First of all, it is an accessible material. Almost every day we have used bottles. and their cost is hefty. By itself, plastic is a waterproofing material, since moisture does not penetrate through it and does not spoil. The undoubted advantage of a plastic pool is its durability. And, of course, from this material you can build a reservoir of any size and shape.
The only downside to using plastic bottles as pool building material is that each one needs to be filled with sand in order for them to hold their shape. And it will take a lot.
For construction work, you will need almost the same tools as in the previous case.
A large pool pit is more convenient to dig with a mini excavator.
Construction works
- Choose a place where the future pool will be located. The smoother it is, the less work you have to prepare it. Clear it of debris and vegetation.
- Installing a slab foundation for this version of the pool would be best.
- Dig a hole 4x2 meters. Its depth should be 15 centimeters. Level the bottom and tamp.
- Build a sand cushion that needs to be moistened and well compacted. The layer should be 15 centimeters. You can pour gravel on top.
- Build the formwork where the concrete will be poured. To do this, use wooden boards. Its width should be 200-250 millimeters.
- Next stage- the construction of a lattice of 8 mm reinforcement. The size of the lattice cells is 100X100 millimeters, and the total area is 8 square meters. Secure the intersections of the rods with wire.
- Lay the reinforcement cage on the bottom. It must not come into contact with sand. To lay it like this, put several halves of bricks on the bottom.
- Then it is necessary to carry out all pipes and communications.
- Pour the concrete mortar and level it with a rule or a long, even board.
- Leave the concrete for a week to harden.
- After that, you can start building walls from bottles.
- Fill each bottle with sand and close the lid.
- Apply cement strip. It should be equal to the height of the plastic container.
- The connecting link between the rows will be a reinforcing cage made of 0.3 mm rods. The dimensions of this frame should be equal to the strip of bottles.
- Lay the sand bottles on the cement and fill any cracks with concrete.
- After laying the first row, fill the bottles with cement and lay the reinforcing cage on top.
- Remove the formwork and continue laying out the bottles as described above until the height of the pool reaches the planned point.
- Leave everything until completely hardened.
- When the structure has frozen, plaster it.
- Creating a reliable waterproofing layer will help you cover the inside of the pool with bitumen.
- The final stage of work is giving it an aesthetic appearance. Inside is PVC film. Exterior finish remains to the taste preferences of the owner.
Care and maintenance
Swimming pool located on fresh air, is always exposed to dirt, branches and foliage. To prevent this from happening, it is covered with a special cover with a fine mesh. If the pool is small, then you can make a lid out of vine branches yourself, which you can cover it with when not in use. If, nevertheless, the garbage got into the water, then it can be removed with a special juice, and with a brush you can remove algae growths.
Don't forget to change the water. It is best to do this every 2-3 days. Water does not need to be wasted. In the country, you probably have plants that require watering. Use this water for them.
For watering plants, water that has not been chemically treated is suitable.
The bottom of the reservoir can be treated with a vacuum cleaner.
You must remember that the life of the pool directly depends on how you take care of it. If you do not want it to become an ugly, bad-smelling swamp, then do not neglect this event.
Water purification methods (table)
| Name | Description |
| Physical | This is the easiest way. The one mentioned above. It is characterized by the use of scoops, a vacuum cleaner, brushes. The installation of water filters can also be attributed to this cleaning method. Filters are sand, cartridge and diatomaceous. The main component of the first is quartz. It is broken up into small particles. Water passes through these particles and is purified. This filter is the cheapest. Most often it is installed in inflatable pools. The second option purifies water better, but its cost is higher. The filter element in it is cartridges that have a cylindrical shape. The last version is made of pressed plates, which are made from the remains of fossil microorganisms. This filter cleans the water best, and its price is the highest. |
| Chemical | Special means for water purification are used. They disinfect water, maintain a normal pH level, remove the smallest dirt and grease particles that filters cannot handle. Plus, thanks to this method of purification, algae will not grow in the water. |
| Electrophysical | This method uses ozonizers, ultraviolet rays, and equipment that releases silver and copper ions. Chemical cleaning is not required in this case. No one will have an allergic reaction from this cleaning method. There will be no smell either. This method is the most efficient. |
Photo gallery: pools from improvised materials
 Improvised materials with the right approach, use and good imagination can turn into a wonderful bassin
  Newton pool can be decorated
  The pool will be a great attribute of the playground
  Some approach the issue with humor
  Children will enjoy splashing in the water on hot summer days.
  And if the container is ennobled and decorated, then it will be doubly pleasant to rest
  A pool from an old container can turn out to be very roomy
  Give new life to an old bathroom
  The walls of the pool can be laid out of brick
  Having a pool on your site, relaxing in the country will become much more pleasant
Video: building a pool
Building a pool in the country can be a completely inexpensive process. If you correctly apply the materials already at hand, you can build a wonderful recreation area for yourself and your loved ones. On hot summer days, the cool water in the pool will bring you great pleasure. Good luck!
Which of the owners of dachas or country cottages does not dream of own swimming pool Location on? And do not think that this is an extremely expensive and requiring great effort in the construction and operation of the structure. With minimal skills in building materials and some expenses, you can build an inexpensive pool.
In this article, we will tell you how to make a pool in the country with your own hands from various materials (concrete, frame, film), and also demonstrate videos and photos.
Pools may vary. For some, an inflatable tank, installed in a suitable place and filled with water from a hose, will be enough. If you want to build a solid stationary reservoir that can serve for many years, you will have to work.
First of all, you need to choose a suitable place. It should be removed from beds and trees. The less debris will fall into the water, the less maintenance effort will be required. In addition, it is necessary to think about the supply of water and its discharge. It is better to choose a simple shape of the pool, without sharp corners: in the form of an oval, circle, square or rectangle.
The easiest and cheapest way to build a pool is to cover the recess in the ground with a special film. However, this structure cannot be called reliable and durable. More often, owners prefer to build pools of concrete or polymer materials.
A fairly simple structure, quite suitable for self-construction, is considered frame pool. Its feature is the design, which consists of a frame "skeleton" of metal pipes. The bowl is lined with three layers of PVC film. Inside it has a special nylon mesh, which gives the material additional tensile strength. The metal frame holds the water pressure.
It is placed with some recess in the ground or simply on the surface. The area for the pool must be prepared: remove all vegetation, and level the bottom of the shallow pit and fill it with sand or gravel. In some cases, even a concrete pad is poured.
Then the entire surface is lined with a heat and water insulator. Penofol or folitep is best suited here. These are modern heat-insulating materials made of polyethylene foam covered with aluminum foil. The mats are laid end-to-end and the seams are glued with construction tape.
After that, the pool itself is assembled according to the instructions attached to the kit. The only tool required for the job is a screwdriver.
Concrete
When erecting a concrete pool, work also begins with digging a foundation pit. In this case, the entire bowl is sunk into the ground. When calculating the dimensions of the pit, do not forget to add about 0.4 m to the wall thickness. The shape of the pit should repeat the outlines of the pool itself. The optimal depth can be considered 1.4 m. To make the recess as reliable as possible, its walls must be given a slight slope to the outer sides, about 5 °.

The finished pit of the desired shape must be carefully leveled, the soil compacted and a sand cushion about 30 cm thick laid on the bottom. Then the pool is waterproofed, everything is covered with a waterproofing agent (roofing material with bituminous mastic) in several layers and formwork is installed. Liquid concrete is poured into the gap between the wooden shields and the earthen wall. Additionally, the walls are reinforced with a double metal mesh. It simultaneously counteracts the pressure of the water in the pool and the pressure of the soil.

Note! Concrete grade - not less than M350.
The bottom of the future pool is also reinforced with a mesh and poured with a concrete layer of at least 20 cm. When the solution hardens, the formwork is removed and the entire surface is rubbed with "cement milk" - a liquid solution of cement and water without adding sand. This process is also called ironing. It allows you to remove microcracks on a frozen surface and prevent their occurrence in the future.

At the final stage, the walls and floor of the pool bowl are finished with a decorative coating. Usually this ceramic tile. However, you must first install a ladder, nozzles, waterfalls and underwater lights, equipment that facilitates the care of the pool.
We offer you to see a photo report of the construction of a concrete pool:


Film pool

Due to its versatility, PVC film has been widely used for arranging swimming pools. It is used:
- to create a pool in the ground;
- for arrangement of frame pools;
- for sealing the concrete base of the pool bowl;
- as a repair kit for an old pool.
Note! PVC film has a thickness of 0.5–2 mm. The thinnest is only suitable for small pools with minimal load. It is best to use a film no thinner than 1.5 mm with a reinforcing layer of fabric.
Pool in the ground

If you want to make a pool quickly and relatively inexpensively, then in this case you can dig a foundation pit with sloping walls, which will be the base of the pool. Carefully remove the roots of the plants and tamp the soil. Make sure that there are no sharp stones anywhere, because they can damage the canvas.
The entire bottom of the pool is covered with sifted sand, with a layer of at least 3 cm and leveled. As a heat-insulating material, you can lay a layer of mineral wool, but it is better to spread roofing material, as it is not afraid of moisture. Spread a non-woven fabric over this cake and only then a film. After that, you can weld the seams.
Note! Before you start welding the seams, you need to practice on scraps of material so as not to spoil the canvas intended for sealing the pool.
In order to fix the edges of the web, you can use a special mounting bracket to which the film is welded. A simpler option is to drop the edges of the film. In this case, often a decorative stone edging is made around the pool.
concrete pool

We will not dwell on the creation of the structure of the pool itself - it should be a reinforced container. The main advantage of using PVC film is that no waterproofing is required. If the surface is not perfectly smooth, then it will be correct to use a substrate, which can be used as geotextile or the same roofing material. Actions with a film are similar when arranging a pool in the ground.
It remains to choose the method of fixing the film on the edges of the pool (it is better if it is a special mounting bracket) and you can use the product.
Repair of an old pool

It is no secret that the capital pool can lose its tightness over time or even crack. If the crack is constantly expanding, then no sealing, even application liquid rubber, will not help. In this case, it is possible, as well as for a concrete pool, to use a PVC film, having previously sealed the cracks and leveled the base.
polypropylene
A polypropylene pool also requires a foundation pit and pouring a concrete bowl. The polymer allows you to solve the main problem in the construction of pools - to ensure reliable waterproofing. Polypropylene is an extremely durable material and is able to take any shape. Pools from it are made in two ways:
- bought finished bowl the right size and shape;
- sheet polypropylene is bought and a bowl is made from it.
Note! The cost of both methods is about the same.
Welding of sheets is carried out using a thermal welding machine - an extruder.

After mounting the polypropylene bowl and installing all communications, concrete is again poured from above and decorative material is laid.
It is polypropylene pools that are most suitable for installation in a summer cottage. They are not afraid of temperature changes and the vagaries of the weather.
Video
The full range of works on the installation of a polypropylene pool is presented below:
See how PVC pool film is welded:
Photo
Below in the photo you can see the various options for the construction and design of the pool:


Who has not dreamed of refreshing themselves in their own pool after a tiring hot day? To many, such an idea seems like a pipe dream, accessible only to wealthy people. This may surprise you, but you can make a reservoir on your site without resorting to a lot of money.
What improvised means can be used as a material for making
First, let's figure out what types of pools exist. They can be divided into several categories:
- frame. As a rule, this is a metal frame on which a sealed canvas is stretched. In the kit you can find a ladder, a cleaning system, a pumping station and everything you need. The design must be assembled by yourself according to the instructions. Not intended for wintering;
- plastic products. This is a one piece molded bowl. Sold in finished form, or you can make a form to order. It can be mounted on a frame or dug into the ground. Also, do not leave for the winter, plastic can deteriorate from severe frosts;
- stationary. The most complex and reliable designs. Usually poured out of concrete.
You can make frame and stationary reservoirs yourself. Suitable for this:
- big tires;
- wooden pallets;
- polyethylene bottles;
- concrete rings (used for wells);
- metal container;
- gabions.
Although such materials do not look very aesthetically pleasing, sometimes it is possible to ensure that do-it-yourself pools are not inferior to expensive frame ones. Let's take a closer look at how to make a pool with your own hands.
 Stationary pool
 Preparation and calculation of the structure
A wise saying goes: "Measure seven times, cut once." Therefore, you need to make a calculation to find out how many materials you need for a pond of the right size.
To make a reservoir of tires you need a simple formula: V=π * r* h. V is the capacity of the future reservoir, π is a constant value (3.14), r is the circumference of the materials used, h is the height.
If we use a tire as a basis, with a width of 1175 mm, a diameter of 3575 mm, then the calculations look like this:
- calculate tire radius: 3580/2 = 1.790 mm;
- use the formula to find out the volume: 3.14 * 1.7902 * 1.175 = 11.82 m3;
- we calculate how much sand and cement is needed: 3.14 * 1.7902 * 0.15 = 1.50 m3.
For wooden pallets, a different formula applies: V = So* h. So is the size of the base, and h is the width of the pallet. It is most convenient to make a pond in the form of a nine square. To find out the size of the base, you need to multiply 6.18182 by the height of the pallet.
Let's do the calculations:
- find out the size of the base: 6.18182 * 1.22 \u003d 8.90.
- reservoir volume: 8.90 * 0.8 = 7.12 m3.
Before making a pool in the country, it is necessary to prepare the site for work: clear the ground from leaves, grass, bushes and debris.
Before starting work, you need to stock up on the necessary tools.
Kit to have on hand:
- durable sharpened knife;
- shovels, for preparing mixtures;
- bucket or concrete mixer for concrete preparation;
- drill or mixer;
- roulette;
- building level;
- hammer;
- screwdriver;
- pliers;
- nails;
- screws.
Some items may not be useful to you, depending on what you are going to work with.
 Tools and accessories that may come in handy
 How to make a tire pool
Buying an old tire today is not a big deal. To do this, you can go to a car repair shop, a junkyard or buy a used tire on the Internet.
The advantages of this material:
- large tire sizes;
- round form;
- tightness;
- the strength of the material is not afraid of either heat or frost;
- cheapness;
- ease of installation and decoration.
The disadvantage of this design is the size. Even the largest tire can fit a maximum of two adults. You won't be able to swim in it. This option is great to please the kids or decorate your garden or backyard.
 Tire pool example
 Step by step:
- on the side of the tire we make markings. You need to cut off excess rubber to get a "bowl";
- cut off the side with a knife;
- preparing the site. You can install the tire in a dug hole, or on flat ground. However, the first option is more reliable and durable. So, we dig a recess of 25–30 cm. The width of the hole should be slightly larger than the diameter of the tire so that it can be fixed well. The base of the recess should be as even and smooth as possible. Then you need to fill in about 15 cm of sand. It must be moistened and tightly evenly compacted;
- we prepare concrete (proportions 1 part of cement to 3 parts of sand), fill in the recess. The thickness of the concrete is not less than 15 cm;
- we put the tire in a fresh solution, slightly press it. If there are voids between the tire and concrete, it is necessary to pour more concrete to create tightness;
- decorating the pond. You can use any materials you like. It is desirable to cover the inner part with waterproof paint (after the concrete has dried).
Be patient, because the concrete will dry out completely in 20-25 days.
wooden pallets
Basically, wooden pallets are used to store products in warehouses. They are easy to find and buy. Pallets have a convenient shape that allows them to be used as a constructor to create the necessary structures. A self-made pool of 9.10 pallets is suitable for 3-4 adults.
 Pallet
 Design advantages:
- from pallets you can create a deeper reservoir;
- on wooden supports it is easier to install a ladder or slide for children;
- no need to dig a deep foundation;
- can be collected and moved to another place;
- easy to repair, reduce or increase the volume.
The main disadvantage of this design in comparison with the tire is the instability of the structure. Since such a reservoir is made up of many parts, tie-down straps and other support structures are needed and need to be checked to see if they can withstand the pressure of the water. Wooden structures do not like water very much, so you need to carefully cover all wooden parts with special solutions.
Instructions for creating a pool from pallets with your own hands
Step by step:
- We cover the pallets with an antiseptic or antifungal solution several times;
- we dig the base to a depth of 30 cm. The volume of the pit depends on the size of the pool, + 10-20 cm of stock;
- evenly fill the base with fine gravel. The optimal layer is 15-20 cm;
- assemble the walls of the structure. We fasten pallets with metal corners, boards, self-tapping screws. We try to make the design as reliable as possible. It is best to use several tie-down straps;
- cut a hole in the wall and bring the drain pipe;
- we drive wooden wedges around the structure for additional strength;
- we fill the base of the structure with concrete, 10-15 cm thick, level it.
The concrete will dry completely after 4 weeks, but after two weeks you can cover the bowl of the reservoir with PVC film. It must be fixed on the back of the reservoir. It remains to decorate the reservoir. External walls are easiest to sew up with wooden boards, boards or plywood.
 How to make a pallet pool
 Plastic bottles. Arrangement of the pool from plastic bottles
You will need cement, sand, boards and plastic bottles.
How to build a pool with your own hands step by step:
- we dig a base with a depth of 30 cm, and a volume of 30-40 cm more than the planned reservoir;
- we make formwork, or a form for concrete. From wooden boards we make a frame in the shape of a reservoir. We fix the structure to the ground with pegs;
- we ram the soil in a dug hole;
- we fill the pit with gravel and sand by 12–15 cm (instead of gravel, you can use a mesh of reinforcement);
- prepare a place for the drain hole, attach the pipe;
- fill the base with concrete, align the drain pipe. Concrete must be compacted with a shovel or board so that it penetrates into all parts and does not form voids. We are waiting for our base to dry for 2 weeks;
- Let's get to the walls. We stretch the thread along which we will equalize the walls;
- we put concrete on a thread. On it, like bricks, plastic bottles filled with sand are laid out. Bottles are fastened with wire. The sequence of actions is repeated until you reach the desired height of the reservoir;
- when the walls are laid out, it is necessary to cover up all the cracks and gaps inside and outside. Next, the concrete must be wiped so that the surface of the reservoir is smooth;
- cover inner part waterproof paint in several layers. Wait 6 days for complete drying. The same paint can be used to paint the outside of the pond.
Such a pool can serve not only as a decorative, but also as a full-fledged swimming pool. Such a pool is inexpensive, because it uses fairly cheap materials and is easy to do with your own hands.
 Making a pool from plastic bottles
 concrete ring
If you want to spend a minimum of time and money to make a pool in the garden - use a concrete ring. The diameter of the rings ranges from 1 to 2.5 m. You will also need to stock up on concrete.
How to make a pool:
- on the cleared site we dig a hole, slightly larger than the size of the ring;
- pour the sand in an even layer (at least 15 cm) and tamp;
- we throw concrete from above (also not less than 15 cm);
- lower the ring into fresh concrete and wait for complete drying (about 4 weeks);
- the inside must be painted with water-repellent paint or covered with PVC film;
- Let's start decorating the outside. Here you can use any materials: stone, tile, wood or paint.
metal container
Another way to do outdoor pool DIY is to use metal containers. Any container that is in good condition and sealed will do. You can find the necessary container at the scrap metal collection point or at the warehouse. In large urban warehouses, it is not difficult to find containers or wagons. However, there are several problems: some containers can rust and deteriorate from contact with water. It may be difficult to deliver a large container to a summer cottage. The first problem is solved by coating the container with a special waterproof material, or choose galvanized containers.
 Metal pool
 How to build a pool on the site:
- carefully inspect the container for integrity, carefully weld all the cracks and holes;
- we cover all the walls with an anti-corrosion agent in several layers;
- we dig a hole (you can at least completely bury the container), carefully tamp the base;
- install container;
- decorate the outer walls of the reservoir.
gabions
Gabions are nets with stacked stones. This is probably one of the most convenient methods to make a garden pool with your own hands of any shape. The advantage is wear resistance long service and cost of materials.
How to make a pool in the yard:
- we dig a hole 30-40 cm more than the intended volume and concrete the bottom;
- at the bottom we lay a metal mesh. We lay out the stones in layers to the desired height of the reservoir;
- we spread the PVC film, fix it on the edges of the gabions.
The stone walls of the pool will look good in any suburban area, and they do not have to be decorated or painted additionally.
 Gabion pool option
 Making a pool is half the battle. It is very important to make sure that the reservoir remains clean and well-groomed. In a non-closed pool, over time, you can find a large number of midges, twigs, leaves and dust. This not only looks unattractive, but also leads to the fact that harmful bacteria will multiply in the water and it will not be safe to swim in it. Therefore, you need to take care of a lid that would cover the bowl or initially make an indoor pool.
Try to fill in fresh water several times a week, and clean the walls from the formed plaque and algae.
Water can be purified in several ways:
- physically - using a water filter;
- chemically - using chlorine, bromine or active oxygen;
- electrophysically - with the use of ozonizers and ultraviolet lamps.
The second method is quite effective. However, remember that chemical cleansing requires proportions. If you put a lot of chlorine, you can cause allergies or even get burned. Bromine and active oxygen are safer for humans.
The third method is considered the most modern and safe, so it is better to give preference to it.
The pool is not as expensive as it seems. Use the materials available to you - the result will please you!
The most accessible and beloved by many recreation is a vacation in the country. It is so nice to relax on your own ennobled plot, chat with relatives and friends, have a party or have a good time in solitude. Therefore, the desire to make the summer cottage as convenient, comfortable and suitable for a good rest as possible is quite understandable.
A swimming pool will also be useful in the country house. Many refuse this luxurious element, believing that its device will be very expensive. But this is not at all the case, because it is quite possible to make a pool with your own hands in the country! And you can also decorate the summer cottage with a pond or a small fountain. These simple structures will help you master the basic types of work required to build a pool. There are many ways and methods of building a pool. We will introduce you to the most popular and convenient for self-implementation.
Step-by-step scheme for the construction of a monolithic pool
The construction of the pool requires the phased implementation of the following steps:
- development of a plan, preparation of drawings;
- drainage device, thermal insulation;
- gain;
- laying communications;
- pouring the solution;
- waterproofing, sealing;
- Finishing work.
Our instructions will help you quickly and efficiently build a pool in the country with your own hands. At the initial stage, it is important to decide on the place where you want to organize a reservoir. At the same time, it is important to take into account not only your own preferences and desires, but also the capabilities of the site and its features. To do right choice, it is necessary to draw up a site plan with all the details and analyze it. Several parameters will help you determine two or three suitable places for the pool.
It is desirable that the selected area be free from large plants and trees. In an open place, the water will warm up faster, and in the shade it will remain cold for a long time. And also the roots of trees can cause the destruction of the bowl, and leaves, grass and other debris will cause a lot of problems. All this will have to be constantly fished out of the water.
Correctly calculate the depth of the pool. An adult can swim more or less comfortably at a depth of at least 1.5 m. If there is less water, then the pool will be suitable only for children. At the desired depth of the pool, add 1.5 m for drainage and take into account the thickness of the concrete walls of the bowl.
Another important issue is communication. It is important not to spoil them in the process of preparing the pit. It is necessary to determine where they are laid before starting work. After all the preparatory work is completed, you can go directly to earthworks. When digging a pit, consider the need for a slope of the walls. It should be around 5º. This nuance will save you from problems with constantly crumbling earth.
The next task that needs to be solved when building a pool with your own hands in the country is a waterproofing device. The first stage of solving this problem is the creation of a fifteen-centimeter sand-gravel "cushion". It must be tamped and leveled. Roofing material is placed on top of the "pillow". First one layer, and on it - the second. The edges of the sheets should rise above the ground by at least 20 cm.
The next step is amplification. It is carried out using a reinforcing cage. You will need material with a diameter of 20 mm. After the frame is ready and laid, the pit is poured with concrete.
Best Option pouring - the whole bowl at once, without dividing into layers. But this is not so easy to do, especially if the construction is carried out on their own.
Therefore, as a rule, this stage is divided into several sub-stages. First fill the bottom. It is important to leave a slight slope towards the drain. After the bottom, the walls are prepared.
To achieve high quality casting, it is recommended to use vibrators. While the solution at the bottom dries out, you can start laying communications.
After the bottom hardens, work begins with the walls. To do this, you need to create a formwork. Please note that the future wall of the pool must be at least 40 cm. If you fill in two stages, then the reinforcement is also performed accordingly. After you have made and installed the formwork, you need to make a frame that connects to the horizontal parts. Now you can pour concrete. It also needs to be compacted with a vibrator. After it hardens, you can perform finishing work.
Do you want to know how to make a pool in the country with your own hands inexpensively? The video on this page will help you understand the basic principles and methods of doing all the necessary work. Read our descriptions, see photos and videos, and you will be able to build your dream pool in your summer cottage. For example, luxury multilevel swimming pool.
In this section you will find detailed recommendations for each stage of the construction of a multi-level simple swimming pool without complex communications. In it, the bowl is simply filled with water, and after a while it is sucked off, and the bowl is filled with fresh clean water.
First of all, you need to choose a place. Then it is necessary to carefully consider each stage of the work, assess the feasibility of their implementation at a particular site. Next, an optimal plan is drawn up that will allow you to do everything you need, with maximum savings and efficiency. After that, you can proceed to the pit.
Since a multi-level structure is planned, it is necessary to calculate the size of each level. In the process of digging the pit, level by level, the filling is also carried out. So, gradually, you will reach the bottom. After hardening, you can carry out a test set of water to find out where there are leaks. If there are no defects, then the water must be pumped out. Next, you can finish the concrete according to your personal preference.
This is one of the easiest and most affordable ways to build a pool in the country with your own hands. In this case, you will not have to mess with the sewer, sewage and other communications. Such a pool does not need cleaning devices. A simple, comfortable and economical pool, which not only allows you to enjoy the coolness of the water, but also serves as a wonderful decoration of the site.
Polypropylene is a modern and practical material, perfect for creating a pool. Among its characteristics are high strength, resistance to temperature extremes, reliability and ease of maintenance.
If you decide to build a polypropylene pool, then, as in previous cases, you need to determine a suitable place for it. The selected area must be marked out in order to be able to properly dig a hole. It is recommended to leave a margin of space, about a meter wide, so that in the future it will be convenient for you to walk around the pool, as well as perform various work with pipes and other communications.
Determine how high the board will reach. You need to dig half a meter deeper than the location of the bowl in order to provide a place for a special “cushion” device. Geotextile is placed at the bottom of the prepared pit. A crushed stone “pillow” is being prepared on top of it. The layer should reach 30 cm. Then reinforcement is performed and concrete is poured.
You can dig a hole yourself or order special equipment. Unnecessary soil can be scattered around the site or taken out.
Then the surface of the pit must be leveled in height, laid out with geotextiles and crushed stone. The resulting "pillow" is rammed. Then, preparing the reinforcing cage, cross-linking the rods with wire every 25 cm. The resulting frame is laid on top. In order for it not to lie on rubble, bricks are placed under it in places.
If you are planning to build a large pool, then you will need a lot of mortar. We recommend ordering it ready-made. This will give you the opportunity to perform a one-time pour of the entire base. Before filling, you need to install beacons from pipes. They will form the basis for the final floor in the future. The base is poured with a margin of half a meter around the entire perimeter.
During the hardening of the base, you can prepare the elements of the polypropylene bowl. To do this, you need to purchase a welding extruder with a seam function. different types. The optimal choice of material is polypropylene sheets 4x1.5 m, 5 and 8 mm thick. Thinner material is easier to bend, so it will go to the construction of the Roman staircase.
For outside seams, use a 90º seam shoe. The seams inside are made with an oval bar.
Welding of the bottom elements is carried out directly on the base. First of all, you need to walk with a manual extruder from the outside, and then with an oval bar and a hot air gun on the other side.
Before laying the bottom of polypropylene, the base is covered with geotextile. Styrofoam is layered on top of it.
If you do not know how to build a pool in the country with your own hands from polypropylene, before starting work, familiarize yourself not only with this instruction, but also with the features of welding this material.
After the bottom is assembled and laid, the locations of the elements of future walls are determined. Marking is necessary so that the bowl turns out exactly the way you planned. The wall prepared for installation is placed in a specific place for it. The connection is made from the inside with a hot air gun. But this is not the main mount. This is a temporary measure so that the design has general form while external welding is performed with the extruder.
When all the walls have found their place, we move on to creating the stairs.
After that, it is necessary to install stiffeners. They are made of thick polypropylene and should be spaced 60 cm apart. The ribs are welded with a welding rod. Holes for fastening reinforcement 12 mm in diameter are prepared in advance in the slats. The distance between them is half a meter. In places where the bowl has a rounded shape, additional rigidity is not needed, there polypropylene is already strong enough. The bowl must be insulated by laying foam sheets between the stiffeners.
From the equipment in such a pool are required:
- nozzles;
- skimmer;
- drain.
Be sure to leave an appropriate drain hole when filling. If you forgot to do this, then the drain will have to be moved to the wall. And in this case, the water that will be below the drain level will have to be pumped out with a pump.
Holes in polypropylene can be made with the same tools as in wood.
The nozzle piping is made from pvc pipes. From the connection is provided with special glue. It is easy to do this job. The pipe must be sanded to the length of the gluing and the element that will connect it (corner, coupling). Then, at an angle of 45º, a chamfer is removed from the pipe. The glue is spread on the pipe and the connecting element and the pipe is firmly inserted. After 4 minutes you will have a reliable connection.
Pipes installed in their places are insulated. In order for the insulation not to be torn off during the pouring of concrete, it is wrapped with adhesive tape.
It is important to correctly connect the nozzles in order to obtain a uniform pressure in each of them. First, the connection is made in pairs, and then a central line is introduced at the center of the connection of each pair.
Filtration devices, a heat exchanger and other equipment are best mounted in the basement. Pipes must be insulated and trenches dug for them.
In order to avoid the appearance of strong concrete pressure on the walls of the pool, formwork is installed with internal and outside. From the inside, it must be fixed so as to maintain a strictly perpendicular position to the ground and sides. Concrete is poured as follows:
- Formwork is installed. Its height is 30 cm;
- The pool is 30 cm filled with water;
- Further, the solution is poured in the same layer;
- A day later, the pool is again recruited by 30 cm;
- After transferring the formwork, the next layer of mortar is poured.
After the solution gains strength, you can proceed to the finishing work.
Types of pools
Explore all possible types of structures if you are planning a pool in the country with your own hands. Photos will help you choose the best option that is suitable specifically for your site. Perhaps in your case it is better to do without construction and limit yourself to a portable or inflatable structure. We bring to your attention short review the most popular pool designs.
Such a pool will not only refresh you in the heat, but will also be an excellent decoration for your summer cottage.
Good form, comfortable and beautiful. You can profitably play with water levels by choosing a place with a height difference.
A small and compact pool of shallow depth will make your children happy! It is convenient to assemble it for the summer and disassemble it for the cold season.
Usually one is made shallow and the other deep. Yes, enjoy water procedures Both adults and children can.

Who wouldn't want to splash around and cool off in their own pool on a hot summer day? How much joy and endless pleasure an artificial reservoir would bring to the adult owners of the dacha and the restless younger generation. Imagine, this seemingly "rainbow" dream is quite feasible.
For those wishing to build a pool in the country with their own hands, we offer a number of proven methods for organizing it. Here you will learn how to make a temporary and stationary version. You can compare which of the methods is easier to implement for you personally, which is more acceptable in terms of price and device method.
This article has clear answers to all your questions. Construction technologies are thoroughly disassembled. Valuable recommendations are given for determining best place under the pool, the choice of the optimal type of material for the construction of the bowl, the implementation of waterproofing and finishing.
Even an inexperienced master is able to carry out the construction of a country pool. It is only necessary to follow the construction technology of the chosen design.
But first you need to choose a suitable place for the swimming facility and its type. Not every site will be able to arrange a large pond for swimming on long distances or jumping from a three-meter springboard.
To build a warm building for a swimming pool in the country house with a roof for swimming all year round expensive and difficult, but a light polycarbonate cover is possible
Structurally, pool baths can be performed:
- With deepening into the ground. The bowl of the pools is installed in the pit, it can be ceramic, fiberglass, monolithic concrete, built from foam blocks or bricks.
- Surface mounted. These are structures for temporary use, there are frame (collapsible) or inflatable. To install them, you will need a flat, rammed or concrete-filled area.
The shape of the bowl they can be round, rectangular, oval or complex geometry. The easiest option is a bath near the bath in the form of a large barrel. But it is difficult to call such a structure a full-fledged pool.
For a device in the country, most often they choose an outdoor pool in a stationary or mobile version.
Due to the lack of a roof, both options will be able to be used for their intended purpose only in the summer, but these structures will be quite enough for a country holiday on the weekends. Their device does not require too serious investments and is quite simple when done independently.
It is much more difficult to build an indoor pool with your own hands. For him, you will have to order a project of a full-fledged building in the form of an extension to a country house with the laying of pipelines, installation of equipment, and heating.
If the site is not guarded, and in winter the owners occasionally visit the dacha, then it is irrational to build such a structure.

Inflatable structures are inexpensive and quickly assembled, but any sharp object can quickly turn them into worthless rags.
To finish the walls and bottom of the stationary pool bowl from the inside, the following is used:
- Fiberglass.
- Polypropylene.
- PVC film.
- Mosaic or tile.
A thick PVC film is used both in frame and monolithic structures. And the rest of the materials are only for the installation of stationary structures with partial or complete penetration into the ground.
If the sides turned out to be uneven, then they will have to be plastered using a reinforcing mesh. It can be metal, but it is better to take a more expensive composite of polymer materials. The latter will cost more, but it will definitely not rust from exposure to moisture.
Without a mesh, the leveling layer of plaster in the structure under construction will not last long. The energy of wave impacts from a floating person will inevitably and quickly destroy it.
You can finish the formed bowl of the country pool:
- mosaic;
- PVC film;
- tiles.
The decorative layer should not only decorate the pool structure, but also reliably protect the concrete from the effects of water.
If at this stage you cheat and make mistakes, then concrete pool will soon need to be overhauled. In some cases, it will be necessary to completely disassemble the damaged structure, and then refill everything again.

The sides and bottom of a monolithic pool can be made without the use of formwork by spraying concrete, but this requires certain skills and special equipment
The easiest way is to decorate the bowl with PVC film. It only needs to be spread out and straightened, and then soldered into separate patches into a single hermetic canvas. On the steps, you should use a film with a ribbed surface, otherwise they will turn out to be too slippery.
The use of tiled decorative materials allows you to create a country pool more attractive appearance. But doing such a lining with your own hands is much more difficult. And it is extremely important at the same time to take glue exclusively waterproof brands, and grout only with antifungal additives.
Option # 3 - from wooden shields
For the manufacture of a wooden pool in the country, you will need bars of 60x60 mm and planed boards with a thickness of 30 mm or more. The design will be in the shape of an octagon. First you need to knock down eight shields high in the depth of the bowl.
All wood must be treated with antiseptics, otherwise the lumber pool will have to be remade several times over the summer
A wooden pool structure can be partially buried in the soil or simply placed on the ground. In the first case, the bottom is best done according to the classical scheme with digging a shallow pit, laying reinforcement and pouring concrete. And in the second one, it will be possible to get by with thick boards knocked down tightly to each other.
After assembling all the shields into a single structure, the necessary technological holes should be made in them. Then a PVC film is laid in the waterproofing bowl. At the end of the work, it remains only to install the stairs and ennoble the upper edge of the sides.
In addition to the three options given, a country pool can be built from bricks or polystyrene foam blocks with concrete poured inside them, as well as from plastic bottles or large tires. There are a lot of ways, the choice here depends on the wishes of the owner of the cottage and his financial capabilities.
How to improve the area around the pool?
The main thing in the design of the pool structure in the country is the shape and color of the bowl. Intricate shapes with curves always attract the eye.
And in order for the pool to visually look deeper than it really is, its inner surface should be made white. In this case, the adjacent area must, on the contrary, be performed in dark brown shades.
A frame pool towering above the ground with a small platform next to it, surrounded by a garden, does not look as cumbersome as it is alone in an open area
To decorate the area adjacent to the bath, it is enough to arrange garden figurines and flower vases nearby. Planting any ornamental plants directly into the pool, as in the case of an artificial pond, is strictly prohibited.


