The easiest do-it-yourself pool. Swimming pool in the countryside
When I thought about how to make a pool in the country, I saw that the Internet resources mostly show expensive objects that are not always liftable even for a person with an average income. The fact is that the proposed models have built-in heating, skimmer or overflow filtration, various lights, and so on, which is much more expensive than the bowl itself.
Let's look at a budget option that almost every summer resident can do if he understands what concrete mortar is. And for a more detailed understanding of the process, we will show you the video in this article.
budget pool
Note. Below we will consider how to make a pool in the country house using the excavated method, since there is also a composite and frame method. But the second and third options are usually sold ready-made, they are more convenient to install, but their price will turn out to be higher than what we will offer you now.
Preparatory work

- The very first stage of construction can be called the determination of the required dimensions of the bowl and its shape.. And if the average depth varies between 120 cm and 160 cm, then no instruction affects the section of the perimeter. It all depends on the size of the site and the number of people who can simultaneously be in the pool.
- If everything is clear with the dimensions, then it should be noted that home-made pools in the country should be located in such a way that there are no trees nearby and it’s not even about the root system that can damage the concrete bowl. The problem is that the trees create a shadow over the water, making it cooler (we will not have heating) and, besides, falling leaves are garbage that you do not need at all.
- If yours, then you should choose the most high place so that when it rains, water does not flow into the pool bowl.
- When choosing any bowl shape, you will have to install wooden formwork with your own hands, but for rounded shapes it is somewhat more difficult to do, although it is quite realistic. So the easiest way to do this is in a pit with straight edges at any number of angles.
Installation work

After marking, we begin the device of the pool in the country with digging a foundation pit, only you will need to make it about 40-50 cm deeper and just as wide in each direction - this will be a place for pouring concrete.
But if you want to make a double formwork, then you will have to leave such a distance at each wall so that you can install an external shield. But you are unlikely to like this option - it is more expensive, and there are more labor costs, and the end result is almost the same.
When the pit is ready, you can start backfilling the sand-gravel cushion and installing waterproofing from a dense cellophane film. This film is best laid under the pillow, more precisely, in its composition - first pour, level and tamp a layer of sand 2-3 cm high and put cellophane on it with a twist on the walls. This inversion should be at least 30-40 cm above the bottom of the pool.
On top of the film, pour another layer of sand of the same height - it will serve to ensure that the pebbles do not damage the cut-off waterproofing. Then lay a layer of crushed stone with a thickness of 5-7 cm on the sand (the larger the fraction, the thicker the layer).
On the pillow, before pouring concrete, lay a plaster mesh, but you can also make a crate of wire rod with a section of 6-8 mm with a cell of 200 × 200 mm or 150 × 150 mm.

Now you need to prepare concrete and for such a structure we will fit M300 or M350 (corresponding classification B22.5 and B25) - you can see the proportions in the table above. The screed layer must be made from 70 mm (more possible) in order to completely eliminate the possibility of cracking.
During pouring, you will need to slightly raise the plaster mesh or steel crate so that it turns out approximately in the middle of the concrete layer, make the level itself with a slight slope, using beacons for this.
While the concrete is hardening, do not waste time - dig a trench for laying pipes for the drain and pumping water and you can lay the pipes right away (32 mm polyethylene brazed pipes will do here). Try to keep the pumping pipe as close to the floor as possible at the deepest point of the pool and install a filter on it, only so that it can be changed later.

About a week later, when it will be possible to walk freely on the floor, the installation of a pool in the country house involves the installation of formwork for pouring walls, with the preliminary installation of cut-off waterproofing. Shields can be made from edged boards, tightly fitting it at the joints so that there are no scars on the monolith, which then have to be removed.
But it will be even more convenient to make such shields from thick plywood or OSB, fixing them with timber and slats so that the sheet does not bend.
Recommendation. If you are planning to build a pool in the country in rounded shapes, then you will have to make the shields from plywood or OSB. You can easily bend such sheets to a certain extent and fix them with a beam and slats.

It is possible that you and your neighbors have country houses made of block containers that are mounted on a column base, but you could still see how the strip foundation is poured and how a metal frame is made for it, such as in the upper image.
To do this, you will need reinforcement (preferably with a variable profile) section 10-12 mm and steel knitting wire. Knit the structure in such a way that all parts of the metal are immersed in the solution by at least 50 mm - this prevents rusting.
Now you just have to install the frame and fill the formwork with concrete, only if you don’t have a vibrator, be sure to tamp the solution with some sort of rail - this way you will remove possible voids and increase the density of the mixture. It will be much better if the walls of the pool are a few centimeters above the ground and such a “base” can be made later, but it’s better right away, making the inner formwork a little higher, and installing a side of timber from the outside.
Advice. There will be a cold seam between the floor and the wall, through which water can seep. To prevent this from happening, use special termination tools, for example, KT Tron-2.

We learned how to build a pool in the country, but around it it is desirable to concrete a platform on which you can lie or change clothes. Such a construction should be rigid and easy to clean, so you can tile it, as in the photo above.
Conclusion
In conclusion, it should be said that if your site is not electrified, then you have a way out, this is renting a diesel generator for a summer residence or buying it. And for additional water purification, you can use ultraviolet disinfection lamps ().
A dacha is a great place to relax, and a swimming pool will not be superfluous, in which it is so pleasant to relax and hide from the heat in the summer heat. Installation stationary pool business is costly and time consuming. Inflatable pools also require investments that not everyone has. As always, people's ingenuity and skill come to the rescue.
Key Points Important for Installing Any Pool
Whatever reservoir is planned, it is important to follow the basic rules:
- the place for the pool should not be in the shade of trees, so the water will not warm up well, and leaves and insects will fall on the water. A swimming pool in an open sunny area will always please you with warm and clean water;
- the site for the reservoir should be flat and well-packed;
- the dug bowl for the pool should be even and smooth;
- it is imperative to consider a water drain system, especially if there are no filters;
- the frame of the reservoir must be well fixed so that the structure is stable and reliable;
- when buying a tarpaulin for a pool, you need to take into account the edges of 50 cm, for fixing;
- it is important to ennoble the area around the pool.

Dug pool lined with foil
This is the easiest and most cost effective way. Initially, you need to dig a hole of the required size, its walls should be even and perpendicular to the bottom.

Pieces of cardboard are laid out at the bottom of the pit, for the softness of walking with your feet. Next, the film is lined in an even layer, a waterproofing film is laid on it, the edges of which are fixed with stones on the ground. Stones also play a decorative role, especially if they different sizes, shapes and colors.
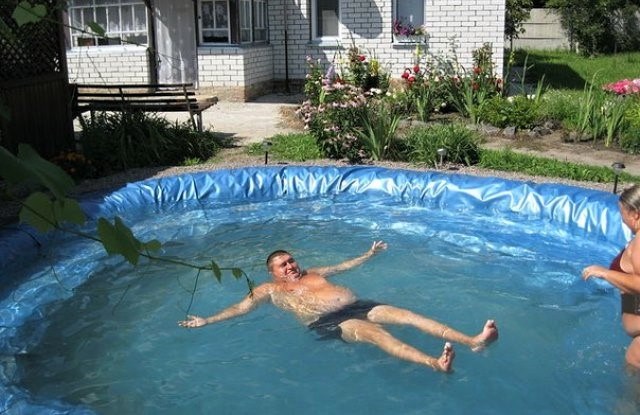
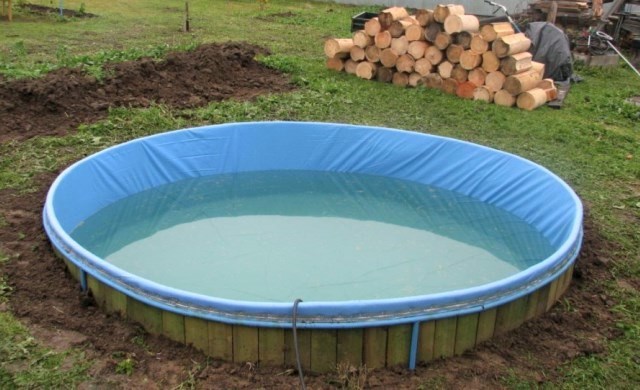
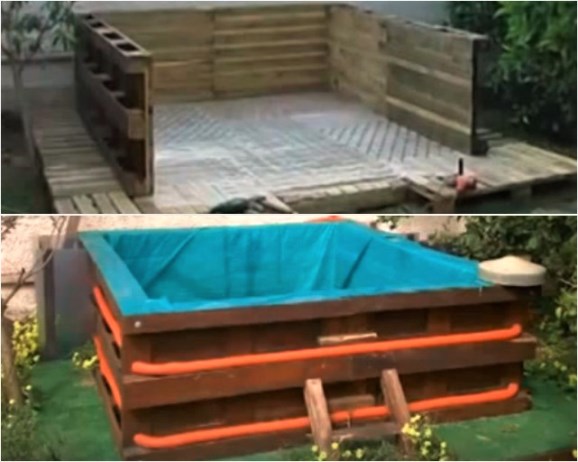
Pallet pool
The manufacturing process of this pool is more labor-intensive than the first option. Initially, you need to find a flat piece of land, compact it well, removing debris, roots, etc. A large tarpaulin is placed on this area.

The next step is to take 9 pallets and putting them on edge, fasten them together with self-tapping screws and slats. As a result, the circle should be closed, a greenhouse film is lined with an even layer, and the junctions of the pallets and the bottom are lined with towels or other material.

The next layer is a waterproofing film, its edges can be fixed with a wide adhesive tape. For the beautiful appearance, the pool can be upholstered with narrow boards or bamboo.
Swimming pool for children
Children can make a pool out of a tire from heavy special equipment, such as a tractor. From the tire you need to cut off the excess to increase its size. Under the tire, it is necessary to pour a concrete platform into which the tire is installed. After drying, the structure is a single whole. The bottom of the pool can be painted.

Pool on a metal frame
With welding, you can make a more reliable pool. Each wall of the pool is made separately, and then they are assembled by welding into a square frame. One wall of the pool is assembled from a galvanized sheet and a profile pipe. After welding the walls into a single structure, the film is covered and reinforced with tape. The pool can be covered with a film or closed with a lid. And since this pool is strong and reliable, it will last more than one summer season. Therefore, for a frame reservoir, you need to install a pump with a cleaning water filter and use disinfectants.
The pool in the country is a great opportunity to swim on a hot summer day after hard work in the garden, and for the kids it will be just a paradise. But it is not always possible to buy expensive plastic or inflatable pool. You can make a small pool with your own hands simply from improvised materials, such as tires, pallets, containers, tubs that you can find in your yard or you can get them for free.
Improvised materials: advantages and disadvantages
There are a large number of different materials from which you can make your own for a short time a convenient country swimming pool, where not only children, but also their parents can splash in the summer. And for this it will not be necessary to spend a lot of money and purchase expensive tools, as in the case of the construction of a stationary concrete pool.
From tires
If you have the opportunity to find or ask your friend a tractor driver for an old unnecessary tire, then you can make an excellent pool in your country house, in which all family members can swim.
The frame (sides) for the pool will serve as an old tire, and the bottom will need to be poured with concrete, about 15 centimeters thick. It is necessary to pour concrete not only inside, but also outside for more waterproofing. It will also be necessary to install a tap to drain the water and provide a purification plant (filter) for the pool. After a week, you will be able to use such a pool without problems.
But there are both advantages and disadvantages of this material for the construction of the pool.
| Benefits of pool tires | Disadvantages of pool tires |
| There is no need to look for materials for the device boards | Small size. Adults will not be able to swim and dive |
| The round and waterproof tire is a ready-made container | You can swim only in a sitting position |
| A thick layer of rubber will reliably hold water | Designed for only one or two adults and a maximum of three children |
| The rubber frame can be easily decorated (painted, overlaid with stone or tile) | The specific smell of rubber and machine oils often remains for a long time |
| Not afraid of water pressure | |
| High degree of reliability and durability |
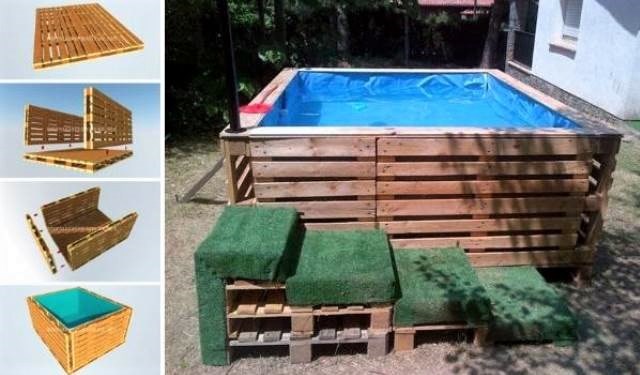
From wooden pallets
Wooden pallets have long been used to make outdoor furniture and can now be used to build a swimming pool. Their sizes and shapes make it possible to build walls (sides) for a reservoir. In order to make a good round design, you will need to take 9 pallets. Then the pool will be able to freely accommodate about 6 people.
| Advantages | Flaws |
| High sides allow you to fill the pool with more water | The wooden structure needs additional reinforcement with textile tie-down straps or stops |
| You can install a ladder for climbing and a slide | The pool must be covered with cladding material |
| No need to dig a deep round pit | The wooden frame must be treated with antiseptics and antifungal agents |
| Ease of installation and dismantling if necessary | Regularly, before pouring water, check the integrity of the pallets and tighten the belts |
| Wood is an environmentally friendly material | |
| Easy to replace any section |
From plastic bottles
Plastic bottles have long been a popular building material for summer residents. These are convenient and practical products from which you can build a fairly high and strong round, oval, square or rectangular structure of the pool walls using cement mortar.
However, there are some advantages and disadvantages plastic bottles as a material for the construction of the pool.
From a cast iron bath
Very often, when making repairs in an apartment, we throw away old cast-iron or steel bathtubs, which can now be useful in the country and not only for collecting rainwater. From such a bathroom you can make a small pool for kids who can splash in warm water while relaxing in the country. For the device of such a pool, you only need the bathroom itself, a certain amount of sand and decorative facing improvised materials.
From container
If you have an empty container in your country house in which you used to store your tools, now it can easily become a beautiful and deep pool. But if you decide to make such a reservoir at your dacha, and the container is not available, then it can always be purchased at an affordable price from the carrier company.
| Advantages | Flaws |
| Affordable cost | Metal is prone to corrosion (if not processed properly) |
| Minimum cost and time for construction | The need for waterproofing |
| Long service life of the metal structure | Difficulty in transporting large containers |
| Does not deform during the entire period of operation | Attraction of additional labor force |
| Can withstand high water pressure | Additional costs for materials |
| Minimum cost for excavation(shallow pit required) | |
| Ease of inserting communications (all pipes can be connected to the frame without welding) | |
| Mobility and ease of use (can be easily dismantled if necessary) | |
| Withstands high water pressure | |
| Large degree of capacity |
From reinforced concrete rings
Reinforced concrete rings, from which wells are arranged, and sewer systems are perfect for construction small swimming pool on the homestead. The height of the standard ring is 90 cm, so the depth of the pool will be sufficient for children and adults, and the maximum diameter is 2 meters. The round ring is already a finished construction of the walls of the pool, but in order to get an impenetrable reservoir, it will be necessary to additionally purchase geotextiles, concrete mortar and sand.
From gabions
Gabions are stones laid in a special metal mesh. Since the mesh can have a wide variety of geometric shapes, the pool can also be made as you wish. Such a pool will look great on a personal plot and, moreover, will not require additional decoration.
How to make a pool from a tire with your own hands
Calculation of required materials
In order to make a sufficiently voluminous pool from a tire, we recommend paying attention to the tires of a Belaz truck. The diameter of this tire ranges from 1.62 to 3.575 meters, and the width is from 49.8 to 114 centimeters. If you need to choose the right size, you can use a special table.
- In order to find out the volume of the future pool, we need to make some simple calculations using the formula V = π·r 2 ·h, where V - denotes the volume of a round reservoir; the number π is a constant, which is equal to 3.14; r is the radius of the circle; h - tire height. We need to know the radius of the circle. To do this, we divide the diameter value by two: 3.575: 2 \u003d 1.7875 mm.
- Then we substitute our numbers and get the volume of the structure: 3.14x1.7875 2 x1.149 \u003d 11.4371m 3. We get a round number 11.438 m 3.
- In order to make the base of the pool, we will need to purchase sand and cement mortar. The sand cushion and the concrete bottom must be at least 15 cm thick, so we need to calculate the amount of these materials.
- Sand: 3.14x3.1951x0.15 = 1.504 m 3. We will need a little more cement mortar, so we need to add 2 more buckets to this volume.
As a finishing material, we can take oil paint of various colors, with which we will paint the outer frame of the pool. And you can decorate it with small natural stones.
List of tools
- A good sharp large knife (preferably hunting).
- Shovels shovel and bayonet.
- Large containers for cement mortar, sand and water.
- A concrete mixer (or a special building container for preparing a concrete solution).
- Level.
- Roulette not less than 5 meters.
Stages of work
- Using a knife, we make a deep cut on one side of the tire. And in order for us to get an even cut, it is necessary to go with a knife exactly along the marked circumferences of the tire. We do not recommend using a grinder, because during operation the rubber will melt and stick to the cutting circle, and it will also crumble a lot.
- We determine the place for the pool and clean it well. We remove unnecessary plants and debris, and then pour a layer of sand and compact it well. You can moisten the sand a little and then it will keep its shape. We need to make a layer of sand 15 centimeters so that the diameter of the pillow turns out to be 15–20 centimeters larger than the diameter of the tire.
- On top of the pillow, we pour the prepared concrete solution to make a layer also about 15 centimeters. We put a tire on top of the solution and pour two buckets of solution inside it.
- Now we leave our pool for about a week for the concrete to harden well.
- After that, we can take waterproof paint and paint inner part(walls) of the pool, so that they are not black, but for example blue, turquoise or green to match the color of the water. We can decorate the outer walls of the tire to our liking: paint with oil paint, overlay with pieces of broken tiles like a mosaic, overlay with small stones, etc.
How and what to paint
If you decide to paint the pool from a tire, then you can take nitro paint, enamel, oil paint or car spray.
Video: how to make a pool from a large tire
Such a pool does not require special operating conditions, since truck tires are designed to work even in the most severe weather conditions and at any temperature. Therefore, the pool will serve you long years.
Periodically, its internal and outer part, and also the bottom will have to be repainted, since even the most waterproof paint will begin to crack and peel over time.
Construction of a reservoir from pallets (pallets)
Calculation of required materials
Pallets will be an excellent solution for a country pool. From them we will build the walls of the structure and the more pallets we take, the larger and rounder our pool will be.
- In order to calculate the volume of the reservoir, we will use the mathematical formula S=A
2 -a 2 where "A" is the side of the square that contains the octagon, and "a" is the side of the octagon. Therefore, “a” will act as a pallet sidewall length of 1.2 meters.
- First, we find the value of "A" by the following formula:
- The result from the root is 1.41421356. Further, according to this formula, we find a fraction and it turns out to be 0.8485281. Then we substitute our numbers into the formula to calculate side "A": 1.2 + 2x0.8485281 = 2.8970562 m.
- We calculate the area of \u200b\u200bthe structure: S \u003d A 2 -a 2 and we get 2.8970562 2 - 1.2 2 \u003d 8.3929346–1.44 \u003d 6.9529346 m 2. Now we round up our figure and get 6.95 m 2.
- Having all the values, we calculate the volume of the pool according to the formula V \u003d S of the base xh, where "h" stands for the height of the structure, which is 0.9 meters. We get 6.95x0.9 = 6.255 m 3.
Tools
- Shovels are large of various types.
- Big hammer.
- Electric or cordless screwdriver.
- Concrete mixer.
- Buckets for sand, water and concrete.
- Gravel or crushed stone (the amount is calculated based on the diameter of the pool).
- Electric jigsaw.
- Sander or sandpaper.
- Roulette at least 10 meters.
- Stakes and strong cord.
- Square.
- Rule (level) and plumb line.
- Marker or pencil.
- Large pliers.
- Wood planer.
- Hardware.
Stages of work
- First, we treat all pallets with antiseptic and antifungal agents and special impregnations, since the tree will be in close proximity to the water.
- For pool sections we take pallets 120x90 cm. From them we will create an octagonal structure.
- We dig a circular pit with shovels so that we get a diameter slightly larger than the size of the future reservoir.
- We level the bottom of the pit well and fill it with gravel or gravel - a layer of 20 centimeters.
- Inside the pit, we assemble a frame from pallets (8 pieces). Before that, we lay dense polyethylene at the bottom of the pit. We put the pallets with a solid part inside the structure.
- We connect all the elements with boards, which are nailed or screwed along the perimeter of the sides of the frame. We strengthen the joints with wooden blocks using a screwdriver and self-tapping screws.
- We make holes of the required diameter in the frame to install a good drainage system.
- After assembling the entire frame, we must securely fasten it with two reliable tie-down straps in a circle at the top and bottom of the pool.
- In pre-prepared holes, we insert plastic pipes for supplying and draining water.
- In order to further strengthen our frame, we drive wooden pegs into the distance between the pallets and the walls of the pit.
- We fill the bottom of the pool with a 10 mm concrete solution and leave it for 5–7 days for it to completely solidify.
- After the concrete has dried, we begin the waterproofing work. To do this, we take a dense polyethylene film and lay it over the entire inner surface of the pool. We fix with tape to the sides.
- We can decorate the outer sides of the pool frame with OSB, chipboard or fiberboard boards, as they will help to hide all unaesthetic elements of pallet fastenings. You can also quickly and inexpensively decorate the frame with ordinary rolls of reeds, bamboo, etc. fastened together.
Video: do-it-yourself pallet pool
Nuances of care and operation
It is necessary to take care of such a pool carefully. Regularly check the plastic film for cuts or other damage through which water can flow. Over time, even a small leak from a small hole will damage the wooden frame (mold, rot, wood will swell, etc.).
Periodically, it will be necessary to drain the water and wash the pool well from sand, dirt and other debris. If you do not have good filters, you will have to change the water frequently, and this is very expensive, so it is best to purchase a good water purification device once. You can even use homemade sand filter, which is the most common among summer residents who make pools with their own hands.
Also, once a year or several years, if necessary, it will be necessary to re-treat the wooden products of the pool with special impregnations.
Pool in the country from PVC bottles
Material calculation
Plastic bottles have already become an almost indispensable attribute of summer residents, as they make many different items for summer cottages out of them: furniture, fences for flower beds and front gardens, greenhouses and greenhouses, including pools.

Tools for the job
- Shovels (you can order a small excavator).
- Electric screwdriver.
- Concrete mixer.
- Bucket for garbage, water and solution.
- Roulette at least 10 meters.
- Pegs and strong cord.
- Big corner.
- Level (rule) and plumb.
- Marker or pencil.
- Hardware (nails and screws).
Construction stages
- Choose a flat area and clean it well. Such a pool will stand perfectly on a slab foundation.
- We dig an even pit 4x2 meters in size and 15 centimeters deep.
- We level the bottom of the pit and compact it well. From above we pour sand (slightly moistened) and evenly distribute it around the entire perimeter, and then compress it to a layer of 15 cm. We also fill up a small layer of gravel.
- We make formwork from wide boards, and so that the frame does not fall apart, we drive wedges into the ground from the outer sides.
- We make a grid from reinforcement (diameter 8mm) in order to strengthen the base. We tighten the connection points of the rods with wire. The grid cell is approximately 10x10 cm, and its area is 8 square meters.
- We lay such a frame of reinforcement on the bottom so that it does not come into contact with the sand. And for this we install a small support of broken bricks. And then we put the frame on top.
- We bring the necessary pipes for supplying and draining water.
- Pour the concrete solution and level it well with a special tool (rule or just a flat board).
- Leave the solution to harden for 5-7 days.
- Then we proceed to the laying of walls from PVC bottles and for this we mark the geometry of the pool.
- We fill each bottle with sand and screw on the cap. Then we apply a wide strip of the solution to the markup.
- From reinforcement (0.3 mm in diameter) we make a frame that will serve as a connecting element between the rows of plastic bottles.
- On the cement mortar, we lay the bottles very tightly to each other, and we also fill the gaps between them with cement. After we have laid the first row, we fill it with cement and lay the frame from the reinforcement.
- We remove the formwork, and begin to carry out the laying of bottles until we get a wall of the required height. If our pool is round, then in the center of the structure we install a home-made compass in the form of a metal pin with horizontal bar, which will help you stay within the radius.
- We leave our walls for 5-7 days so that the cement mortar is completely dry. After that we start plastering the walls. As a waterproofing, we cover the inner surface of the pool with bitumen.
- Next, we start finishing work. We take a plastic film, which is necessary for the arrangement of the internal space of the pool. We lay it well, stretch it, cut off the excess, and weld the joints and carefully process them with special glue or sealant.
- Now you can decorate the place around the pool at your own discretion.
Care and maintenance
In order to keep the water in the pool clean, it is necessary to install appropriate filters.
On a hot summer day, it is difficult to deny yourself the pleasure of refreshing yourself in a cool pond. Not everyone has a country house on the banks of a river or lake, and the construction of a stationary pool requires space, time, and material costs.
Is there an alternative to capital expensive construction? Fortunately, people's ingenuity did not bypass this issue. We have selected not only the most interesting and simple ideas, but also the most viable ones that can really be implemented on suburban area without special skills.
The presented designs are not designed for 10-year use, they do not comply with all the standards for the construction of pools. But the authors set completely different goals: cheap, fast, seasonal. Nevertheless, certain rules must be observed during such construction, so for starters, let's get acquainted with the general recommendations.
Important points when planning and building a homemade pool
Regardless of the choice of material for the construction of a seasonal pool, we recommend that you pay attention to the following points:
- the place for the pool should be in direct sunlight, and not in the partial shade of the garden: the water will heat up faster and there will be less debris in the form of falling leaves and insects;
- the site must be leveled and tamped;
- the bottom and walls of a homemade bowl should not have sharp protrusions and a hard surface;
- you need to immediately think about how and where the water will be drained during regular replacement (especially if the installation of filters is not provided);
- the frame must be strengthened so that the structure does not fall apart under the pressure of water;
- when buying a waterproofing film (tarpaulin), take into account the size of the container with a margin of 50 cm around the entire perimeter.
When arranging a budget pool, do not forget about the arrangement of the area around it. Along the perimeter, you can make a mound of pebbles or river sand, decorate approaches with a terrace board, or simply knock down wooden flooring from old pallets. Also, for comfort, it is desirable to think over a towel rack.
Just dig a hole and cover it with cling film
The first stage is the most time-consuming - digging a hole of a suitable size and depth. When the pit is ready: the bottom is leveled and rammed, the walls are perpendicular to the bottom and do not crumble, proceed to the second stage - surface preparation.
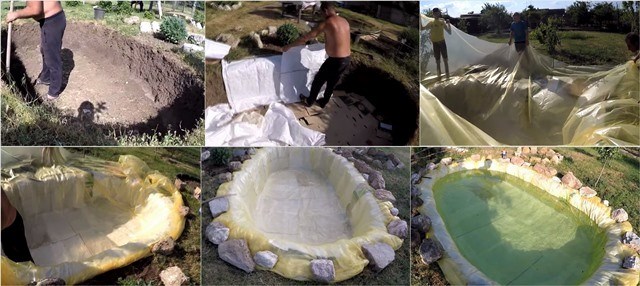
Cut cardboard boxes are laid at the bottom so that it is soft to step on. The walls are covered with bags so that the film does not tear on the unevenness and roots of plants.
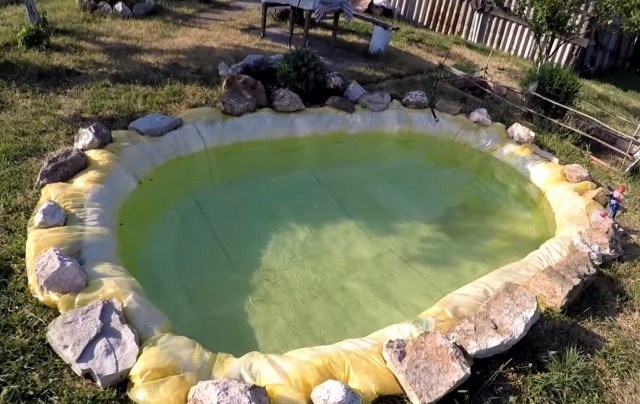
At the third stage, the pit is covered with a waterproofing film. The upper edge is pressed with stones, which additionally plays the role of decor.
In the soil, you can bury a bowl of improvised materials, covered inside with a film. This will require a lot of effort, but it will be possible to increase the depth of the pool. Since the edges of the bowl protrude above the soil surface, the earth will not be washed into the water.
We are sure you will love the idea of having a pool. And by the next season, you will not want to build temporary structures. The best solution would be to organize a pleasant vacation spot for many years to come. For the construction of a private pool, it is best to turn to professionals who will help at all stages of its construction. Already a lot good reviews received the company "POSEIDONSTROY". They will be able to make a pool according to your wishes or offer standard projects for implementation.
Frame pool from pallets
To begin with, they choose a flat area and cover it with a dense tarpaulin (perhaps an old banner or canopy). Next, take 9 pallets and fasten them with self-tapping screws and slats. Pallets are placed on edge, connecting with a ring. When the round frame is ready, it is secured with tie-down straps for extra rigidity.
On next step the inner surface of the "bowl" is covered with a dense greenhouse film, and old towels, bedspreads or blankets are laid on top at the junction of pallets and on the bottom. This is done to soften the surface so that while swimming it is comfortable to cling to the stacks and walk along the bottom.
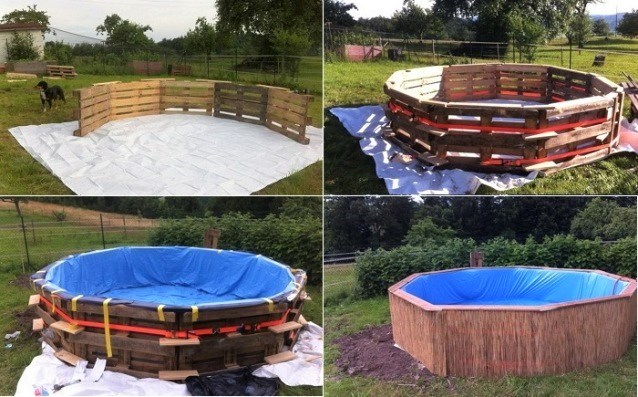
The final layer is a waterproofing film. If it is blue or blue, the water in the pool will always be bright. Some advise using black film to improve water heating. It is important that under the film there are no open sharp corners, protruding boards and a rough surface, on which the film will quickly tear.
The film is fixed to the upper edge of the pallets with a special adhesive tape. For decorative finishes outside pool, you can use reeds or bamboo. Narrow boards are nailed on top to hide the pallets.
The frame can also be made rectangular by connecting the pallets at right angles. The bottom can also be lined with pallets.
To create the most comfortable zone, you can fix a lighting stand on the corner and make steps out of pallets.
Fill such a pool with tap water from a garden hose, and drain it manually or with a low-power pump. If chemistry was not used for disinfection, then vegetable beds and flower beds are boldly watered with water.
Pool from old boxes
The frame of the pool can be made from old wooden or plastic boxes. Of these, they make up a rectangular box, fasten each to each other and additionally wrap it around the perimeter with plastic tape.
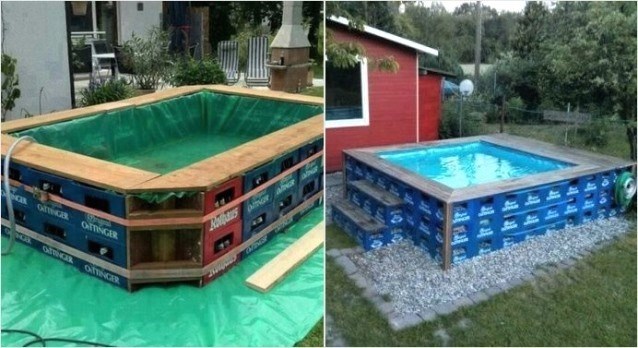
The structure is assembled on a tarpaulin. Inside, the box is covered with a dense waterproofing film, pressing the upper edge with wooden boards.
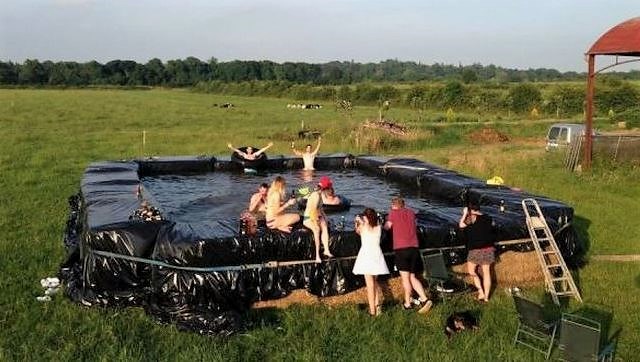
Pond of hay - simple and cool
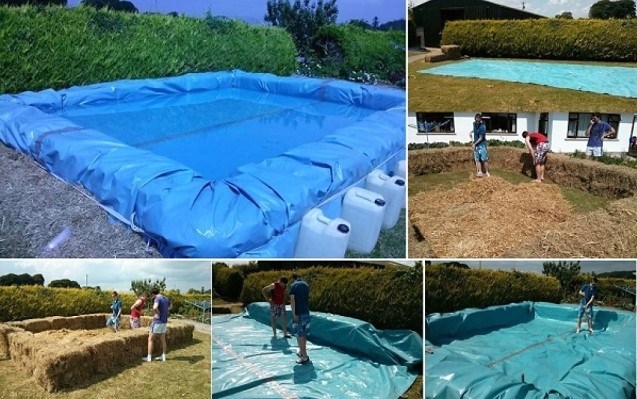
Looking for improvised materials for the construction of a swimming pool in the summer cottage sector, enthusiasts turned their attention to hay, which is an indispensable attribute of agricultural land.

It is spread on a prepared site, and boards are built from rectangular compressed bales. Further, everything is according to the already shown scheme: a dense film is covered in the resulting bowl, the structure is pulled together with straps. To protect the waterproofing film from damage, the first layer on the hay can be put cardboard or a thick tarp.
Pool on a metal frame
For those who are friends with welding, it will not be difficult to make a simple do-it-yourself metal pool.
Each wall is made separately from a profile pipe and a galvanized sheet. You can assemble the structure by welding or make it collapsible with bolts.

A liner made of a waterproofing film is installed inside, which, if desired, can be made to order according to the dimensions of the resulting structure. You can ennoble such a pool with the help of pallet flooring, as well as make a cover.

To improve ease of use, it is recommended to install a pump with a filter and use disinfectants for regular use. Thanks to this, your pool will not turn into a muddy swamp in a few days, the water from which will need to be completely pumped out and replaced with new water on a regular basis.
Mini pool from a large tire
A very simple idea for making a reservoir from a large diameter tire from heavy special equipment will complete our selection.

To expand the future pool, the first step is to cut the sidewalls of the tires. The resulting workpiece is installed on a pre-prepared concrete pad and poured with concrete. Thus, the tire and concrete form a bowl, which, after the concrete has dried, must be painted inside with a special paint.
As a result, you will get, albeit small, but not requiring much effort to maintain and a very cozy pond that will help you refresh yourself on hot days.
Most often, the pool is associated with foreign holidays and luxury, but it’s not so difficult to make this attribute yourself in your summer cottage and enjoy swimming and cool water all summer season. In this article, we will tell you in detail how to make a pool from improvised materials with your own hands.
Tire pool
If you settled on this option, the most important thing is to find the right tire. Best fit tire from a tractor or combine, since the diameter is quite enough for the growth of an adult. In addition, you will need a bag of cement and sand. The production order is as follows:
- With a sharp knife and a hacksaw, cut one side of the tire, leaving a side. It is more convenient to cut in circles on the tread. Do not use a grinder, as the rubber will begin to crumble finely and stick.
- We choose a flat area, clear it of turf along the diameter of the pool or a little wider, then fill in the sandy “cushion”.
- We fill a circle with a thickness of about 15 cm with cement and hoist the tire.
- We level the cement and, for reliability, pour a couple more buckets.
- We make out the sides of the pool. There are no boundaries of fantasy here - they can be painted, laid out with mosaics, stone or brick.


After completion of the work, it is necessary to wait about a week for the concrete to completely harden - the pool from the wheel with your own hands is ready, you can enjoy water procedures!
Swimming pool from an old bath
The most optimal option is a cast-iron bath, as it is durable, reliable and not subject to corrosion. If such a bath is not found, you can use steel, most importantly, pre-treat the damaged enamel. You will also need gravel and sand. When choosing a place, it is recommended to give preference to a shady area, closed from the scorching sun - this will avoid the rapid heating of the water and the container itself. Let's get to work:
- We dig a hole of such depth that the bathtub entered there by 3/4.
- At the bottom we fall asleep a sandy "pillow" 20 cm high.
- After making sure that the edges of the bath are strictly horizontal, we lower the future pool into the pit.
- Pour sand into the voids and compact it.
- We clean the turf around the perimeter and make a trench.
- We decorate the pool - you can decorate the edges with stones, paint with colored paints, etc.


Concrete ring pool
 This option is easy to manufacture, since the container itself is already ready. Typically, the size of a sewer or well ring ranges from 1 to 2.5 m, which is quite enough for a small reservoir. In addition to the ring itself, you will need: geotextiles, concrete mortar, sand.
- On the prepared site, we dig a hole to fit the size of the ring.
- Fall asleep sand "pillow".
- We put geotextiles and concrete the bottom.
- We lower our future pool.
- We fill the voids with sand and compact it.
- We decorate the pond according to your desire and imagination.

The manufacturing technology of such a pool is very simple. gabions- these are stones laid in steel frames. The mesh frame can be absolutely any shape, so it is one of the most suitable materials for building a pool. In addition, it is inexpensive, strong and durable. To work, you need a solution of concrete and a strong film. Procedure:

- We fill the bottom with concrete, while the diameter should be made slightly larger than the future pool.
- We install the base mesh on the bottom and lay the stones in layers.
- On inside we fix the film on the bowl - it will provide waterproofing.
- We firmly fix the edges of the film to the upper edge of the gabion - the original and inexpensive stone pool is ready.

At first glance, it may seem that wood is an unsuitable material for building a pool, but this is not so. Such pools, with proper construction, are very strong, durable and reliable, in addition, they are environmentally friendly and fit perfectly into the suburban country landscape. To work, you will need a standard set of tools for construction and repair, including a grinder, a hacksaw, pliers, etc.; Materials: 25 mm boards, 50x50 mm wooden beams and 20x20 mm laths, sand, cement, gravel, PVC film, metal sheets, as well as consumables such as nails, washers, etc. Despite its complexity, the process is quite simple:

- We cover the boards and bars with drying oil and enamel. Then, having decided on the size and shape of the future pool, we construct wooden shields from them, from which the structure will subsequently be assembled. To do this, it is necessary to assemble a frame from the bars and sheathe it with boards, the main thing is that they fit as tightly as possible to each other.
- We prepare the pit - its depth should be equal to 2/3 of the height of the shields, and the diameter is slightly larger than the pool itself. We fill the bottom with gravel.
- Inside the dug hole, we assemble a structure from shields, cutting out holes for pipes.
- We lay communications - pipes for supplying and draining water.
- We prepare wooden wedges 20 cm long and metal plates 20x20 cm - 3 pieces for each shield. We insert the wedges into the space between the shields and the pit itself, from the side of the pit we attach plates to the wedges. We fill the remaining gaps with gravel and hammer in the wedges.
- To finally fix the shields, fill the bottom of the pool with cement for 10 cm, after hardening, lay it out with PVC film - it will provide waterproofing.
- We ennoble and decorate the pool as you wish.

Another great resource for self-manufacturing pool, gaining great popularity - a metal shipping container. It is better to use a sea container for 20 or 40 feet, but you can also take construction and even garbage. In addition, you will need a welding machine and an anti-corrosion compound. Getting Started:

- If there are gaps in the container, carefully seal them.
- We process the outer walls with an anti-corrosion compound.
- We bury the container in the ground to the desired depth.
- It remains to give the pool an aesthetic look: you can paint it with waterproof paints, lay out the surface with decorative tiles, etc.

Plastic bottles have long established themselves as a useful, practical and affordable material that is widely used in everyday life, especially in the summer cottage. The manufacturing process of such a pool does not require large financial costs and deep knowledge in the field of construction. In addition to bottles, you will need: sand, gravel, concrete mortar.
- Having chosen the shape of the future pool, we prepare the site: we remove the turf and pour a layer of sand and gravel.
- We fill the bottom with concrete.
- We start laying by tightly immuring the bottles into the walls and bottom of the pool, while it is very important to fill both vertical and horizontal seams - this will ensure maximum tightness.
- We design and decorate the pool.

If you have set yourself the task of building a pool yourself, choose the method that suits you and boldly proceed! The result will pleasantly surprise all family members and guests, and will also become a source of pride and highlight of the suburban area.


