Exercises for stretching the muscles of the legs. Leg stretching exercises for beginners - the best complexes for the legs and back
In the article, you will find a lot useful information with regards to stretching (stretching).
In short, I will tell you: about the types of stretch marks (static / dynamic), what is the difference between them, their advantages / disadvantages (what is better for a beginner, etc.), I will touch on a very topical issue that interests many beginner guys / girls: “ how to stretch correctly” (where to start, what to do, how to do it, etc., so as not to harm and not waste time).
Well, and finally, I will tell you about the complex of the best (effective) exercises for stretching all the muscles of the body (neck, trapezoid, shoulders, arms (biceps, triceps), chest, back, and of course the legs), of course talking about the technique of their implementation , everything is detailed with pictures, in general, so that there are no unnecessary questions.

Each has its own goals, for example:
- do the splits;
- improve posture,
- improve muscle elasticity;
- develop coordination;
- acquire a flexible and "obedient" body, which will help you easily master new sets of exercises in various directions ...
- for fighters, for example, to perform kicks (for example, (hit to the head), etc.)
- to improve *nt*mn*th life, new poses are all business =)
- and so on. in general, there are a lot of directions.
But! Let's not fan the air with stories that it is useful, everyone needs it, etc.
Everyone makes his choice, a person wants to do it - ok, no - this is his choice.
Always follow the simple rules below, and everything will be zashib =)
1. Before stretching the muscles (it doesn’t matter if it’s the legs or other parts of the body (back, chest, arms, neck, etc.), without fail warm up before your workout.
This is vital so that you do not harm yourself, do not get injured (sprain or something else), because the body is “cold”, and muscles and ligaments stretch very poorly on a cold body, therefore injuries are inevitable. Do you need it?...

If you are engaged in anaerobic training ( Gym, training with iron), then stretching should be performed after training (not at the beginning, as some individuals mistakenly do, but only at the end, after strength training).
This is done specifically due to the fact that stretching helps to relax and relieve tension from the muscles. Accordingly, if you put it at the beginning of the training, before strength training, where mobilization of forces is required, you will only worsen your strength results.
2. Perform absolutely all stretching exercises smoothly, under control, without any sharp rash movements / jerks that can lead to injury (even on a warm muscle).
3. During the performance of this or that exercise, try not to strain your muscles, because relaxed muscles stretch much better (more efficiently).
4. When doing stretching exercises, always make sure that your back (namely the spine) is straight(you can’t swear, you can’t grimace, because in this way you reduce the flexibility and elasticity of muscles and ligaments).

5. Breathing should be as calm and even ( starting position - inhale (nose), stretch - exhale (mouth)) - follow this (and in no case, do not hold your breath during this or that exercise, this is not permissible).
6. As a rule, the execution time for one exercise is about 60 seconds.
Well, in general, it varies depending on the flexibility of your muscles (at first, as much as you can, usually it is 5-10 maximum 15 seconds, however, each time (gradually) you need to try to build up to the right minute or more depending on your fitness level).
7. Get in the habit of exercising regularly(and not when you feel like it / want it, once a week or a month ... because the effect of such training is like a goat's milk). I would recommend that you start with at least three regular workouts per week (less will not be enough), and gradually (under control, according to well-being) increase to daily trainings (if you wish), no, then 3 times will be with your head.
8. What else to say something ... oh yes, in no case DO NOT copy someone.
Do not try to stand out by throwing show-offs, how cool I am (I am), etc.
Always stretch for yourself, not for someone else.
Always consider your personal stretch limits or injury is inevitable. The sheepskin is not worth the candle...
9. If you are doing stretching with a partner, be very careful and tell him about your feelings. I'm not arguing that stretching together is more fun, but be very careful and speak up right away if you feel too much, because your partner cannot feel when your thigh is about to break ... (this is just an example, get the point).

10. A very common mistake many people make is that they do not pull MUSCLES, but LINKS! Ligaments are strong and almost inextensible shells of the joints.
Breaking them is quite difficult, but with due diligence it is possible.
As a result, you will have to undergo a long rehabilitation, or completely forget about training.
Therefore, always observe elementary precautions, namely:
- Slightly bend your knees as you pull your hamstrings;
- When working on stretching the legs, remove the lateral load on the knees by turning the toes of the legs up;
- Just be careful when stretching the small muscles of the arms or the vulnerable muscles of the shoulder girdle;
- Avoid severe pain when doing flexibility exercises.

11. Many do stretching in such a painful way that they simply can not stand it and give up this activity. This is not the right approach!
In no case should you endure pain, for this is the direct and shortest path to a hospital bed.
However, stretching should not be too pleasant if you want to get serious results in the foreseeable future. Do you understand?
All in all, no severe pain but don’t just filonte….
12. Stretch the body should be symmetrical, paying equal attention to each limb or half of the body. If you pull your right leg for 5 minutes, please pull the left leg for the same amount. Nothing less.
Only in this case, you can count on the benefits of stretching exercises.
13. A reasonable duration of a flexibility workout is considered to be at least 30-50 minutes, no less. More - you can, but not less (although I'm on initial stage I spent 15-20 minutes, gradually reaching 30 minutes, I never do more than 30 minutes, because there is no need - those who are seriously engaged in this, who want to achieve serious results, have a need).
When should you not stretch?
There are practically no contraindications for muscle stretching, so anyone can do it.
However, it is not recommended to perform various exercises to stretch any part of the body if:
- Severe spinal injuries;
- Inflamed hip joints;
- Sick lower back;
- With bruises of the legs;
- In case of cracks in the bones, especially the pelvis;
- With high blood pressure.
- Classes during pregnancy, according to experts, are not prohibited, however, the physiological changes that occur in a woman's body during this period require special attention... therefore, be vigilant (see how you feel).
- And also, in no case should you train stretching on a COLD BODY (without a warm-up), I have already talked about this in detail above.

P.s. Ideally, if you have significant health problems (especially with joints and muscles), then before starting stretching exercises, you should consult a doctor or an experienced trainer.
In case you have been stretching and you experience the following symptoms:
- Dizziness
- muscle spasm
- Unexplained crunching or clicking in the body
Then see for yourself how you feel, maybe you need to rest for 5 minutes, you can change the exercise, you can stop training altogether ...
Types of stretch marks
There are five types of stretch:
Active- the practitioner himself makes efforts to stretch one or another part of the body.
 Passive- these are movements performed with the help of a partner (work in pairs).
 With this type of stretching, the amplitude is greater than with independent work, however, the training has one subtlety: if you don’t reach it, then there will be no effect from the exercise, and if you pull it, you can get injured.
It is for this reason that you:
- Must be absolutely confident in the competence of your partner;
- Constantly inform (during the performance of this or that exercise) about your feelings to him, so as not to get injured.
In my opinion, this is a kind of metamorphosis of static stretching, which is not performed under own weight, but under the influence of the partner's efforts. Here, in fact, are all the differences.
Dynamic- unlike the static one, this type is performed in motion.
The simplest example is lunges with one foot forward (back), to the side.
 An increase in the amplitude of movements is achieved by increasing the speed or intensity of the exercise.
ballistic- in short, this type is performed with jerks and springy actions (forbidden for wellness stretching).
 In detail, the basis of ballistic stretching is made up of jumps, pushes and other sharp power movements that contribute to muscle stretching.
Please note that all exercises are performed with maximum amplitude and abruptly (the only type in which exercises are performed not smoothly, under control, but abruptly), due to which jerky traumatic stretching of muscle and connective tissues occurs.
During such a load, the joints and muscles experience risky overloads, so this method is not widely used (for beginners, as far as I know, it is not recommended).
Statistical- This is the most effective type of stretching recommended by doctors. In this type of stretching, a certain pose is taken, in which all muscles are maximally stretched, after which the body position is fixed for 15-30 seconds (maximum 1 minute).
 P.s. in general, the fixation time depends on the flexibility (stretching) of a person.
In my opinion, in fact, all these types can be divided into two types (statistical (holding) and dynamic (in motion). Why the hell should you reinvent the wheel, who knows.
CONCLUSION: The ballistic type of stretching is the most traumatic, because, as already mentioned, it includes various swings and springy movements with a large amplitude ...
Accordingly, if your muscles and joints are not properly prepared, then this can lead not to stretching, but to torn ligaments, muscle injuries, “knocking out” the joint, and so on ...
That is why, for most people, I would recommend that you start stretching training only with static smooth exercises.
In the future, as your fitness (length of service, experience, etc.), see for yourself.
The best stretching exercises for all parts of the body
 Don't forget that only after a thorough workout you can move on to basic exercises that develop the flexibility of any part of the body.
As a general rule, stretching should begin with neck stretching, then move on to shoulders, back, arms, chest, and abs, and lastly, do leg stretches. This is me, for reference, so that you are aware)), but do not worry, I have already compiled everything for you below, just start repeating.
NECK STRETCH
Exercise number 1.
- The exercise can be performed both standing and sitting (in my opinion, it is more convenient to stand).
- Head tilts are performed with the help of the hands: the free hand is simply extended along the body (in our example, the right one), the working hand (in our example, the left one) performs the movement, namely: with the left hand, gently pull the head down to the shoulder.
- After that, just hold this position for as long as you can, and then switch to the other side.
- Repeat a couple of times on each side.
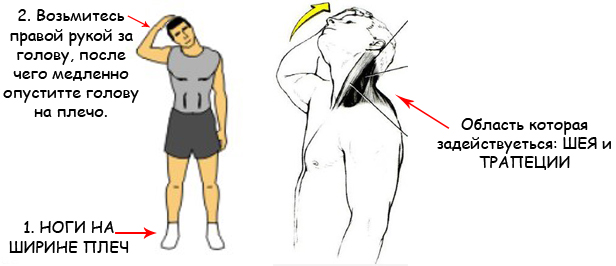
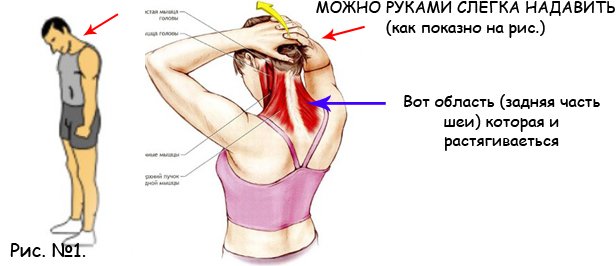
Exercise number 2.

- Stand up straight.
- Place both palms on the back of your head.
- Slightly pressing them on your head, stretch your chin to your chest.
- Stay in this position and feel the stretch in the back of your neck (see pic #1 below).
MUSCLE STRETCH: shoulders, back, chest
Exercise number 1.

- The exercise is performed while standing.
- Stand with your feet shoulder-width apart and raise your right hand up.
- Then pull it over your head close to your ear. Grab your right elbow with your left hand and gently pull your hand towards your ear. You should feel tension in your deltas (shoulders).
- When you feel it, stay in this position for as long as you can.
- Repeat with the other hand.
Exercise number 2.

- Stand straight, feet shoulder width apart.
- Put both hands behind your back so that your elbows are bent at an angle of 90 degrees (see as in the picture above).
- Grab your other hand as close to your elbow as you can and pull it gently across your back to the opposite shoulder.
- Hold the stretch for as long as you can, and then stretch with your other hand.
MUSCLE STRETCH: SPINA
Exercise number 1.

- Grab a pole or pole with one hand and lean back, straightening your legs so that the back muscles are stretched.
- Hold for as long as you can, feel the stretch (burning) in this position, and then repeat the exercise with the other hand (see the picture above, you will roughly understand what I mean).
MUSCLE STRETCH: hands and wrists
Exercise number 1. Triceps stretch (and even shoulders, back)

- Starting position, standing, feet shoulder-width apart (according to convenience).
- First, throw (raise) one arm (say, right) back behind your back, and bend it at the elbow.
- Now we pull up the second hand (left), that is, we take the left hand by the right elbow and begin to pull it gently, slowly, under control, as far (deeper) as possible.
- Hold the stretch for as long as you can, and then repeat the exercise with the other arm for as long as you can.
Exercise number 2. Stretching the biceps

- Kneel on the floor and place your hands down in front of you, pointing to your knees with your fingers.
- The thighs almost touch the feet.
- Arch your back and lean back slowly, under control, keeping your elbows motionless and your palms on the floor, so that tension (stretching) of the muscles we need occurs.
- Stay in this position (when it burns) for as long as you can.
- Then relax for 15-20 seconds and repeat the exercise again several times (as you feel).
STRETCH MBREAST
Exercise number 1. Stretching pectoral muscles about the rack

- Find some kind of support (vertical) like a WALL (as shown in the picture above).
- Go to the wall and place your hand on the wall or any other vertical surface (depending on what you find) and bend your elbow 90 degrees while leaning forward with your whole body and slightly to the side of the arm until you feel the tension of the pectoral muscles.
- After that, linger in this position for as long as you can (in order to stretch the muscles of the chest), and then repeat the exercise on the other side.
Exercise number 2.

- Stand in an upright position and pull your outstretched arms back while keeping them locked (as shown in the figure below).
- After that, not abruptly, but in a controlled movement (if you can, of course) raise your hands to the ceiling (as long as you can, according to your well-being), it is important to keep your hands with all this - DIRECT, until you feel a stretch in the pectoral muscles.
Exercise number 1.

- Lie on your stomach and place both hands on the floor directly in front of you (as if you are going to do push-ups).
- P.s. I personally push with my fists (I have a wrist injury), but you can, with your hands (see for yourself).
- Raise your head and chest off the floor, arching your back slowly and carefully. Feel the stretch as your abs stay in this position for as long as you can.
- Then rest and repeat several times.
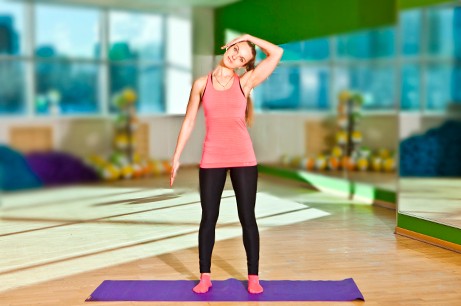
Exercise number 2.

- Starting position: standing, feet shoulder-width apart.
- Place one hand on your belt (as shown in the picture above) and tilt your torso to that side while reaching for your hand.
- Then repeat on the other side.
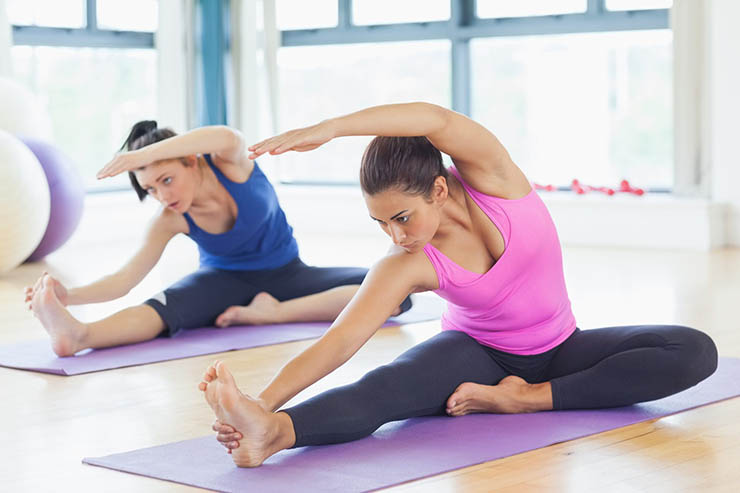
Exercise number 1.

- Sit on the floor. Legs are widely spaced.
- Start tilting your torso forward as low as possible, then do springy up and down tilts.
Exercise number 2.

- Sit on the floor with your legs wide apart.
- Bend to the right leg as low as possible. Hands hold on to the leg below the knee.
- Do springy tilts up and down at least 10 times. (you can go up to 50).
- Return to starting position and repeat with the other leg.
Exercise number 3.

- Sit on the floor. The legs are moved and stretched forward.
- We tilt the body as low as possible, trying to reach the ankles with our hands. If this is difficult, the knees can be slightly bent.
- We make smooth springy tilts up and down at least 10 times (reaching 50). Your goal is to touch your head to your knees.
Exercise number 4. It's like sitting on a twine 🙂

- Move your feet away from each other until you feel a stretch in the leg muscles of the inner thighs during the stretching exercise (the final pose of the legs in the form of an obtuse angle, approximately 120-140?).
- Tilt the body down, put your elbows on the floor (or try to reach for it, but not jerkily, but slowly). Stay still (hold, feel the tension) for 5-10-15-30 seconds (depending on how flexible you are).
- Every day, try to put your feet further apart, increasing the time of immobility in all intermediate poses.
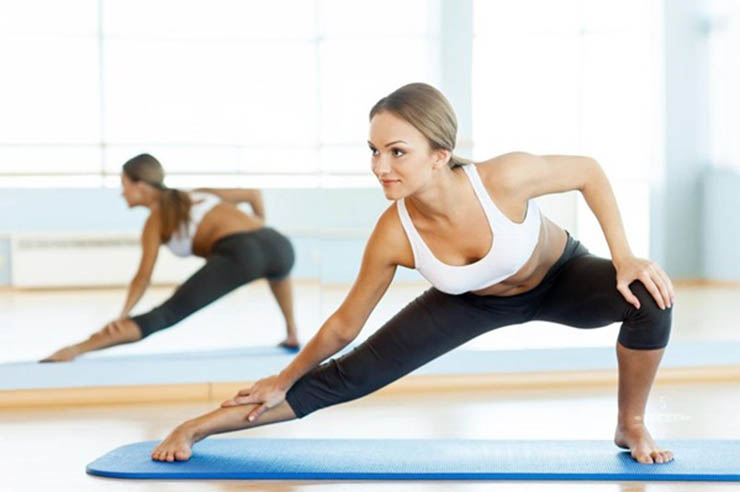
Exercise number 5. for stretching rear surface leg muscles (looks like a lunge).

- Stand on a hard surface with a straight body.
- Extend your left leg forward (and your right leg back) as far away from you as possible.
- Bend it at the knee, dropping down. Keep your back straight, feeling the stretching of the muscles of the legs during the exercise, stop in such a position that the angle of the bent right knee is 90 degrees.
- Relax the core - let the weight of your body be distributed downward, increasing the pressure on the legs. We stand as still as we can (as usual, no more than 1 minute).
- You can try to put your hands in a “lock” behind your back (to be honest, for beginners this is very difficult, so you can just put your hands on your hip or on the floor, or you can even hold them on a handrail / lean against a wall (if you can’t keep your balance).
- Repeat everything with the left leg.
Exercise number 6. Lunges to the side
 Lunge to the right side, the toe of the left leg at this time looks forward (or at a slight angle outward) and the whole foot is on the floor, the left leg is straight. Stretch (lower), feeling the tension. The same must be done on the left side.
Exercise number 7. forward bends

- Place your feet shoulder-width apart.
- With your legs completely straight (the knees don't bend at all, watch this, that's the point of the movement) perform 12 springy forward bends.
Exercise number 8. Groin stretch, inner thighs

- Sit on the floor, then press your feet together.
- Grasp your feet with your palms.
- Rest your elbows on your knees (see picture).
- Start slowly pressing your elbows on your legs and at the same time tilt your torso forward (in principle, you can just put pressure on your legs so that they get apart, and keep your torso straight, see for yourself).
- In any case, make sure that your back is straight at all times.
- Bend as you exhale, and, having reached the peak of the tension, linger in this position for as long as you can (in the future, reaching up to 1 minute). Then return to the starting position and repeat such inclinations a few more times (as you feel).
Exercise number 9. Stretching the back of the thighs
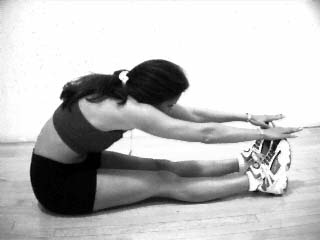
- Sit on the floor. Straighten both legs in front of you.
- Start reaching your hands towards the toe (or even further if you can), feeling the tension in the back of the thigh, linger for as long as you can (up to 1 minute).
- Repeat the exercise several times (as you feel).
Exercise number 10. Pulling the front of the thigh (quadriceps)

- Stand up straight, bend one knee and press the heel against the buttock with one or both hands (as shown in the photo).
- If necessary, help yourself with the opposite hand to maintain balance.
- Watch your knees, they should be in line, and the inner thighs are tightly compressed.
- Strain gluteal muscles and twist the pelvis a little forward and upward - this way you will increase the sensations. Hold this position for as long as you can (no more than 1 minute) feeling tension in the front of the thigh (quadriceps).
- Repeat all over again with the other leg.
Exercise number 11. Stretching the hips and buttocks

- Lie on the floor with your back down. Bend both legs at the knees.
- The upper body is completely relaxed.
- Raise your left leg to your right knee (as shown in the photo).
- Embrace your right knee with both hands and begin to slowly, under control, pull it towards you.
- Change the mutual position of the legs and repeat the exercise.
Exercise number 12. Ankle stretch (SHIN, CALVES)

- Stand facing the wall, then rest your palms on the wall.
- Take one leg back 40 - 60 cm, without lifting the heel off the floor (if it is still torn off, then press it to the floor in order to feel the tension in the ankle and calves. Otherwise (if you do not press the heel), the exercise loses its meaning.
- It is only when the heel is pressed that you feel a burning sensation (tension), only in this case, a stretch occurs. In general, they pressed the heel - and linger in this position for as long as you can (up to 1 minute).
Regards, administrator.
The pain caused by a leg sprain is familiar to everyone: there is hardly a person who has not received this type of injury at least once. Damage to the muscles, tendons or ligaments on the leg is quite easy to get - it’s enough to fall awkwardly due to ice or going down the stairs. Usually, a sprain is not life-threatening, but timely treatment is important for faster healing and pain relief.
What is a leg stretch?
Stretching (distortion) of the leg is an injury caused by the maximum tension of the muscles or ligaments and tendons (the fibers that connect the muscle and bone). At excessive load on the leg, its tissues do not withstand the pressure exerted, resulting in stretching of the limb. In fact, this breaks individual fibers in the bundle while maintaining the integrity of others.
The tendon fibers have a very high strength, but they are designed for a certain direction of movement and cannot withstand loads in an abnormal direction.
Unlike sprain, tissue rupture is the destruction of all muscle fibers, ligaments or tendons at once.
Stretching can vary in severity. In fact, these are small tissue tears, which are classified depending on the magnitude of the deformation and the location.
Usually, the load on the ligaments of the ankle increases during movement, when the heel tucks sharply inward
Most often, the cause of injury is active sports, falling or jumping from a height, violation of the warm-up rules before high physical activity. Also, some diseases of an inflammatory nature can affect the elasticity of the fibers and lead to stretching (tendinitis, paratenonitis).
Traumatic injuries of the tendons are often diagnosed with various mechanical influences and excessive force load, in particular during sports
When stretched, you can often feel like something burst in the leg or torn. An injury is always accompanied by sharp pain, which can be felt for up to a month and a half, while the acute phase lasts from 5 to 8 days. In addition, the sprain site swells, a hematoma appears, and the leg becomes less mobile.
Often, pain in the leg can be caused not only by stretching, but also by a pinched nerve. At the same time, redness, swelling and restriction of freedom of movement of the limb are also observed. Unlike sprain, a pinched nerve is often caused not by injury, but by a disease (osteochondrosis, sciatica).
Video: stretching: definition and treatment
Distortion classification
Leg sprains are primarily classified according to the type of injured fibers:
- Crick;
- sprain;
- tendon stretch;
- combined stretching of several types of fabrics at once.
Depending on the severity of the damage, three degrees of distortion are distinguished in each group:
- I degree: characterized by minor pain, preservation of mobility of the leg joints and simultaneous rupture of several fibers while maintaining the integrity of the tissue.
- II degree: in this case, the appearance of swelling of the injured area, disability, hemorrhage, inability to step on the limb are typical. The pain is moderate. There are significant fiber breaks in the fabric.
- III degree: manifested by rupture of fibers, severe and sharp pain, as well as a violation of the stability of the damaged joint in case of rupture of the ligaments. Extensive bruising appears on the injured site. When a muscle is torn off, it is impossible to use it under load, a characteristic muscle weakness appears.
For grades 1 and 2, conservative treatment is most often prescribed, and for grade 3, surgical intervention is often required.
Sprain classification
Traumatology also systematizes sprains depending on the group of damaged ligaments. So, the ankle joint, which is most prone to distortion, is fixed by three groups of ligaments:
- The outer surface of the joint: here are the ligaments that help fix the talus from lateral displacement:
- Calcaneo-fibular ligament.
- The anterior talofibular ligament is the most frequently injured of all the other ligaments.
- Posterior talofibular ligament.
- The inner surface of the joint: the deltoid ligament passes here, connecting the talus and navicular bones.
In second place in terms of trauma are the ligaments connecting the tibia:
- Tibular ligaments (posterior, anterior, posterior transverse).
- Intertibial syndesmosis.
Classification of muscle strains
The calf muscles are more at risk of injury, thanks to which a person maintains balance during movement and bends the knees and feet:
- calf muscle;
- soleus muscle.
Hip strain is a very common injury in athletes.
Stretching of the thigh muscles (biceps, membranous, anterior) occurs mainly during sports training, while in a more severe case, the muscles lose their ability to contract and are subject to long-term recovery.
Tendon sprain classification
Depending on the location, there are several types of tendons that are more prone to stretching:
- The Achilles tendon is the most powerful in the whole body, at the same time the most injured, which is associated with significant loads.
- Patellar tendon - sprain is accompanied by pain localized above the knee.
- Hamstring - distortion occurs when the lower leg is rotated abnormally, is characterized by pain under the knee and a characteristic protrusion in this area.
- Tendon hip joint- provides its fixation, connecting the bones of the pelvis and upper part hips. Any excess load associated with tension in the thigh muscles leads to injury to the tendon tissue.
Classification according to the location of the injury
Both single and combined sprains most often occur in the ankle and knee joint.
However, there are other locations that are at risk of distortion from the impact of a traumatic factor. In total, 6 areas are distinguished in which this kind of tissue damage can occur:
- Foot - in this place and tendons occurs due to high load on the joint, the injury significantly limits movement.
- Ankle (ankle) - is a complex articulation of the bones of the lower leg and foot, in this place complex stretching of the tendon and ligaments can occur.
- The lower leg is the area from the knee to the heel, the muscles of which are often prone to injury.
- Knee - the knee joint is prone to stretching of the muscles and ligaments, if damaged, it can lose stability.
- Hip - in this place are especially vulnerable internal muscles, the ruptures of the fibers of which occur most often.
- Buttocks - in this area, stretching of the fibers of the muscles and ligaments may occur, the tendons are less affected.
The most common types of ligament injuries in the leg are ankle and knee sprains.
Causes of leg sprain
As a rule, this type of injury is the result of sudden falls or intense load. In the case when there is a sharp movement of the joint, exceeding its physical capabilities, there is a stretching of the muscle, ligament or tendon. The reason for this may be:
- a fall;
- slipping;
- wearing uncomfortable shoes, including high heels;
- turning the foot in or out;
- running on uneven surfaces;
- incorrect landing after a jump;
- active sports:
- tennis;
- volitional struggle;
- basketball;
- football, etc.
- incorrect weight lifting technique;
- a sharp blow to the leg.
There are also factors that predispose to stretching of the leg tissues:
- clubfoot;
- flat feet;
- arthrosis;
- O-shaped curvature of the legs;
- connective tissue diseases;
- excess weight;
- poor warming up of muscles before training;
- incorrect gait, placing the foot on the back of the heel;
- the presence of previous leg injuries, causing weakening of the ligaments.
With constant stretching of the tissues of the leg (for example, in the case of professional sports activities), this type of injury flows into a chronic form.
Muscle strain can be obtained in everyday life without calculating the load and effort during the sudden lifting of weights, during sports or when performing work tasks.
Leg sprain symptoms
When the leg muscles are stretched, the following symptoms are observed:
- pain in a stretched muscle both during exercise and at rest;
- muscle weakness in the leg;
- hypersensitivity to touch at the site of sprain;
- lack of performance of the damaged muscle;
- the presence of edema at the site of sprain, bruising or hematoma;
- when severe injury- pain shock, loss of consciousness, fever.
In any case, no matter which muscle is injured, severe pain occurs, and in the event of a complete rupture, a characteristic pop is heard.
With a sprain, the symptoms are similar, the presence of pain, bruising and the development of swelling is characteristic. The joint becomes inactive, there are difficulties in walking.
A hallmark of a sprain is a feeling of instability in the joint, its incorrect position when moving.
When the ligaments are sprained, the edema lasts for a week, and after it decreases, a hematoma remains
Tendon sprain is accompanied by acute pain in case of lightning-fast and extensive injury, or insignificant if the lesion is not so large. In addition to pain, tendon sprain accompanies tissue swelling and limitation of limb movement. In the absence of medical care, even with a slight stretching of the tendons, an inflammatory process can develop that reduces the elasticity of the tissue, which contributes to the complete rupture of the vein and depressing consequences.
If the Achilles tendon is damaged, pain will be observed in an area about 5 cm above the notch of the calcaneus, accompanied by swelling of the tissues of the ankle and difficulty in flexing the foot when trying to raise the fingers. The patient cannot stand up on his toes, run.
It is unacceptable to ignore even the slightest signs accompanying an Achilles tendon sprain.
Diagnosis and differential diagnosis
Diagnosis includes a physical examination to determine the area of damage and determine the severity of the leg sprain. The detection of a partial or complete rupture of the fibers determines the further path of treatment and the duration of the recovery period, as well as the need for surgical intervention.
If a visual examination is insufficient, ultrasound methods for diagnosing a damaged joint, as well as MRI and arthroscopy (taking a biopsy to determine connective tissue disease) are sometimes used.
Rupture of the medial lateral ligament of the knee joint, detected by ultrasound
When diagnosing sprains, X-ray methods are not applicable, since only soft tissue formations can be subject to such a deformation.
However, x-rays can help in the differential diagnosis with a fracture, as stretching and bone integrity are accompanied by similar signs, and are sometimes combined in one injury.
In addition to radiography, clinical signs are taken into account to clarify the diagnosis: in case of sprain, there is no sharp pain on palpation of the bone, fragments are not felt and crepitus is not diagnosed (the sound that occurs when bone fragments rub against each other). At the moment of injury, you can hear a characteristic pop, and not a crunch of bones.
Also during the differential diagnosis of stretching, the latter is excluded based on the data obtained after radiography. During a visual examination, the deformity of the joint is assessed, as well as the possibility of resistance when trying to move and a decrease in the length of the limb - when stretched, the above symptoms are atypical.
Leg sprain treatment
The choice of method of therapy directly depends on the diagnosis, associated complications and the severity of the injury. With the first two degrees of distortion, treatment at home is possible, and only the latter has indications for hospitalization of the victim.
If you have any doubts about a visit to the doctor, you should consider the following warning signs, in which a visit to the doctor is necessary:
- there is no mobility in the area of the damaged joint, due to severe pain it is impossible to lean on the leg;
- the leg looks unnatural, the location of the joints is broken;
- pain sensations do not decrease, edema does not decrease for more than three days, bruises grow in size;
- increased body temperature, there are signs of inflammation and redness of the injured area;
- no home treatment positive effect.
After visiting a traumatologist, it is important to follow all the recommendations of the doctor, only then the treatment will be faster and more effective and will not leave any unpleasant consequences. When prescribing bed rest, this advice should not be neglected and, as a last resort, when walking, use crutches to relieve the load from the sore leg.
At any degree of stretching of the leg, the patient is advised to rest.
First aid for sprains
Before contacting medical professionals, you can help the victim to avoid more serious consequences caused by sprains and shorten the rehabilitation period.
Emergency care consists of several simple but effective actions:
- Apply a cold compress to the sprain. For this, products from the freezer are suitable, or just ice, which should be wrapped in a towel and applied to the injured area. This will provide vasoconstriction and reduce swelling, as well as relieve pain. Cold should be kept for 15 minutes every hour.
Cold compresses should be applied on the first and subsequent three days after injury.
- Creation of conditions for maximum immobility of the leg in the joint. For this purpose, it is possible to apply tight bandaging with an elastic material, as well as the imposition of an orthopedic bandage (bandage, splint) made of synthetic lightweight fabrics. At the same time, immobility is ensured and, as a result, a decrease in pain and swelling, protection from further injury and aggravation of the situation (vascular rupture, hemorrhage). When bandaging the leg, do not overtighten the limb to maintain a good blood supply. At night, the bandage should be removed.
Long-term immobilization is also required in the case of a complete rupture of the tendon until the mechanical strength of the connecting structures is restored.
- Ensuring rest of the injured limb. The less the victim disturbs the diseased joint, the better. For the first three days, any physical activity on stretched tissues is prohibited in order to avoid worsening the prognosis of recovery.
- The injured leg must be positioned so that it is above the level of the heart (on a roller or pillow). This will help ensure the outflow of blood from the sprain, reduce pain and swelling.
- With a strong pain syndrome, you can give the victim an analgesic: paracetamol or ibuprofen.
When stretching the leg, the following actions are prohibited:
- Carrying out heating procedures (applying heating pads, compresses, going to a bath or sauna, rubbing with warming ointments). This will provoke the formation of more severe edema, hemorrhage, as well as a deterioration in the prognosis of the course of the disease.
- Drinking alcohol, which will also provoke the above consequences.
- Activity of the injured limb, attempts to walk, massage the sprain. In the acute period, this can lead to further rupture of the fibers.
Active movements are allowed during the recovery period, but not during the acute phase
Video: correct application of an elastic bandage for ankle sprain
Medical therapy
Treatment with drugs is reduced to anesthesia and local application of ointments (gels, creams, etc.), which help reduce swelling, reduce hematomas, restore tissues and disturbed blood microcirculation. Taking painkillers is most relevant for the first 3-4 days after receiving a stretch, then you can reduce therapy only to the local application of ointments. Among analgesics, Aspirin, Analgin, Ibuprofen, Ketanov, Paracetamol are most often prescribed.
Among the ointments, two groups can be distinguished that help in the treatment of sprains:
- Cooling ointments. The use of these drugs is especially important in the early days of injury, as they have analgesic and sedative effects. When applying the ointment should not be rubbed into the damaged area, you need to wait until the drug itself is absorbed into the skin.
- Warming ointments. These funds are applicable in the rehabilitation stage and are applied to the skin after an acute period, 4-5 days after injury. The drugs make the muscles more elastic, have an anti-inflammatory effect and promote faster healing.
Photo Gallery: Cooling Pain Relief Ointments and Creams to Treat Sprained Legs
Ibuprofen has a local anti-inflammatory and analgesic effect Reduces and relieves pain, swelling of the joints, and also increases the range of motion Quickly relieves both spontaneous pain and pain during movement, reduces inflammatory edema at the site of sprain Voltaren relieves inflammatory edema and post-traumatic pain Heparin ointment - anti-inflammatory drug, local anesthetic Ketonal relieves pain, swelling and inflammation at the site of leg sprain
Ointments should be applied 2-3 times a day, in the amount of 3-4 g per application. The duration of treatment is determined by the doctor and depends on the severity of the leg sprain. A good therapeutic effect is given by the simultaneous use of ointments and the administration of Troxevasin in tablet form.
NSAIDs should be used for a limited time due to their effect on the body as a whole. Prolonged use of non-steroidal drugs can have a negative effect on the function of internal organs.
Photo gallery: warming ointments used during the rehabilitation period
Finalgon has a vasodilating effect, which is accompanied by an intense, prolonged feeling of warmth Apizartron - a combined preparation based on bee venom for external use Natural components of the balm stimulate blood circulation and lymph flow, help improve metabolism in the injured area, relieve inflammation and swelling Nikoflex - a combined preparation that has a local irritating, analgesic and absorbable effect Causes irritation of sensitive receptors of the skin and subcutaneous tissue, dilates blood vessels, improves tissue trophism
It is worth remembering that any ointments are not applicable in places where the integrity of the skin is broken. In addition, a contraindication to the application of warming ointments is:
- pregnancy, lactation;
- oncology;
- exacerbation of chronic diseases;
- individual intolerance.
Video: treatment of sprains with ointments
Physiotherapy
Physiotherapy refers to therapeutic measures prescribed after the course of the acute phase of the patient's illness.
Table: stretching physiotherapy
| Procedure name | Effect |
| UHF therapy | UHF therapy has an anti-inflammatory effect, stimulates lymph and blood circulation, accelerates recovery processes, and helps relieve pain. |
| Ultrasound Therapy | It has a weak warming effect, has a micromassaging effect on tissues. Under the action of ultrasound, biologically active substances are formed that promote pain relief and relieve inflammation. |
| Paraffin treatment | Treatment with the heat of softened paraffin improves blood circulation, improves lymph flow, and restores damaged tissues. |
| diadynamic therapy | Refers to the methods of myostimulation. Helps to reduce pain, dilate blood vessels and increase blood circulation, accelerate metabolism in tissues. |
| Magnetotherapy | It has a positive effect on blood properties, promotes the resorption of hematomas, accelerates the recovery of injured tissues, enhances lymphatic drainage and activates biochemical processes. |
| electrophoresis | Allows you to enter the required medicine through the skin at the site of stretching under the action of an electric field. It can be iodine, Dimexide, painkillers. |
The number of necessary physiotherapy procedures is selected by the attending traumatologist, usually from 3 to 10 sessions are prescribed. Depending on the severity of the condition, several methods of physiotherapy may be prescribed simultaneously.
Massage helps to reduce pain, improve blood and lymph flow in the damaged area, and restore normal joint activity.
It is forbidden to massage the stretching site through pain, this can lead to a deterioration in the patient's condition.
Pre-massage the area that is above the injured area on the leg (for example, when sprained ankle joint massage should begin with rubbing the lower leg). The massage time is gradually increased from 5 minutes to 15.
Massage consists of two parts: preparatory and main. Before the procedure, it is necessary to ensure that the position of the leg is such that all muscles and ligaments are relaxed (put rollers and pillows). The first week of the massage session consists mainly of stroking the injured area, kneading and squeezing is performed on the upstream area. In the second week, you can add more active movements in the area of damage.
Video: restoration of injured ligaments with massage
Surgery
Therapy with the help of surgery is an extreme method of treatment, which is resorted to if other methods do not bring the desired positive effect. Also, in particularly difficult situations, for example, a complete rupture of the ligament and, as a result, the formation of joint instability, the intervention of a surgeon is required to ensure further full-fledged work of the leg.
When a ligament is torn, your doctor may do one of two things:
- Suturing the ligament.
- Fixation of the damaged ligament with another, adjacent ligament.
With a complete separation of the muscle from the bone, it is also believed that conservative treatment is less effective than surgical treatment, first of all it concerns rear group thigh muscles. To return the muscles to their original place, special fixators are used, which are attached to the bone and then sutured with threads to the tendon of the torn muscle.
Surgical technique for tearing off the posterior thigh muscle group (hamstring) - suturing the common tendon of the posterior thigh muscle group to the ischium using anchors
After the operation, the patient wears special corrective belts that help relieve the load from the muscle and speed up healing. The recovery period after surgery is 4-6 weeks.
With a rupture of the tendon, they mainly resort to a conservative direction of treatment. However, in the absence of positive dynamics within 2 weeks, as well as in case of repeated rupture, the doctor may decide to perform the operation. The tendon is sutured with one of the many types of tendon sutures, the most commonly used is the Krackow suture.
Krackow suture: both ends of the torn tendon are sewn together with this suture, after which the threads are tied together
After the operation, the patient's leg is immobilized (fixed) using an orthosis or other similar devices. This period lasts 3-4 weeks, followed by further restorative therapy.
Folk remedies
Therapy folk methods when combined with medications, it helps to speed up recovery.
Raw potato compress
For treatment, it is necessary to wash and peel the potatoes and grate it. Transfer the resulting mass to gauze and apply to the stretching site 3-4 times a day for 20 minutes.
Chamomile flowers in the amount of 4 tablespoons pour a liter of boiling water and cook for 15 minutes. After that, insist the resulting broth for an hour and add to the water when taking a bath. In addition to chamomile, you can similarly prepare a healing decoction of oak bark and St. John's wort.
In the presence of a hematoma, the use of warm compresses is prohibited.
Photo gallery: folk remedies for sprained legs
 Hot milk compresses are considered the most effective in stretching Potato tubers have an anti-inflammatory and anti-ulcer effect When applied externally, onions have a wound-healing effect Chamomile has an anti-inflammatory and healing effect As lotions, decoctions and infusions from oak bark are used for skin inflammation, wounds and sprains St. John's wort - anti-inflammatory and wound healing external use
It must be remembered that folk remedies cannot fully replace drug therapy and are used only as a component of complex treatment.
Treatment prognosis and possible complications
With timely therapy and first aid, the prognosis for treating the disease is favorable: the stretching is completely fused, the elasticity of the fibers is restored. The rehabilitation period takes from 3–4 weeks to six months, depending on the severity of the injury, but it is important to carry out a full treatment and not ignore the doctor's prescriptions and recommendations.
In the absence of proper care, the consequence of stretching the leg can be:
- instability of the injured joint;
- development of inflammatory diseases (arthritis);
- re-stretching of damaged fibers;
- in more severe cases - limb defects, the transition of the disease to the chronic stage.
The above complications can also occur with self-treatment: the victim often cannot make a correct diagnosis and miss a more serious injury.
Prevention of sprained legs
To prevent stretching of the muscles and ligamentous apparatus, the muscles should be strengthened regular classes sports without excessive physical activity(jogging, swimming). It is also recommended to choose suitable shoes for walking and to be careful when walking in high heels.
It is important to pay attention to nutrition and healthy lifestyle of life: being overweight puts extra stress on your joints.
When you receive an injury such as a sprained leg, recovery may not be quick. The minimum period for restoration of full working capacity is 3 weeks. You should not be inactive and postpone a visit to the doctor - a timely diagnosis and the right approach to treatment will speed up recovery and save you from unpleasant consequences.
Here, especially for you, a set of exercises for stretching the legs is described in detail, presented the best program trainings and recommendations of professional trainers.
Leg stretching exercises: the benefits and harms of the complex
Leg stretching exercises are very important not only for keeping the legs in great shape but also to maintain good health of the whole organism. Today, leg stretching exercises have gained immense popularity. What is the reason for their spread? Let's consider in more detail.
1. Availability
Doing some sports exercises requires certain skills. Thus, they become available in execution only for professional athletes. Leg stretching exercises are suitable for absolutely everyone. They can be performed by both trained athletes and amateurs. The main conditions in this business are desire and endurance.
2. Benefit
Leg stretching exercises are incredibly beneficial for health. It is simply necessary to fulfill them. Leg stretching exercises perfectly train flexibility, thereby increasing skin elasticity. They also work well on the joints, increasing their tone, making them mobile and healthy. Stretching also prevents aging, relieves tension from the body after exhausting strength training.
3. Relaxation
Leg stretching exercises, in addition to their direct function, also play the role of relaxation. General state the body improves, the mood rises. This happens due to the stimulation of blood circulation. Leg stretching exercises greatly improve blood circulation.
Note! Leg stretching exercises, like any other, must be performed exactly according to the rules. If you make mistakes when performing, you can cause irreparable harm to the health of your body.
Among the negative consequences of incorrect stretching of the legs are the following:
microtrauma;
Joint damage;
Sprain;
General harm to the body.
However, if you follow all the instructions for the correct implementation of exercises for stretching the legs, the health of the body will only grow. Let us consider in more detail which stretching of the legs is correct.
Proper stretching of the legs: what is it like?
Leg stretching exercises can be divided into two types:
static;
Dynamic.
Let's take a closer look at each type.
1. Static stretch. This type of exercise for stretching the legs of the trainer is offered for beginners to the sport. It smoothly works out the muscles of the legs without causing any damage or injury. We will consider static stretching in our article.
2. Dynamic stretch. These leg stretches are only suitable for advanced athletes, as they require well-stretched muscles. This group stretching exercises make up various rolls in the twine, tilts and so on.
Leg stretching exercises: what you need to know before starting a workout
Leg stretching exercises should be approached with great responsibility. That is why you need to warm up first.
Warm-up exercises are as follows:
Squats;
Jumping rope;
Riding an exercise bike.
Squats. This exercise must be done in two sets. The number of times for each approach is 25-30. It is important not to tear off the heels from the floor when performing.
Rope jumping. This exercise warm-up should be done 50 times. The number of approaches is two.
Riding an exercise bike. If the simulator is not available, then it will be replaced by a beautiful regular bike. You just need to ride it for about 10-15 minutes.
Stretching the legs: the right static exercises
Static leg stretching is a set of specific effective exercises. Let's consider them in more detail.
Note! During training, room temperature is very important. For execution static exercises it should fluctuate between 17-18 degrees.
Exercise One. Stretching is performed lying on your back. Raise your straight legs up so that they are in a position perpendicular to the floor surface. Place your hands along the body with palms down. They act as a support. Spread your legs in different sides to the limit. They cannot be bent at the knee. In this position, you need to linger for 30-35 seconds. Repeat the exercise three times.
Exercise two.

Sit on the floor as follows: feet rest against each other, knees bent apart, back straight. Your task is to press your hands on your knees so that they touch the floor surface, imitating the wings of a butterfly. This must be done very carefully so as not to damage the ligaments.
Exercises three. Squat down on the floor. Stretch your right leg to the side with the heel down and toe up. Grasp the toe on the outstretched leg with your right hand and bend the body. If you can’t grab your fingertips, then just reach for them as much as possible, bending your body to the right side. Your task is to touch the thigh with the body in the process of tilting. After doing this, switch legs. In total, you need to do 30 tilts on each leg with a break of one minute.
Exercise Four.

Sit on the floor in a reverse lotus position, as if trying to sit in a transverse split with bent knees. Stretch your thigh muscles, but don't tense them. Your task is this: hold out for two minutes in this position.
Exercise five. Take a deep lunge as follows: right foot in front and left behind. The left leg should rest with the knee on the floor, creating support. You also need to rest your hands - either on your right knee or on the floor. Your task is as follows: bend forward until you feel a stretch in your thigh muscles. Hold this position for 30 seconds. Then change your leg.
Exercise six.

Get on your knees. Stretch your straightened right leg forward and place it on the heel. Rest your hands on the floor. Bend your body forward as much as possible. The back should be straight. Hold for 35 seconds and switch legs. This exercise pulls the knee ligaments and thigh ligaments well.
Exercise seven. Lie down on your back. Raise your left leg, bend at the knee and place it on the floor without lifting your foot from the floor surface. Raise your right leg up without bending your knee. Grab it with your hand and tilt it towards you to the limit. At the limit, hold your leg for 30 seconds. Do the exercise in three sets with each leg.
Exercise eight. Sitting on the floor, stretch your legs forward. Now spread your legs in different directions to the limit. You can't bend your knees. Hands serve as a support in front. Slowly tilt your torso forward, feeling the stretch. Hold for a minute in this position. Perform the exercise in three sets with a minute of rest.
Exercise nine.

Position yourself on the floor. Spread your legs shoulder width apart. Stretch your arms forward. Bend your torso forward and touch the floor with your palms. Hold for 15-20 seconds in this position. Perform tilts in three sets.
Exercise ten. Stand straight. Put your feet together. Perform downward torso, stretching your arms forward and touching the floor with your fingertips. Perform 10-15 such inclinations, while not bending your knees.
Exercise Eleven.

Standing straight, close your legs together. Bend your torso down and clasp your knees with your hands. Try to bend to the limit and touch your knees with your forehead. Legs should be straight. You need to stand in this position for 20 seconds. Perform such slopes in three approaches.
Exercise twelve. Sitting on the floor, straighten your legs in front of you. Close them together. Stretch your hands forward. Do a few forward bends, touching the tips of your toes with your hands. The legs cannot be bent. The average number of slopes is 10 times. After that, bend forward to the maximum limit and grasp the tips of your toes with your hands. Hold on for 30 seconds in this position. Repeat the exercise from the beginning. The break is one minute.
There are many training programs and methods for performing exercises for stretching the legs. We present to your attention the best of them. Numerous reviews indicate that the stretching program described below is not just harmless to the ligaments. It helps to quickly and effectively stretch the ligaments of the legs.
Note! The main principle of this training program is complication. Performing exercises, each time you need to increase the load more and more. This will provide excellent results.
So, the program we have chosen implies the obligatory performance of two workouts per day.
1. First workout. It should be done in the morning. This workout focuses on the main load. Stretch the ligaments in it to the maximum limit, with the maximum number of approaches.
2. Second workout. It must be in the evening. This workout takes about 10 minutes. It shouldn't be too hard on it. But its implementation is mandatory.
Note! To help yourself, you can freely use dumbbells and other weighting agents in the set of exercises described above for stretching your legs. By increasing your workload, they will become the best helpers on the way to achieving your goal.
Now let's present some useful advice on self-conducting home workouts for stretching the legs.
Workout at home: how to properly stretch the ligaments of the legs with the help of a set of exercises
Based on the advice of experts, we bring to your attention some useful recommendations for training. By following these tips exactly, you can easily protect yourself and your ligaments from various injuries and damage that are so common during Not correct execution leg stretching exercises.
1. Warm up. As mentioned above, warming up before starting a workout is required. He will develop the ligaments well, heat them up, saturate the blood with oxygen.
2. Smoothness. Never make sudden movements. You need to stretch smoothly and slowly so as not to break the muscle ligaments. If the training was correct, then by the end of it you should perform all the exercises of the complex much easier than at the beginning.
3. Time. Ideally, each element of the exercises should take no more than 1-2 minutes. Depending on the shutter speed, this time may vary up or down.
4. Voltage. In no case do not allow it in your workouts. When stretching, the body should be relaxed. If the muscles are tense, they will not stretch.
5. Posture and legs. Always keep your back straight. Posture must be perfect with the correct execution of exercises for stretching the legs. The legs should also be mostly straight, apart from special exercises, where knee flexion is indicated (for example, lunges and so on). However, unlike posture, the slightest bending of the legs is allowed in all exercises. This is done to avoid injury.
We have prepared for you the best 17 leg stretching exercises that are suitable for both beginners and experienced athletes.
Types of stretching exercises
Exercises for stretching the muscles of the legs can be divided into several types:
| Stretch type | Description |
| Statistical | Especially suitable for beginners, as it is gentle on the muscles. The muscles are stretched, but not tensed. Do such exercises from 15 seconds to a minute. You can train any muscle group. |
| Dynamic | The essence is completely opposite to static. This warm-up is distinguished by dynamics, active actions. Arm raises, leg lunges, body twists. |
| Passive | It differs from static in that it is performed in pairs. Here it is important to feel your body and respond in time to the partner’s actions, prompt him about how hard to press or pull. Such a warm-up allows you to stretch your muscles even better, increase the range of motion. |
| Active | It is in many ways similar to dynamic, but its main difference is independent actions and work with its own weight. Such a warm-up often acts as an addition to another type of stretching, but it can also be independent. |
| ballistic | This is a specific type, not suitable for everyone. Unlike smooth stretching movements, these exercises are performed rhythmically and intensively - jumps, pushes, sharply and with maximum amplitude. |
When to stretch your muscles: before, during exercise, after exercise?
Jacob Wilson, a sports physiologist at Florida State University, says you need to stretch before your workout. However, this should not be a static form, you need to perform a dynamic warm-up. And after class - stretching to calm the body, bring the pulse back to normal (book "Cardio or Strength" by Alex Hutchinson).
Referring to the same source, you can see that Jason Winchester, a scientist at Louisiana State University, is sure that you should not stretch before exercising. But here is a must. If such exercises are planned, it is good if enough time passes before the main exercises. You can also do them on non-training days.
Warm up before stretching
Experiments on rats at the University of Michigan showed that the muscles must be warmed up before stretching, otherwise they are severely injured. Experts advise warming up before stretching - jogging, cycling to warm up properly (book "Cardio or strength" by Alex Hutchinson).
How and how much to stretch?
Ideally, you need to focus on stretching the legs should take 10-15 minutes. On average, stretching lasts about 10 minutes. Before starting, you should restore the pulse.
Back thigh exercises
Exercises for stretching the back of the thigh can be performed using additional items. And also lying down, standing or sitting. Here is the list of exercises:
You need to lie on your back and raise your leg. Throw a rope, expander or rope on the foot and pull the foot towards you. The same must be done with the other leg.

Standing stretch

Leaning towards the legs
Stand up straight and put your hands on your waist. Take a step forward and bend your body down. The back should remain straight. If you bend your leg at the knee, it will be tense Bottom part hips, and if the legs are straight, the back of the thigh is tensed.

Tilt to one leg
Sit on the floor and stretch your legs out in front of you. One leg must be bent at the knee and rest the foot on the thigh of the other leg. Grasp the foot of the outstretched leg with your hands, stretch forward and pull the sock towards you. You can't arch your back. Repeat with the other leg.

Standing bends
You need to stand up with your legs wider than your shoulders. Lower yourself down, keeping your back straight. Hands rest palms on the floor. The toes of the feet point forward, as do the fingers.

Longitudinal twine
It is necessary to sit on the longitudinal twine and place your hands on the sides, resting your fingers on the floor. The weight of the body must be transferred to the hands. No need to turn the hips and shoulders to the sides.
Exercises for the inner thigh
There are several exercises for stretching the inner thigh. Performed lying or sitting. Each one is worth trying:
Deep squat
You need to sit down to a rack or simulator so that when you squat, grab this projectile. Turn your knees and toes outward. The squat is performed with a straight back.

"Butterfly on the Wall"
You need to sit on the floor, bend your knees and press your feet to each other. Now try to keep your back straight and lower your knees to the floor. But don't pressure them.

"Frog"
It is necessary to lie on your stomach, spread your legs to the sides and bend them at the knees at an angle of 90 degrees. In this case, the socks look to the sides. Try to lower the pelvis as low as possible to the floor. Great if you can completely put the pelvis on the floor.

"Frog with a straight leg"
We lay down on the floor with our stomach, spread our legs and bend one at the knees, and stretch the other. The thighs should be parallel to the floor. Try to lower your pelvis to the floor. Repeat with the other leg.

Fold forward
It is necessary to sit on the floor and spread your legs to the sides as wide as possible. Toes point up. Now you need to lie on your stomach, stretching your arms forward with your palms resting on the floor.

Cross twine
Spread your legs out to the side cross twine. The pelvis should be on the same level with the knees and feet. With a good stretch, you can put your hands in front of you, elbows on the floor. Aim to pull the pelvis towards the floor in this position.
Stretch next to the wall
You need to lie on your back close to the wall. So that the legs are spread to the side as wide as possible and pressed against the wall. The legs will drop under their own weight. Toes point down. You need to stay in this position for 5-10 minutes.

Exercises for the outer thigh
Exercise near the wall can be performed even by untrained people. And what is done while standing requires some preparation. But at the same time, the press also swings. How to perform exercises for stretching the outer thigh, see below:
Hip abduction
Sit sideways near the wall and rest your palm on the surface. Cross your legs and sit down. The leg brought back should slide down without bending at the knee. Keep your body straight. Now on the other leg.

Standing stretch
Cross the legs in a standing position, one hand on the belt, and the other freely lowered down. It is necessary to lean towards the lowered hand. You can bend over with your arms raised above your head. The abdominal muscles also heat up.

Calf exercises
These are simple and enjoyable exercises that you can do without having enough developed muscles. It takes at least 5-6 repetitions of each exercise to stretch the legs.
Stretch after warm-up. So you can deepen the stretch without injuring the muscles and ligaments.
Warm up before stretching
When you stretch after a workout, the muscles are already warmed up and no additional warm-up is required. If you decide to arrange a separate stretching lesson, first do a few exercises:
- Joint warm-up: twist the joints, make tilts and turns of the body.
- 5-7 minutes of cardio: running or jumping jacks, rock climber, running in place with high knees, .
After you warm up a bit, you can start stretching.
How and how much to stretch
With the help of these exercises, you can arrange an independent stretching lesson and stretch all the muscles of the body well. However, this will take about 60-90 minutes. For a quick stretch, choose one or two exercises for each muscle group involved in the workout.
To stretch your muscles well, linger in each pose for 30 seconds to two minutes. You can remain still or gently bounce. Sudden movements are fraught with injury, so leave them for another sport.
We will give exercises for stretching from top to bottom: neck, shoulders and arms, chest and back, abs, buttocks, hips, shins.
Neck Stretching Exercises
Tilt your head back, stretching the front of your neck. From this position, tilt your head to the left. For greater effect, place your left hand on the right side of your head, but do not press hard.

Place your right hand on the left side of your head. Tilt your head forward and to the side, increase the pressure with your hand.
Repeat on the other side.

Place one hand on the back of your head and the other on your chin. Lower your head by doing double chin. At the same time, the neck remains straight, the back of the head tends upward. You should feel it at the back of your neck, especially at the base of your skull.
Shoulder Stretching Exercises
4. Stretching the front of the shoulders

Put your hands behind your back, grab your wrist with the other with one hand. Bend your elbows and lift your wrists higher. Push your chest forward and feel the stretch in the front of your shoulders.
5. Stretching the middle part of the shoulders

Grasp the opposite elbow with your hand, press your shoulder towards you and pull it down. Repeat with the other hand.
6. Stretching the back of the shoulders

Grasp the right hand with the left above the elbow, press it to the body and straighten it, lower the right shoulder down. With your left hand, pull your right hand up, lifting it with your elbow. Feel the tension in the back.
Repeat with the other hand.
7. Triceps stretch

Go to the wall, lift your left elbow up, put your forearm behind your back. Lower your left shoulder blade down. To check that it has really dropped and will not rise during the stretch, place your right hand below your left armpit.
Repeat on the other side.
8. Biceps stretch

Grasp the door handle, rack or other support, turn your back to it. Turn your arm with your elbow up and move the body slightly forward.
Repeat with the other hand.

This pose allows you to simultaneously stretch the triceps of one arm and the front of the shoulder of the other. Bring one hand behind your back from above so that the elbow looks up, and the second from below - the elbow looks at the floor. Try to connect your wrists at the level of the shoulder blades.
Change hands.
10. Wrist extensor stretch

Sit on your knees, put your hands in front of you so that the backs of your hands touch the floor, and your fingers are pointing towards each other. Gently shift your weight onto your hands, stretching your forearms. To enhance the effect, try clenching your fists.
Chest Stretching Exercises
11. Stretching the chest in the doorway

Come to the doorway, lean on the jambs with your elbows and push your chest forward, pectoral muscles.

Put your hand on the wall, lower your shoulder and turn around in the opposite direction. Repeat with the other hand.
Back stretching exercises

Stand next to a rack, simulator or other support, turn your left shoulder towards it. Grab a stance high above your head with your right hand, tilt your pelvis to the right and down, stretching the entire right side of your body.
Repeat on the other side.
14. Stretching the muscles of the lower back

Sit on the floor, move your right leg forward, left leg back. Bend your knees at a 90 degree angle or slightly more. Place your right hand on the floor, raise your left hand above your head. Pull the left leg down and back, tilt the body forward and twist to the side right foot.
Change legs.

Sit on the floor, bend your knees and place your feet on the floor. Grab your shins with your hands inside, put your wrists on your feet. Lean forward as low as possible.

Sit on the floor with your buttocks touching your heels. Bend forward, lie on your knees with your stomach and stretch out your arms.

Get on all fours, then tilt your pelvis back and up so that your body looks like an angle. The arms and back should be extended in one line, the knees can be bent, and the heels can be torn off the floor. The main thing is that the back remains straight, without rounding in the lower back.

Grab a low horizontal bar and hang freely, relaxing your body. Feet must remain on the ground. Relax them, slightly bend your knees.

Lie on the floor on your back, arms along the body, legs straight. Raise your legs and then throw them over your head. Hands rest with elbows on the floor, hands support. Do not lean on the neck, the fulcrum is the shoulders.
Stretching exercises for the press

Get on your knees, push your chest up, lengthening your spine, and then lean back with your hands on your heels. Try to bend over thoracic region. Do not throw your head back, look up.

Lie on the floor on your stomach, put your hands under your shoulders. Push yourself up, the pelvis rises, the legs remain on the floor. Lower your shoulders, bend in the thoracic region.

Stand up straight with your feet together. Raise your arms and join your palms above your head. Bend in the thoracic region and tilt the body back. Tighten to eliminate a strong deflection in the lower back.

Stand up straight, raise your arms above your head, interlock your fingers and turn your palms up. Stretch up and lean first to one side and then to the other side.

Lie on the floor on your back, spread your arms out to the sides, palms down. Move your pelvis to the left, lift your left leg, bending it at the knee, bring it behind your right leg and try to put your knee on the floor. Turn your head to the left and relax.
Repeat the exercise on the other side.
Butt Stretching Exercises
25. Lying stretch

Lie on the floor on your back, raise your legs bent at the knees. Place the ankle of the left foot on the knee of the right. Press the knee of the right foot on the left to deepen. Repeat with the other leg.

Get on all fours, put the ankle of the right foot on the knee of the left. Push your pelvis back to deepen the stretch. Repeat with the other leg.
27. Sitting stretch

Sit on the floor, stretch your legs forward, straighten your back. Bend one leg at the knee, grasp the shin with your hands and press it to your chest. The lower leg should be parallel to the floor, the forearms lie on top and press it to the chest, one brush covers the other.
Repeat with the other leg.

Sit on the floor, bend one leg at the knee at a right angle and move forward, take the other back and straighten. You can lean forward and place your forearms on the floor.
If you find it difficult to perform this pose on the floor, try placing your foot on a raised platform.

Stretching exercises for the front of the thigh

Calf stretching exercises
48. Stretch against the wall

Rest the toe of your right foot against the wall, take your left foot a step and a half back. The feet are firmly pressed to the floor, the left leg is straight. Try to reach the wall with your right knee, while the muscles of the left leg will be stretched.
Change legs.

Stand close to the wall. Put your right toe on the wall, take your left foot a step and a half back. Bend your left leg at the knee, increasing the stretch. Change legs and repeat.

Sit on the floor, stretch your straight legs in front of you. put one foot on the thigh of the other. Grasp the foot with the opposite hand and pull the sock.
Change legs.


