How to build back muscles at home without exercise equipment. The best basic exercises to strengthen the back and abdomen Workout the back and side muscles of the press
As you understand, in the subacute period, we perform the most simple and lightweight exercises, lying on our backs and with a flat pillow under the lower back.
Look at the video examples of such exercises.
Do you think that in this case the press does not work?
It is through his work that such therapeutic exercises!
This is how we first turn on the press - from the very simple exercises. An important condition is that we include such exercises so far only in the main part of the complex, alternating with other unloading exercises.
Usually 4-5 days are enough to move on to other therapeutic exercises for the press. At this stage, we continue to do exercises in unloading positions, but not only lying on our backs, but also lying on our stomachs, standing on all fours.
How to complicate the load on the press and not overdo it?
An example of exercises for the press with increasing load: lifting both legs, bent at the knee and hip joints, initially without the participation of the pelvis. Later we complicate - we begin to raise bent legs already with the pelvis.
In parallel with this, we connect the back muscles to work, performing therapeutic exercises while lying on the stomach.
Here is an example of a mini-complex for the abs and back muscles at this stage.
Of course, do not forget about the warm-up and cool-down in order to properly prepare the body for work and properly relax it after completing the main complex.
Later, you need to diversify the exercises, combine exercises for different muscle groups of the corset, using different starting positions. So you gradually strengthen all the muscles of the body.
Then the press and strong back muscles will take on household loads and evenly distribute them among themselves, unloading the spine and keeping it in a healthy state.
Such a scheme will be safe and at the same time effective.
It was according to this scheme that I built my phased
All sets of exercises in the program are divided into four stages:
- The first stage - the subacute period - all exercises are only strictly lying on your back, combined with relaxing and breathing exercises
- The second stage - strengthening the anterior abdominal wall and "helpers" of the lumbar region - exercises for the transition period and preparation for the third stage
- The third stage is the strengthening of the muscular corset - exercises to work out all the muscle groups of the corset. They are distributed so as not to create a large load on the lower back, but also gradually strengthen and restore it.
- The fourth stage - stabilization of the spine - exercises in a standing position, in an inclination, on balance in combination with unloading. When you have strengthened and restored the balance between large muscle groups, you can work on the small muscles that stabilize the spine.
IN this moment time for my subscribers there is a special discount for this program. You can get acquainted with its detailed description by clicking on the link below on the page and take the opportunity to purchase the program at a special price.
And another important condition!
It is very important to combine exercises for the press and back muscles with unloading exercises. All exercises in medical complexes programs "Secrets of a healthy lower back" are combined with each other so as not to overload the muscles and at the same time the work was effective.
This concludes today's lesson. In the next lesson, we will talk about communication bad posture and lumbar osteochondrosis. It will be interesting!
See you soon!
effective strength training, experts assure, can be carried out both with the use of simulators and without them. What is the difference? “By exercising with free weights, we involve not only the target muscles in the work, but also connect the small muscles-stabilizers,” comments Lyubov Orekhova, head of the sports department, personal trainer, group program instructorcityFitness— Dobryninskaya.
This is a plus for those who want to get "cubes" as soon as possible. And a minus for those who are new to fitness. “Since we don’t have a fixed body position and we need to maintain balance when doing exercises, it’s more difficult, so it’s not recommended for beginners to start with free weights,” says Lyubov Orekhova. - Better master the technique of execution strength exercises in the trainers.
Free weight training is considered more beneficial for those whose goal is to lose weight or make muscles more voluminous. "The more different groups muscles work, the more energy is spent in one workout, that is, you lose weight faster, explains Irina Terentyeva, instructor Club World Gym - Krasnodar. “And as a result of training with free weights, muscles develop and respond faster due to greater stress than when working on simulators.”
Exercise machines are also considered safer than free weights. “If a person has health problems, in particular, with the spine (protrusions, hernias), then axial loads are not recommended for him. Then he can perform exercises on the same muscle groups in simulators. For example, platform leg press while lying down. In this exercise, there is no axial load on the spine, but the muscles are worked out the same as in squats, where there is an axial load, ”adds Lyubov Orekhova.
The difference is that to train a muscle group in simulators, you may need several different exercises, and with free weights - just one. For example, to work out the front and back of the thighs with dumbbells, only lunges are enough. Do you want to pump these muscles in the simulator? Have to do two different exercises- extension and flexion in simulators. In practice, this means a longer session compared to training in the free weight zone.
How to combine training with free weights and machines
It all depends on your level of training, health status and goals. Beginners are encouraged to use the simulators. “The longer a person works out, the more difficult his exercises can be: for example, no longer in simulators, but with free weights,” says Lyubov Orekhova.
Therefore, more experienced fitness athletes can gradually “switch” to free weights. It is permissible to build a training program like this: work out the muscles of the legs with free weights, and the back - using simulators.
All major muscle groups - legs, back, abs, arms - can be worked out both in simulators and with free weights. What to choose for this exercise, shows Lyubov Orekhova.
Leg exercises
Recall: working with free weights allows you to load several muscle groups at once, while in the simulator each of them will have to be pumped with separate exercises.
Without equipment: lunges with dumbbells
Stand up straight, take dumbbells in your hands, place your feet hip-width apart. Step your left foot back, lean on the floor with your toe. Bend your knees to a right angle, lower yourself into a lunge. Do not bend in the lower back, do not bring the right knee beyond the projection of the foot. Then slowly straighten up. This will make one repetition. Perform the same number of them on each leg.
In the simulator: bending the legs lying on the stomach
Lie with your stomach and chest on the simulator, fix the body so that the fasteners for which you will pull the weight fit snugly on your ankle. Slightly turn your legs so that the heels come closer to each other. Bending your knees, gently pull the weight towards your body. Then lower your legs back (but keep them slightly above parallel with the floor). Work rear surface thighs and gluteal muscles.
In the simulator: leg extension in the simulator
Sit on the simulator, grasp the support handles with your hands. Fix the feet under the rollers, press the lower back against the back of the simulator. Extending your knees, gently lift your legs forward and up. Work on the front of your thigh.
Exercises for the muscles of the hands
In this group, we have collected exercises that pump not only the muscles of the hands, but also the muscles of the shoulders.
Without a simulator: triceps extension
Stand up straight, take dumbbells, lower your arms along the body. Lean your body forward slightly, do not arch your back. Lock your forearms in one position. Bend your elbows to a right angle and pull the dumbbells closer to the body. From this position, gently straighten your elbows, pulling the dumbbells back. Then return to the starting position. This is one repeat.
Without a simulator: delta breeding
Stand up straight, take dumbbells, lower your arms along the body. Gently spread your arms to the sides to shoulder level, do not unbend your elbows completely. Then lower your arms with dumbbells to the starting position (closer to the pelvis). This is one repeat.
In the simulator: biceps curl
Stand up straight, facing the machine, grasp the handle of the lower block with both palms reverse grip. Bending your elbows, pull the handle towards you (approximately to chest level). Work your triceps. Then slowly lower your arms to the starting position (do not fully extend your elbows). This will make one repetition.
In the simulator: extension with a rope handle
Clip on top block rope handle. Stand facing the simulator, grasp the edges of the handle with your palms. Press your forearms and bent elbows closer to your body. Extending your elbows, pull the handle down to the level of your hips. Work your triceps. Then slowly return to the starting position (elbows bent). This will make one repetition.
Back exercises
We asked Lyubov Orekhova to show us basic movements involved in the work mainly upper part back and latissimus dorsi.
Without a simulator: reduction of the shoulder blades
Stand up straight, take dumbbells, lower your arms along the body. Lean your body forward slightly. Bringing the shoulder blades and bending the elbows, pull the dumbbells closer to the stomach. Then slowly lower your arms down. This will make one repetition.
In the simulator: thrust of the horizontal block
Sit on the simulator, rest your feet on the support platforms (knees straight), grasp the handle with your palms. Bending your elbows, working the muscles of your arms and back, pull the handle to your belt. Slowly return to the starting position by straightening your elbows. This is one repeat.
Exercises for the abs
There are many types of twists on the press, which allow you to effectively pump this area without simulators. We will show only one - the basic - option with a weighting agent.
Without a simulator: twisting with dumbbells
Lie on your back, take a dumbbell in your hands. Bend your legs into hip joint and lift your feet up. Stretch your arms with a dumbbell up. Lifting your shoulder blades off the floor, gently twist your body forward and up. Work your abdominal muscles, do not strain your neck. Then slowly lower your body onto the mat. This will make one repetition.
With the simulator: hanging leg raises
Stand on the platforms of the simulator, press your lower back to the back, grasp the handles with your palms, place your forearms on the upper support platforms. Lower your legs down and "hang", leaning on your hands. Working with the abdominal muscles, gently lift your legs up to parallel with the floor. Then lower them down. This will make one repetition.
Combine these exercises in your workout as you see fit. The number of repetitions and approaches depends on your goals (do you attend workouts for weight loss, for gaining muscle mass or to increase strength).
How to properly divide workouts into muscle groups
There is a split (when we separate workouts “by day” and muscle groups) and full body (we pump the whole body in one workout). For fans of the second method, the question “how to properly alternate workouts for muscle groups” is irrelevant.
But if you have chosen a split approach, then pay attention to the following recommendations of trainers.
* Consider the frequency of training. Do you go to the gym twice a week? Then, at each lesson, work out 3-4 muscle groups (for example, day 1 : legs, lower back, chest, triceps. Day 2 : shoulders, upper back, biceps).
For those who work out three times a week, 2-3 muscle groups can be pumped at each workout. For example, day 1 : legs, lower back, shoulders. Day 2 : upper back and biceps. Day 3 : chest and triceps.
* The press can be combined on the same day with any muscle groups.“I recommend doing abdominal exercises at the very end of the session,” says Lyubov Orekhova.
* You should not combine chest training with shoulder work on the same day. So you overload the deltas, because of which you will not be able to work out the shoulders to the right extent.
* When combining a biceps or triceps workout with other muscle groups, do arm exercises at the very end of the session. Because, by overloading the muscles of the arms at the beginning of the workout, you risk not finishing in the rest of the exercises (if we are not talking about squats, lunges, and other movements for the lower body).
Read more about how to build a leg, arm and back workout in, and articles.
Whatever activity you choose, don't forget to stretch your muscles before and after your workout. This will protect you from injury.
Learn how to effectively train your abs and back and turn them from weaknesses into strengths.
If the abs and back are your weak points, then the FST-7 workout is what you need, thanks to which these muscle groups will receive maximum load, during which not a single moment will be missed.
The abbreviation FST-7 itself is “fascia - stretching - training”, and the number 7 is the final number of approaches and repetitions in the very last exercise. The main task of such a training scheme is micro-ruptures of a special shell, consisting of connective tissues, which is located around muscle fibers. These very micro-ruptures of the connective tissue are obtained due to their large filling with blood, thanks to the superpower.
Further I will explain in simpler words - the main result of the FST-7 training will be an increase latissimus dorsi back and creating a truly athletic torso. In addition, the exercises for the press will go first, it's like preparing the body for hard work on the back. For your attention, to achieve this goal, 5 main exercises for the back and 4 for circular method for the press.

TrainingFST-7 for back and press
Train the press by the method, that is, 1 approach of each exercise is performed, then a rest of 1 minute comes and 2 approaches are performed - 1 minute of rest and 3 approaches.
If you feel that your forearms can’t stand it and the barbell slips out of your hands, which does not allow you to pump your back muscles normally, use them, they will remove some of the load from your forearms and emphasize the load on your back.

BLOCK ROD TO BELT SITTING- to perform this exercise, the back muscles are already well engorged with blood, including the lower back, so 3 approaches will be enough to perform the block pull without using partial repetitions.
When performing the exercise, make sure that when pulling the block to the belt, it touches the body, the elbows move as close to the body as possible, the shoulder blades come together, when lowering, slightly relax the back slightly rounding it to further stretch the widest.
UPPER ROW WITH STRAIGHT HANDS- the last exercise for the final study of the back, in it pay utmost attention to the execution technique, when the block pulls up, the chest drops to the bottom, only in this way the widest will receive good stretch for the subsequent powerful reduction. Do not forget that the rest between the trips of this exercise is 45 seconds, this will allow you to “hammer” the muscles of the back as much as possible, bringing them to muscle through a wonderful pumping.
Conclusion
You can modify the workout by replacing similar exercises that train the same muscles, the full list of exercises is.
The FST-7 back and abs workout should not be done all the time, enter it into training process as pumping up the back and the press, under the condition of their weak development or periodically, in order to break through stagnation in the muscles for further growth.
If you train constantly according to this scheme, under the condition of malnutrition and insufficient rest, over time the muscles can be overtrained, which will cause a decline in strength and energy and will affect the effectiveness of the entire training process.
This is a standard ab exercise. It is during the execution of twists that the rectus muscle is included in the work. abdominals(she is responsible for the cubes on the stomach), the pectoralis major muscle, the external and internal obliques, as well as the transverse abdominal muscles.
Performance. Keep your middle and lower back pressed into the floor. This way you avoid engaging the hip flexors. Try to keep your hands at your temples, do not stretch your chin and neck up. The abdominal muscles should lift you. On the rise, you should exhale deeply, inhale - in the lower position.
Do three sets of 30 reps.

This exercise is aimed at working out the lower press (abdominal part). Muscles involved in this exercise: iliopsoas, tensor fascia lata, sartorius, rectus femoris, adductor longus and brevis, pectineus, rectus, oblique and transverse abdominis, quadriceps.
Performance. Lie on the floor, stretch your arms along the body and press to the floor. Raise your legs off the floor and perform crossing movements. During the exercise, make sure that the lower back is pressed to the floor. The lower the legs are lowered, the greater the load on lower press. If you find it difficult to keep your legs at this level, raise them a little higher. If you feel your lower back lift off the floor, raise your legs a little higher. Make sure your legs are straight.

This exercise is also aimed at working out the lower press (abdominal part). Muscles involved in this exercise: iliopsoas, tensor fascia lata, sartorius, rectus femoris, adductor longus and brevis, pectineus, rectus, oblique and transverse abdominis, quadriceps.
Performance. Lie on the floor, stretch your arms along the body and press to the floor. Raise your legs off the floor and perform walking movements with a small amplitude. Socks should be pulled over, the lower back pressed to the floor. The lower the legs are lowered, the greater the load on the lower press. If you feel that your lower back is off the floor, lift your legs a little higher and fix this position. Make sure your legs are straight.
Do three sets of 30 seconds each.

During this exercise, the rectus abdominis, external oblique, quadriceps and tensor fascia lata (thigh muscles) work. This exercise is more aimed at burning fat, and not at working out the relief.
Performance. Lie on the floor, raise your legs bent at the knees (the angle should be 90 degrees), stretch your arms in front of you. Raise your upper body towards your knees, reaching forward with your arms. On the rise, exhale, in the lower position - inhale. Try not to tear your lower back off the floor and do not lower your legs. Make sure that the chin is not pressed against the neck.
A simpler version of this exercise is to cross your arms and lie on your chest. More complex - the hands are behind the head or are at the temples.
Do three sets of 10 reps.

During this exercise, the main load is directed to the oblique muscles of the abdomen, but the rectus abdominis, quadriceps and tensor fascia lata (thigh muscles) also work.
Performance. Lie on the floor, put your hands behind your head, bend your knees. The feet should rest on the floor. Perform a twist in which the right elbow reaches for the left knee to the middle of the thigh, and the knee approaches the elbow. During the exercise, try to raise the upper body so that the shoulder blades come off the floor. The lower back should be pressed to the floor. Don't tuck your chin into your neck or pull yourself up with your hands. When twisting, exhale, in the starting position - inhale.
The closer the feet are to the pelvis, the greater the load.
A simpler version of this exercise - the non-working arm is extended to the side (forms with shoulder girdle straight line) and pressed to the floor. This will give you extra support while twisting.
Do 30 reps on each leg.

During this exercise, the rectus abdominis, external obliques, internal obliques, transversus abdominis, as well as the muscles of the legs and buttocks (gluteus maximus) work.
Performance. Lie on the floor, put your hands behind your head. Start doing leg movements like you are pedaling a bicycle. At the same time, lift your upper body, trying to tear your shoulder blades off the floor. Alternately stretch your right elbow to your left knee, your left elbow to your right knee. The exercise can be performed at any pace. Try not to press your chin to your chest and do not pull your head up with your hands. Remember to breathe properly: exhale should fall on each twist.
Do three sets of 20 reps.

During this exercise, the core muscles are included in the work (the rectus and transverse abdominal muscles, the extensor of the back, the trapezius muscle, biceps and pectoral muscles), buttocks and leg muscles (thighs and calves).
Performance. Get into a plank position on your forearms. The elbows should be located exactly under the shoulders, the stomach is pulled in (the navel is pulled up to the coccyx), the back is even (there should be no deflection in the lower back). In this position, swing with a small amplitude. When moving forward, the shoulders should be in front of the elbows, and when moving back, be behind the elbows. Make sure that the back with the legs constantly form a straight line (without deflections or, conversely, arches in the lower back).
Do the exercise for one minute.
You can watch the full video with all the exercises.
The lower back aches, it is difficult to bend over, the vertebra clicks? All these are signs of a neglected back. Weak muscular corset cannot support the spine and internal organs so there is pain. Exercises to strengthen the back muscles will relieve problems and become an effective prevention of spinal diseases.

Exercises for the back differ from others in the degree of risk. If you injure your back, then due to the displacement of the support, the spine will be overloaded, organs and blood vessels will be squeezed, and this will immediately affect the functioning of the brain.
Before performing the complex, you need to go to the doctor. X-ray and consultation is the minimum that needs to be taken care of.
The safety precautions when doing exercises to strengthen the back are as follows.
- Slow movements. Your task is not to make the complex as quickly as possible, but to feel the work of the muscles as much as possible.
- Forget jerks. Sharp lunges, twisting and tilting transfer the load on the articular-ligamentous apparatus.
- Progress through more repetitions or complication. Exercises with dumbbells are shown with a strong back. Weak muscles will not be able to lift the weight, so the legs, arms, and abs will be more involved in the work. The complex will cease to be targeted and disperse throughout the body.
- Follow your well-being. Stop exercising if you experience discomfort. Overcoming yourself through pain will only harm your body.
- Don't exercise on a full stomach. Do exercises before meals or after 2 hours.
The complex is performed every day. Set aside half an hour in the morning and evening for this. A couple of your favorite exercises can be done every hour as a warm-up for the back.
Watch your breath! It must be even. We strain the muscles on the exhale, relax on the inhale. This is an indispensable condition for the effectiveness of the entire complex.
Before class, put a special gymnastic rug on the floor or folded 3-4 times. This will soften the shocks and remove excess stress from the vertebrae.
Who is contraindicated for back exercises?

The training complex is not designed for everyone. There are precautions.
You should not do spinal strengthening exercises if:
- there is a spinal injury;
- recently had an operation and the sutures did not dissolve completely;
- there is a period of exacerbation of a chronic disease;
- there is bleeding;
- there are problems with the kidneys, lungs, heart or blood vessels;
- You are pregnant.
Still want to work on your back? Make an appointment with an orthopedic doctor. He will advise the safest exercises for you from the repertoire of physiotherapy exercises.
Preparing for a workout
A good warm-up is the key to a safe workout. Unheated muscles and ossified joints can cost you your health. Special attention give a warm-up in the morning, because before that the body was motionless for a long time.
How to do a warm-up?
- Let's wake up the body. Run in place or jump. Now you need to wake up and make your heart work faster.
- We develop joints. Rotate your joints different sides starting from the top. We knead the foot like this: slightly bend it in the middle with your fingers back until slight discomfort. Rotations are bad for the neck. We replace them with slopes 10 times in four directions.
- We stretch the muscles. Stretch slightly to the sides so that the muscles become elastic and receive blood flow.
A set of exercises for the back
The system is designed for medium and First level fitness. Exercise at home without weights. Do up to 15 repetitions, the number of approaches: from 1 to 5, depending on the level of fitness.
Bridge hips
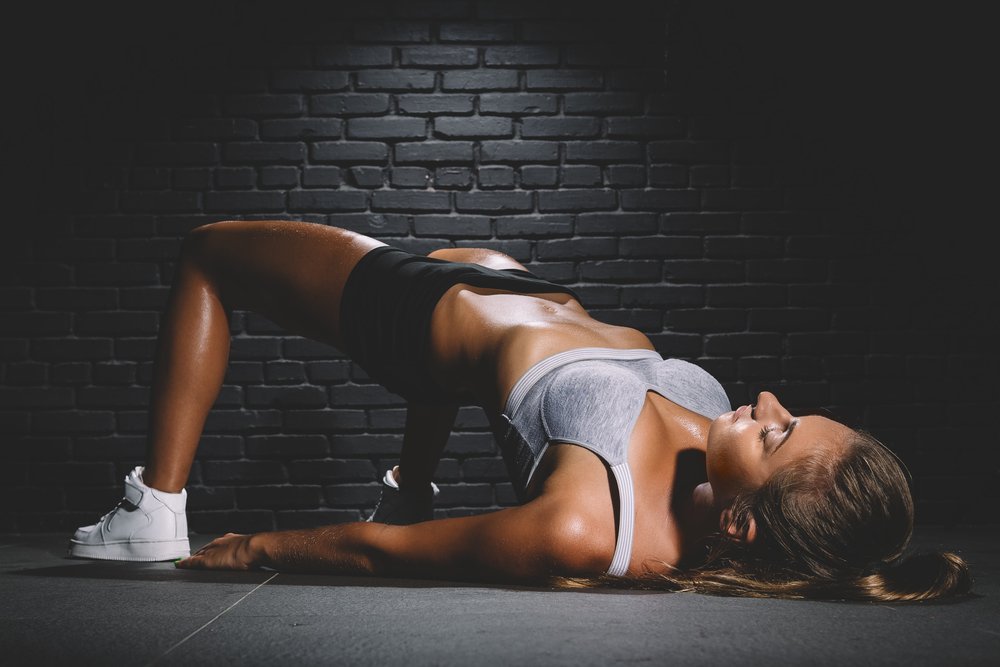
Often it is recommended for people with a weak supporting apparatus: correct execution involves muscles more than ligaments and joints. Training removes lumbar pain by strengthening and stretching the muscles of the back. The buttocks, abs and hips are also included in the work.
How to perform?
- Lie on the floor with your knees bent. The arms are extended along the body, and the back is firmly pressed to the surface.
- On the exhale, we tighten the buttocks and raise the pelvis up until the hips and chin can be connected in a straight line. The lower back is slightly rounded so as not to overload. The primary movement is made by the pelvis, not the back.
- As you inhale, relax your muscles a little and go down.
Keep your muscles tense at all times. Do not drop your body down, but slowly lower it.
Complicated level: lift the body on one leg, the second at this time is bent and lies on the first leg, the ankle touches the knee.
dog and bird
The exercise involves the whole body, because you have to maintain balance. The buttocks will receive an additional stimulus by raising the legs.
How to perform?
- Get on all fours with your arms and legs at a 90 degree angle to your body. Positioning hands shoulder width apart.
- Tighten the muscles of the body so that the back is absolutely even. The shoulder blades are slightly flattened, the gaze is directed downward.
- At the same time, raise and extend your left arm and right leg. They should be parallel to the floor.
- Slightly linger in a tense position.
- Slowly come back and switch arms and legs.
You can complicate the exercise by taking more time at the point of maximum tension. Isotonic exercise simultaneously trains and stretches the muscles, increasing blood flow. Try to stand with a raised leg and arm for 5-10 seconds, sway slightly, keeping your balance.

One of the most difficult exercises even with own weight. The effect is comparable to training in the gym. It differs from the usual bar by an increased load on one side and a powerful study of the oblique abdominal muscles, which are just responsible for supporting the back and creating a thin waist.
How to perform?
- Lie on your side, leaning on your elbow. The hand is extended forward and pressed to the floor, creating additional support. The second hand lies on the waist.
- Place your legs on top of each other, only one touches the floor.
- Straighten your back and tighten your stomach.
- As you exhale, lift your body off the floor and lift it up. Perfect option- The body is like a straight line.
- Hold the plank position for a few seconds and slowly lower yourself to the floor.
The support goes to the arm and leg. A sagging belly is a problem that can cost your spine health.
For beginners, a plank on the side with legs bent at the knees is suitable. This increases the area of \u200b\u200bsupport, which helps to maintain balance.
The complication is also carried out due to the greater standing in the bar. Hold with a straight back for 10-20 seconds and you won't need dumbbells.
The most difficult option: when lifting the body, we also raise upper hand and leg. They are in a position of 45 degrees relative to the body.

About 90% of people believe that lunges are an exercise for the buttocks. However, this movement involves the whole body, including the back - it holds the body, preventing it from falling over. Most of the load will be received by the lower back and the front surface of the thigh.
How to perform?
- Stand up straight, the legs are medium, hands on the waist.
- Breathing in, take a step forward. The weight is transferred to this foot and placed evenly across the entire foot. Make sure the body is straight. The back leg rests only on the fingers, and the knee almost touches the floor.
- As you exhale, direct your center of gravity to your back leg and straighten your front leg. Return to starting position.
When lunging forward, do not drop the knee of the hind leg to the floor - knee cap fragile. Gently lower your leg and linger one and a half cm to the floor.
Keep your lower back straight, do not touch your leg with your stomach. If it is difficult, then slightly tuck your back forward, the main thing is not to allow the press to sag. Keep your head straight and look forward.
Place your feet shoulder-width apart, not in a straight line. This will make it easier for you to keep your balance and protect yourself from injury.
Fitball stretches
Our back is tilted forward during the day. The lower back is clamped in one position, so it starts to hurt. Fitball exercises compensate for this by creating a backbend and relieving tension.
There are several options for stretching on a gym ball. Consider the two most effective.
Exercise for the deep lumbar muscles.
- Lean on the ball with your lower abdomen. At the same time, the legs are widely spaced, straight and rest on the floor with socks. The arms are parallel to the body.
- As you exhale, lift the body up, straightening your shoulders. Try to reach higher.
- On an inhale, come back.
Bridge on the fitball to strengthen the back muscles.

- Lie back on the ball. At the same time, hands and feet must rest on the floor, maintaining balance. The calves are pressed against the ball.
- Gently roll the ball under your back. The spine is tightly pressed to the fitball, there should be no gaps and unnecessary deflections.
- Try to stay in the bridge for a few seconds.
The exercise is safer than the classic version without gymnastic ball. The muscular corset is formed gradually, without overloads.
Baby pose
The exercise comes from yoga. Great for relaxing after a workout and during the work day. Muscles tense slightly, stretch more. The muscle that straightens the spine and the lower back are most involved. At sedentary work these muscles are contracted 90% of the time, which causes back pain.
When stretched, the intervertebral discs return to their normal position. Excessive pressure from the nerves and blood vessels goes away, and the influx of fresh blood saturates the body with oxygen.
How to perform?
- Get on your knees.
- Lay your body down on your knees and relax. The head rests on the floor with the forehead or temple.
- Stretch your arms along the body without straining them.
- Make sure your shoulders and neck are also relaxed.
- Hold the pose while breathing deeply. As you exhale, relax the muscles one by one from the bottom up: first the feet, then the calves, thighs, etc.
- Slowly return to a kneeling position.
Due deep breathing the abdominal organs receive a light massage. This increases blood flow and improves their functions.
Prevention of back pain
Do not expect sharp pains, take care of your back in advance. All prevention is based on compliance with traffic rules.
- Watch your posture.
- Warm up regularly: our body is not designed for constant sitting.
- Sit with a straight back in an appropriately sized chair.
- Don't get carried away by carrying heavy weights.
- Engage in physical education; for busy people, our complex is suitable for half an hour.
If you have back problems, visit an orthopedic doctor at least once every six months. He will track the dynamics of your condition and help you correct it. healthy back- the guarantee of the health of the whole organism!


