Push-ups from the floor with a high setting of the legs. Push-ups in an inclination - legs above the head and vice versa
Chances are you've done some form of push-up since your PE class in high school, so you definitely know how to do this exercise properly, right? Well, it's quite possible not. Practice shows that most people are terrible at exercises that use body weight, such as push-ups. Simply put, most people simply don't know how to do push-ups. Experienced trainers note that a huge number of people make the same mistakes. Therefore, if you don't want to be like "the majority", you should identify your weaknesses when doing push-ups in order to learn how to do this exercise correctly, with ideal form.
You put your hands wrong
When it comes to doing push-ups correctly, it all starts with proper hand position. Most people place their hands either too wide or too far forward. This puts too much pressure on your shoulders and you don't get the full benefits of push-ups. Make sure your palms are directly under your shoulders, just slightly wider than your chest. This allows you to get a secure footing and not strain your shoulders during the exercise.
You allow your elbows to move in any direction

This is the most popular consequence of placing your hands incorrectly. Also, many people believe in the myth that your body should take the shape of a "T" because your arms should be at a 90 degree angle to your body. It also puts unwanted strain on the shoulders. You should place your hands correctly, making sure that your wrists are neither in nor out, but straight, and your middle finger is parallel to your body. Your elbows should be no more than 60 degrees away from your body so that your body takes on the shape of an arrow rather than a "T".
You lower your head and arch your neck

Many people are so absorbed in doing push-ups that they forget that one of the most important elements of this exercise is keeping a straight back. This leads to a large number of errors, one of the most common of which is lowering the head. People forget that the neck is part of the spine, and therefore, when they begin to feel the heaviness of this exercise, the even neck disappears first. In addition, many people lower their heads so that they feel like they are closer to the floor than they really are. Unfortunately, this only puts extra strain on your neck muscles without benefiting the rest of your muscles. Therefore, you should try to keep your neck in a neutral position, look straight at the floor without looking up.
You let your back sag

As soon as your neck drops between your arms, your lower back sags next. This is an inevitable violation of the correctness of the exercise by those people who do not have enough strength to perform a regular push-up. In particular, we are talking about weak abdominal muscles. If you don't keep a close eye on your form, it can lead to pain in your lower back. Instead of doing more incorrect push-ups, focus on doing fewer push-ups while maintaining proper form.
You raise your hips

A slightly less common mistake when doing push-ups is the tendency to lift your hips up. This is also an attempt to cheat the system, as this movement reduces the load on the abs, making the exercise easier, but it is less likely to lead to injury or back pain compared to the previous mistake. If you are trying to cheat the system, then you are only cheating yourself and just missing out on the opportunity to work on your abs.
You don't move until the very end

This is one of the most common mistakes. People don't do full pushups. They just do easy push-ups without even getting close to the floor, while pretending like they are doing everything fully. But this is far from true. People are fooling themselves first of all when they think that slight bending and straightening of the elbows in the plank is a push-up. This is not that exercise. In fact, strength and endurance are increased exclusively by full-fledged push-ups, slow movements along a full trajectory to the floor.
You are doing push-ups too fast.

The push-ups described above are often accompanied by increased speed. People find that if they use as much momentum as possible to do a few quick push-ups, it will compensate for errors in form. This trend is causing incorrect execution push-ups for many people. People simply forget about technology, and it is from this moment that they begin to have serious problems. To break this bad habit, focus on controlling your body and focus on quality, not quantity.
You Cross Your Legs When You Modify Pushups

If you modify push-ups by doing incline push-ups or kneeling push-ups, for example, you can achieve a much more impressive result. However, if you cross your legs when you do kneeling push-ups, you should stop doing it. Crossing your legs when you're sitting is not ergonomic, so why do you think it's a good idea to cross your legs while you're doing push-ups? The best way to do kneeling push-ups is to keep your legs straight and your toes touching the floor.
You are not using your abs and shoulders 100%.

Everyone knows that push-ups strengthen your chest and triceps, but if that's all you're focusing on, you're underestimating push-ups and also increasing your chance of injury. Push-ups engage almost all of your front muscles, from your quads and abs to your shoulders and chest, as well as your back and glutes to stabilize your body during the exercise. You should also make sure that all the muscles of the body are tense and that no muscle group remains unused.
you hold your breath

The last, but no less important mistake is common to almost all difficult exercises. When people begin to have difficulty performing, they hold their breath and try to overcome the difficult movement. If you are already finishing the set and have used all the resources of your body, then there is nothing wrong with holding your breath. But if you do this throughout the entire set, you are simply not approaching the basic physiology of the exercise. Your body needs a steady stream of oxygen to keep you moving and correct breathing may even allow you to do better with the exercise.
Benefits of Proper Execution

Yes, push-ups are far from the easiest exercise, but when you bring your form to perfection, you will quickly begin to strengthen the muscles of the chest, shoulders, and with them the triceps, all with the help of one exercise that does not require any equipment. What's more, the abs are also strengthened, as you need to constantly maintain a perfect plank throughout the entire set. As tempting as it is to relax and forget about form, it's better to do fewer reps with perfect form than more reps with bad form.
To keep progressing, it's important to keep up the intensity of your workouts by learning new exercise variations and moving away from what you're already used to.
This does not mean that you need to replace push-ups with another exercise. Just try others - this will be a real test for the muscles and ensure rapid progress.
If up to this point you have always done only classic push-ups, Lifehacker will help you translate your workouts into new level. The push-up complex below will make your pecs beg for mercy.
1. Classic push-ups (warm-up)
Get into a high plank position with your hands under your shoulders. Begin to lower your body, keeping your back straight, until your chest touches the floor, and then straighten your arms, returning to the starting position.
Do this exercise as a warm up. Do 3-4 sets of 12-20 reps.
2. Push-ups with a wide setting of hands

These push-ups are performed in the same way as the classic ones, only the hands are placed not under the shoulders, but slightly wider. By spreading your arms wider, you remove part of the load from the triceps and transfer it to the pectoral muscles.
If that's too easy for you, try spreading your arms as wide as you can and, keeping a slight bend in your elbows, do push-ups from that position. The wider you put your hands, the more load will be transferred to the pectoral muscles.
3. Push-ups with cotton

Starting position - as in classic push-ups. You gently slide down and then push yourself up sharply, lifting your hands off the floor and clapping your hands under your chest. After the clap, land in the starting position.
A sharp exit from push-ups provides for the muscles of the chest, and this The best way spur stalled progress.
Do 3-4 sets of 8-12 reps.
Before the exercise, be sure to warm up and stretch your wrists: a sharp load when landing on “cold” muscles can lead to injury.
4. "Diamond" push-ups

This exercise is the opposite of push-ups. wide staging hands Here you put your hands close to each other, so that the fingers touch each other. During push-ups, the elbows should move close to the body.
If you can't do this exercise, first try placing your hands under your shoulders and doing classic push-ups, but keep your elbows close to your body. When you feel comfortable doing such push-ups, you can move on to the “diamond” ones.
During the "diamond" push-ups, more load goes to the triceps. It is best to do them after wide-arm push-ups to give a rest to the loaded pectoral muscles.
5. Push-ups with arms raised

Stand facing a bench or other platform. Place your hands on the edge of the bench (not under your shoulders, but slightly wider) and perform standard push-ups, trying to keep your body straight.
Due to the position of the body with an elevated top this exercise provides more stress on lower part chest muscle.
If these push-ups seem too easy for you, try push-ups with a tilt of the body on the rings. Feet on the floor, hands on rings fixed at a distance of half a meter from the ground. During such push-ups, you make an effort not only to lift the body, but also to maintain balance on unstable rings. As a result, the pectoral muscles are loaded much more strongly.
6. Raised Leg Pushups

Place your feet on a bench or other platform and your hands on the floor. In this position, perform regular push-ups.
As in the previous exercise, due to the position of the body, the load is shifted, but this time - by upper part pectoral muscles.
Do 3-4 sets of 12-20 reps.
Completion
The final exercises will help you increase muscle hypertrophy.
Choose the most difficult type of push-ups for you and do as many repetitions as you can until muscle failure. Then rest for 30 seconds and repeat again.
And do not forget about rest: intense training should alternate with a recovery period.
Friends, welcome! Today we will look at the well-known push-ups at a new angle, namely, push-ups at an angle up.
On the calendar 21 February, Wednesday, which means it's time for a technical note on the ABC of Bodybuilding. And today we will talk about push-ups at an angle up. After reading, you will learn all about the muscle atlas, the benefits and technique of performing the exercise, and we will also find out the degree of its effectiveness and analyze some practical points.
So, take your seats in the auditorium, we begin.
Push-ups at an angle up. What, why and why?
Analysis of exercises intended not only for the gym, but also for performing at home - these are the goals of our technical notes. The gym is good, but sometimes situations arise when it is clearly not up to it, but you don’t want to be a “vegetable” at all. And that's when 4 -x wall training comes to the rescue. Push-ups at an angle up are somewhat easier to learn / perform, also it does not flatten (as it does horizontal push-ups) chest, but lifts it, and thirdly - and that's enough :).
Well, let's take a closer look at push-ups at an angle up.
Note:
For better assimilation of the material, all further narration will be divided into subchapters.
Muscular atlas
The exercise belongs to the class of basic / compound and is aimed at working out the chest.
The muscle ensemble includes the following units:
- targeted - pectoralis major (sternal head);
- synergists - pectoralis major (clavicular head); front delta, triceps;
- dynamic stabilizers - biceps (short head);
- stabilizers - straight, oblique and serratus anterior, pectoralis minor, quadriceps, gastrocnemius / soleus muscles;
- antagonists of stabilizers - extensors of the back.
A complete muscle atlas is the following picture:

Advantages
By performing the push-up exercise at an angle up, you can expect to receive the following benefits:
- accentuated effect on the bottom of the chest;
- development of strength and endurance (mainly sternal/bottom);
- improvement of breast stretching;
- breast lift (relevant for women);
- strengthening the muscles of the upper shoulder girdle;
- elimination of breasts;
- improving results in bench press exercises - at an angle down.
Execution technique
Push-ups at an angle up are exercises entry level difficulties. The step-by-step execution technique is as follows:
Step #0.
Come to horizontal bench, rest your hands (palms) on its edge, placing them shoulder-width apart. Take an angled plank position with respect to the bench. Static tighten the press, look freely.
This is your starting position.
Step #1.
As you inhale, begin to bend your arms in elbow joints and, as soon as you touch the edge of the bench with your chest, as you exhale, push yourself out of it, returning to the PI. Repeat the specified number of times.
In picture form, all this disgrace looks like this:

On the move like this:
Variations
In addition to the standard version of push-ups at an angle up, there are several variations of the exercise:
- from bars;
- from the fretboard;
- from the step platform;
- from fitball;
- from a narrow platform using a parallel grip;
- using TRX loops;
- from the wall.

Secrets and subtleties
To get the most out of the exercise, follow these guidelines:
- throughout the movement, follow the position of the elbows - they should not “walk” around;
- throughout the movement, follow the position of the body - a stretched string;
- at the end / bottom point of the trajectory, linger for 1-2 counting and only then start the reverse movement up;
- slowly and under control go down and powerfully / explosively push up when going up;
- use the positions of the socks both together and slightly apart;
- to work out the chest, use different heights of elevations;
- breathing technique: inhale - when lowering down, exhale - when pushing up / going up;
- numerical training parameters: number of sets 4-5 , the number of repetitions - 20 .
With the theoretical side finished, now let's look at some practical points.
How to maximize the load on the chest in push-ups, or what does the angle affect?
One of the desires of a woman starting to visit the gym is to master the skill of push-ups from the floor. However, the horizontal version of the exercise (when legs/body are parallel to the floor) is the heaviest due to the fact that it is held on the hands heaviest weight (near 55-65% from your body weight). Conventionally, it is as if an unprepared woman began to press the barbell with a weight 32-35 kg (60% from weight 50-55 kg).
Therefore, it is best for young ladies to master push-ups from an inclined version. (angled up), thus using physics to your advantage. The thing is, when you tilt your upper body higher, your lower body holds more weight, so the athlete is (by own weight) less resistance.
As confirmation of the above, we present some calculations, the purpose of which is to show how the angle affects the generated resistance ( example, the average man).
- height 1,75-1,80 m;
- shoulder to palm length: 0,584 m;
- length from shoulder to hip: 0,629 m;
- length from hip to ankle: 0,8 m;
- push-up height: 0,45 m;
- height counter: 0,8 m.
Calculate: resistance values (resultant forces in hand) arising from push-ups at different angles.
Solution: Using the principles of engineering statics, Newton's second law and some simplifications (metric system), we have the following:
Option number 1. Push-ups from a flat surface

Using trigonometry, the angle between the floor and the plane of the back is 24,12 degrees. The horizontal distance from the foot to the thigh is 0,73 meters and up to the hands - 1,304 0,73 0m) × W - ( 1,304 m) × FHand = 0. We get: 1,304 fhand= 0,730 W or FHand = 0,5598 W.
Thus, with a horizontal push-up, the force generated in the hands is 0.5598W (56% from body weight).
Option number 2. Push-ups at an angle up from a chair

Using trigonometry and the Pythagorean theorem, the horizontal distance from feet to hands is 1,475 39,24 0,620 meters. The forces in the horizontal direction are zero, Fx = 0. The sum of the forces in the vertical direction is: FY = FHand + FFoot - W = 0. The sum of the moments about the foot is: MFoot = ( 0,620 m) × W - ( 1,475 0,420 W.
(chair height 0,45 m) up, the force generated in the hands is 0,420 W (42% from body weight).
Option number 3. Push-ups at an angle up from the table

Distance from feet to hands is 1,311 meters. The angle between the plane of the back and the floor is 53,96 degrees. The horizontal distance from the foot to the thigh is 0,470 meters. MFoot = ( 0,47 0m) × W - ( 1,311 m) × FHand = 0. We get: FHand = 0,360 W
Thus, with push-ups at an angle (table height 0.81m) up, the force generated in the hands is 0,360 W (36% from body weight).
General conclusion: Pushing up from a flat surface, you lift about 56% your body weight (other 44% held by feet). The higher you take the push-up elevation (becomes more angle) , the easier it is to perform them and the weaker the muscles are loaded. Therefore, if you are a girl and want to learn how to do push-ups at home, then start with high push-ups at an upward angle, gradually reducing the angle.
Actually, we have finished with the main part of the note, let's move on to ...
Afterword
Today we got acquainted with the push-up exercise at an angle up and found out why it is better for a girl to start mastering its standard version. Next Wednesday, we will analyze something else, we are waiting, sir ...
PS: Do you have a hard time doing push-ups? How much do you do at a time?
PPS: did the project help? Then leave a link to it in the status of your social network - plus 100 Karma points guaranteed :)
With respect and gratitude, Dmitry Protasov.
I found a very interesting program, which, according to the source, was compiled by a hardened prisoner named Paul Wade, who was known for his incredible strength. Everything is pretty banal on paper:
Stage 1. Push-ups from the wall. It's simple warm-up exercise great for beginners. We stand facing the wall at a distance of 40-50 cm and rest our hands against it. While inhaling, we bend our elbows, approaching the wall. On exhalation, we return to the starting position. We perform 3 sets of 50 repetitions.
Stage 2. Push-ups at an angle of 45 degrees. You can use a cabinet as a support. We do 3 sets of 50 repetitions.
Stage 3. Push-ups with an emphasis on the knees. They are performed like regular push-ups, only the legs are bent at the knees. You need to do 3 sets of 30 repetitions.
Stage 4. Half push-ups. We take emphasis lying down, put under the stomach basketball and we start pushing. We perform 2 sets of 25 repetitions.
Stage 5. Standard push-ups. To control the correctness of the exercise, you can put under the chest tennis ball. We do 2 sets of 20 times.
Termination Criteria
Do 2 sets with a rest of 1-2 minutes (do not stop when performing a series of 20 repetitions), stay in adequate physical and psychological states)
Personal Resources
1.5 months time
Green Goal
I need this to keep my body in good shape.
If you set yourself the task of pumping the pectoral muscles as much as possible, then a visit looks like the best option. The availability of special equipment, qualified instructors - all this will help you achieve the desired results. But often a situation arises when regular visits gym impossible. In this case, as an alternative to the gym, they can serve.
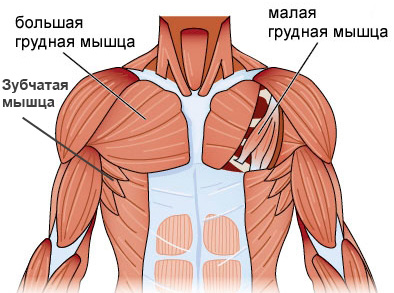
If you want to focus on wiggle, then you need to consider that they consist of several symmetrical groups, including:
- pectoralis major muscle
- pectoralis minor muscle
- anterior dentate.
Do not forget that when training the pectoral muscles, the body spends a huge amount of energy, which has a beneficial effect on the burning of adipose tissue.
The modern rhythm of life of many people in our time is such that it is often very difficult to make time for a regular visit to the gym. Training process at home can be considered as an adequate replacement for the gym. In the first place should be the desire of the student to achieve the goal.
First of all, you need to decide on the number of classes per week. Many beginners mistakenly believe that daily exercises can lead to the desired result in a minimum amount of time. But the peculiarities of the pectoral muscles are such that during active work, the muscles receive multiple microtraumas, and after each lesson, time is needed for their full recovery. Therefore, on initial stage the number of training sessions should not exceed two sessions per week.
You should also adhere to a certain dosage in the number of approaches for exercises for the development of chest muscles. Depending on the individual physical training their number should be from four to eight approaches per workout. For those who are just getting started the best option there will be one - two exercises for two three approaches. And remember, excessive overload of the pectoral muscles does not good results. For achievement desired result make a training program and try to stick to it on a regular basis.
Workout Exercises
The simplest and most versatile exercise available to anyone starting to develop their body is simple push-ups. If we take a closer look at the mechanism of the push-up process itself, we will see that this is a kind of variation of the bench press. In addition, push-ups are the best general developmental exercise. When push-ups, the muscles of the hands are also involved, which ensures a uniform development of the muscles of the upper body. In addition, there is an active effect on the abdominal muscles, which has a beneficial effect on the entire body as a whole. To a lesser extent, the muscles of the legs are involved, but they also receive a small share of the load.
The simplest and most versatile exercise available to anyone starting to engage in the process of developing their body is simple push-ups. If we take a closer look at the mechanism of the push-up process itself, we will see that this is a kind of variation of the bench press. In addition, push-ups are an optimal general developmental exercise that affects a huge number of muscles. When push-ups, the muscles of the hands are involved, which ensures a uniform development of the muscles of the upper body. In addition, there is an active effect on the abdominal muscles, which has a beneficial effect on the entire body as a whole. To a lesser extent, the muscles of the legs are involved, but they also receive a small share of the load.
Like many exercise push-ups have different variations, using which you will load various groups chest muscles.
One of these options is narrow push-ups. The difference between narrow push-ups and regular push-ups lies in the width of the arms. In case of tight push-ups hands are placed in such a way that the fingers of both hands are turned inward and touch each other. When lowering, you need to touch your hands with your chest and maintain a second pause in this position. When performing this exercise, you should Special attention to a straight back. Push-up movements are smooth without jerks, without delays.

The next option for push-ups is push-ups on stools. Two stools are placed shoulder-width apart, a sofa or chair is used as a footrest. Starting position as regular push-up. The main difference is that in this variation of push-ups, the depth of lowering the body increases. Also in this exercise, it is possible to work with weights, for example, you can use a backpack with books as an additional load.
Push-up with forward bend
The meaning of this exercise lies in the fact that the legs are located above the level of the head. You need to put your feet on some kind of elevation and perform the usual ones. This exercise will involve the upper chest, as well as the main muscle groups of the arms. When performing this exercise, you should pay attention to the correct setting of the elbows. If possible, try to spread them apart to ensure maximum load the muscles of the chest.
The presence of conventional dumbbells will allow you to significantly diversify the program training sessions. The most versatile exercise is the following: having taken the starting position lying on your back, bend your legs at the knees, stretch your arms with dumbbells up. Then, as you inhale, slowly lower your arms until your elbows touch the floor. Try not to rush, do it this exercise at a smooth, steady pace. Significantly diversify such exercises with dumbbells can allow the usual folding athletic bench, which can be bought in any sports store.
Remember that nothing is impossible. With a certain amount of desire, even at home, you can achieve excellent results. Find an additional incentive for yourself regular classes, allocate free time, and the results will pleasantly please you.
Chest workout at home - Video


