How to stand up from a bridge position. How to learn to stand on the bridge from different positions: a set of exercises for flexibility
The bridge is basic exercise, which serves as the basis for the most difficult gymnastic tricks. The ability to perform it is an indicator of good physical form. After all, in order to do this, you need not only to have certain skills, but also to have a solid muscle corset. But not everyone knows how to properly stand on the bridge. It's pretty difficult exercise, and with an illiterate approach, it can be unsafe. Consider all the stages of preparation for it and its correct execution.
Exercises to warm up the joints and spinal muscles
An unprepared person should not try to immediately stand on the bridge. At best, you can damage unheated ligaments and muscles, and at worst, you can get more dangerous injuries, up to the set of exercises given here will help you prepare for this difficult trick:

How to get on the bridge from a prone position
Do this exercise from a standing position is much more difficult than from a prone position. In this case, it will be more traumatic. Therefore, before giving an answer to the question of how to learn how to stand on the bridge while standing, let's try to understand how to do it from a prone position on the floor. To do this, we need a soft gymnastic mat or a small insurance mat. If there is neither one nor the other, you can just take a blanket folded four times. We lay down on it with our backs, bend our legs at the knees and put them shoulder-width apart. We raise our hands up and take them back. Then we bend them at the elbows and lean on the palms, placing them next to the head. Gently straighten your arms and legs, bending your back. We fix this position for a few seconds. We return to the starting position. With each new approach, we try to fix for a longer time.
How to get on the bridge while standing

To perform this exercise, you will need not only a soft mat, but also Well, of course, a little patience and effort on your part. After reading this chapter, you will learn how to quickly get on the bridge from a standing position. If wall bars no, you can use a regular wall. We do everything slowly and carefully, without sudden movements. We stand with our backs to the Swedish wall, we keep our legs shoulder-width apart. We raise our hands up. Lean back and lean against the wall. Then, carefully fingering her slats, we go lower. And so we do until we touch the floor. After that, we return to the starting position in the same way, along the wall rails. You need to perform this exercise several times. Getting up on the bridge from a standing position for the first time will help a soft mat or blanket and a coach or just some person who will insure you. We stand up straight. We raise our hands up. The legs at this time are shoulder width apart. For the first time, you can increase the distance between them to maintain balance. Then we lean back with our hands raised up until we touch the floor with them. The coach all this time should insure you, supporting you behind your back. Before you decide to do the trick yourself, you need to clearly learn how to do it with an assistant.
Bridge for advanced

You can make this exercise more difficult. But only “pros” who have already mastered the trick from a standing position should do this. Now we will learn how to learn how to get up on the bridge from the vertical Do not try to perform it if you are not in very good physical shape. The trick requires not only a great concentration of attention, but also an excellent state of the vestibular apparatus. So, we stand on our hands, we raise our legs up. We bend them at the knees and begin to smoothly and carefully lower them down from the back, maintaining balance. As soon as they touch the floor, you need to distribute the load evenly between them and your hands.
Common Mistakes
The first and most common misstep when performing a trick is that people go to the "bridge" with their backs and shoulders. And you need to do this only with the help of hands. This is most likely due to the fear of falling. You don't need to be afraid. After all, your muscles are well warmed up and ready to perform such a difficult trick. A soft mat will insure in case of a fall. The second mistake people make when trying to learn how to do a bridge and trying to do it on their own is doing the trick with their back, without distributing the load on their hands. The result is a lopsided and unstable bridge. It will be correct to rely on hands in the process of execution.
The Benefits of Exercise

All exercises that serve to prepare for the implementation of the bridge, well strengthen the muscles of the back. It is important. It's no secret that our spine is daily subjected to the strongest physical activity. He can withstand it only if strong muscles support him. Regular execution The “bridge” trick will help not only form a good muscular dorsal corset, but also develop the flexibility of the spinal joints. This is especially important for older people. After all, over the years, our bones lose calcium, become more fragile. And the joints, on the contrary, accumulate harmful salts, which help to reduce their mobility. As a result of all this - a hunched back, constant pain and the inability to straighten the shoulders. Regular performance of these exercises will allow you to stay in excellent physical shape at any age.
The article will be useful to a wide range of readers. Especially for those who want to learn how to stand on the bridge and what exercises can be used to strengthen the back muscles.
In a modern city dweller, the spine is not loaded much - it mainly performs a supporting function. The cartilage of the discs from this coarsens, the ligaments grow, as a result of which the mobility of the vertebrae relative to each other decreases. Even if there is no back pain, it can be difficult to bend forward to reach your fingertips without bending your legs. It's even harder to bend back to see the wall, let alone step on the bridge. If these symptoms are present, it is urgent to start exercises that can restore flexibility.

It is easy to check this even at home: at shoulder level on the wall or door make a mark.
First test: the mark must be seen by bending back, for which you need to stand with your back to the wall a step away from it.
Second test: Turn your right side to the wall and straighten your left hand, try to touch the mark with it. Repeat the same steps for the left side. If you do these movements is not difficult - the flexibility is excellent. If efforts are made for this, good. Well, if the tests fail, it’s bad and you need to urgently restore it.

People who do not pass the tests will not be able to stand on the bridge - training is needed to develop flexibility. When starting it, be sure to do a warm-up that will warm up the body and help achieve the goal.
Shoulder workout:
- With this warm up muscle group exercises do an excellent job, during which the arms rotate simultaneously or alternately back and forth. To do them you need to stand up straight, do not bend your back.
- Bend your left hand into elbow joint and place at chest level. The forearm is parallel to the floor. Turn the upper part of the body to the right, twisting the spine. Then, repeat all for the right side.
- The arm raised and bent at the elbow (forearm behind the back of the head) is pulled down and to the side with the other hand. Change the position of the hands, and repeat for the other side.
- Straightened arms are in front and clasped in the lock. Raise them up, bending in the back and shoulders.
Warm-up of the shoulder girdle and lumbar:
- Put your hands on your lower back and bend your back back while tilting your head back.
- Perform torso forward bends with simultaneous retraction of straight and closed arms.
- The hands are closed, the arms are straight. Perform a swing above the back of the head, tilt the body forward until the fingers touch the floor, swing again, etc.
- Legs straight, with your palms, grasp the back of a stable chair and the crossbar (at waist level). Try to bend down at the shoulders and spine as much as possible.
Warming up the back muscles:
- Circular rotations. In the starting position, the legs are straightened, the back is straight. try top torso describe a circle.
- Put your feet shoulder-width apart. Without bending them, lean to the sides, straightening the arm that is at the top parallel to the floor.
- Get on all fours, and arch your back up and down with maximum amplitude, as a cat does.
- From the same starting position, perform next exercise, which will later help you get on the bridge: imagine the crossbar, which is located close to the floor, as if crawling under it.
- Lie on your stomach with your hands clasped at the back of your head. Curve towards the waist upper part body.
- From the same position, arch your spine backwards.
- Having laid a gymnastic mat, do rolls from the chest to the hips and vice versa.
- Hips on the floor, rest your hands on the floor and bend in the lower back, throwing your head back and trying to reach the back of the head with your toes.
- Starting position: lie on your stomach, then, straightening your legs and arms, try to rise as high as possible and stay in this position.
- Another exercise useful for getting on the bridge: you need to kneel, grab your heels and bend at the waist.
- Without changing the position, i.e. kneeling, swing your leg, bending at the neck and lower back. Try to see your foot above your head. Mahi is performed alternately with both legs.
After performing the complex for the deflection, which is necessary, it is required to bend the spine. To do this, you need to sit on your knees, lowering your buttocks on your heels, and your stomach on your hips, stretching your arms and putting them on the floor: arch your back upwards.

This is the easiest option. To get on the bridge, first lie on your back, bending your knees and bringing your heels closer to your buttocks. Put your palms, fingers turned to the body, behind your head (above your shoulders). Raise your pelvis by tensing your leg muscles and leaning on your hands. Arch your back, trying to straighten your legs. Returning to the starting position, first the shoulder blades touch the floor, and then the buttocks. The exercise is repeated several times.

With insufficient flexibility of the shoulder girdle, getting on the bridge is obtained mainly by leaning on the legs. The weight of the body is unevenly distributed, so the position is unstable. In addition, the palms and feet are at a great distance from each other, which increases the load on both pairs of limbs.
Those who can stand up correctly have straight legs and arms perpendicular to their backs. To achieve this, try to bend your back and straighten your limbs from the “bridge”.
Rocking in the direction of the foot-head is recommended. As flexibility increases, the distance between the palms and feet should be reduced so that the limbs experience less stress. Yes, and stand on the bridge will be easier.

To stand on the bridge, you need to bend your knees (feet are on the surface, and your back is straight), put the palm of one hand back, slightly turn your torso in her direction. Leaning on this hand and feet, tear the buttocks off the surface, describe an arc with your free hand, lowering it to the surface.
To return to the original position, perform the movements in reverse order. With the acquisition of flexibility, it is recommended to master the inversions performed from the bridge. To do it this way: rotating the torso to the left, move the right hand (behind the left), then right leg move to the left. As a result, the back will be at the top, and the emphasis will be on the feet and palms. To do the bridge again, it is necessary to rearrange the right leg and left arm almost simultaneously. At the same time, learn to roll over to the other side.

When you have mastered the rollover, you can easily get on the bridge from the sitting and lying positions, you can try to do the bridge from the standing position. At first, the Swedish wall will help to do it: come up and turn your back to it. Bend over and grab the bar. Arching in the back, slowly "step" down the crossbars
If there is no Swedish wall in the house, use the usual one: bending over, move your palms along it, going down. Return to the starting position by “stepping” with your palms up.
Shoes and the surface should not be slippery, so as not to fall and hit the back of the head.
When with the help of the wall you can touch the floor with your palms, you can stand on the bridge, which is considered the most difficult ”: bending your knees slightly and moving your body forward, bend at the waist, straighten your arms and throw your head back to see the floor. Bending down, stand on the bridge.
If you can't bend forward and reach the ground with your hands or bend back when you see a wall, then you should definitely start doing special exercises that increase the flexibility of the spinal column. Otherwise, you may soon begin to feel back pain. In this regard, you should learn how to stand on the bridge. This gymnastic exercise will allow you to significantly improve the flexibility of the spinal column.
To find out the degree of flexibility of the spine, you should fix a label on the wall (door), placing it at the level of the shoulder joints. After that, you need to perform two movements:
- Take a standing position with your back to the established mark at a distance of one step. After that, start bending back and try to see the mark.
- Turn to the mark with your left side and, raising your straightened left hand, try to touch its mark. Perform on the other side.
If you can easily pass these tests, then your flexibility is at high level. If this is difficult for you, then the flexibility is average, and when you cannot perform the movements, it is bad.
Warm-up exercises in preparation for the bridge
Below we will tell you how to stand on the bridge, but before that you need to do a good warm-up to prepare the body.
Shoulder exercises
- Fulfill rotational movements arms outstretched back and forth.
- Bend at the elbow joint with one arm at chest level, while placing the forearm parallel to the ground. If you have bent your right arm, then begin to turn the body to the right, while twisting the spinal column. Then repeat on the other side, changing hands.
- Bend your arm at the elbow and lift it up, placing your forearm behind your head. Start pulling with the other hand raised down, and after completing the exercise, repeat the exercise on the other side.
- Lower your straight arms down and connect them into a “lock”. Then lift them up, simultaneously bending in the back and shoulder girdle.
Exercises for the lower back and shoulder girdle
- The palms are on the hips. Begin to bend back, while throwing your head back.
- Leaning the upper part of the body forward, stretch simultaneously closed, straightened arms parallel to the ground.
- Close your hands and begin to tilt your body forward until it is parallel to the ground. Swing your straightened arms above the back of your head, tilting your torso forward and touching the ground with your hands.
- The palms are on the back of a stable chair or the crossbar at waist level, and the legs are straightened. Sink your spine as low as possible.
Exercises for the muscles of the back
- Legs and backs should be straightened and in this position begin to perform circular motions upper part of the body.
- The legs are straightened and located at the level of the shoulder joints. Perform side bends and at the same time straighten your arm, located at the top parallel to the ground.
- Take a position on all fours and begin to arch your back up and down with the maximum possible amplitude, imitating the movements of a cat.
- Without changing the initial position, imagine that a crossbar is installed in front of you near the ground. Perform the movement as if crawling under this bar.
- Take a position lying on your stomach, clasping your hands at the back of your head and bend the upper part of the body in the lower back with maximum amplitude.
- Without changing the initial position, stretch your arms forward, while closing your palms. Roll from your hips to chest and back.
- The starting position is similar to the previous movement, but the palms rest on the ground. Start arching your lower back by tilting your head back.
- Take an emphasis on your knees and begin to perform swing movements with your leg, while bending in the lower back.
Most Common Bridge Mistakes

Now we will talk about the most common beginner mistakes, and then you will learn how to make a bridge from various positions. When shoulder girdle does not have sufficient flexibility, then the main support when performing the bridge falls on the legs. This is a very unstable position, as the weight of the body is distributed unevenly. Also in this case, the feet and palms are far enough apart and this increases the load on the muscles of the limbs.
When the bridge is done correctly, the limbs should be perpendicular to the back. To increase the mobility of the spinal column when performing the bridge, it is necessary to straighten the legs and arch the back. You can also sway slightly alternately in the direction of the palms and feet. As the mobility of the spinal column increases, you should gradually reduce the distance between the feet and palms.
How to stand on the bridge in a prone position?

Take a position lying on your back and place your heels in the buttocks area, bending your legs to do this. knee joints. The palms are located on the ground slightly above the shoulder joints, and the fingers are directed towards the body.
Straining the muscles of the legs, begin to lift the pelvis. After that, it is necessary to bend in the back, straightening the legs at the same time, as far as possible. Returning to the starting position, first the shoulder blades should touch the ground, and then the buttocks. Perform the movement several times.
How to stand on the bridge in a sitting position?

The legs must be bent at the knee joints, the back straightened, and the feet must be on the ground. Place the palm of your right hand on the ground and rotate your body slightly. Start lifting your buttocks off the ground, leaning on your legs and right arm. After that, describing an arc with your left hand, place your palm on the ground and stand on the bridge.
Returning to the starting position, all movements must be performed in the opposite order. As the flexibility of the spinal column improves, it will be useful to master the rollover from the bridge position:
- The upper part of the body must begin to turn to the left, moving the right hand behind the left. After that, you need to place the left foot behind the right. As a result, you will find yourself in a position where your back is pointing up, and you are leaning on your hands and feet.
- To return to the bridge position, you must simultaneously put your right foot and hand.
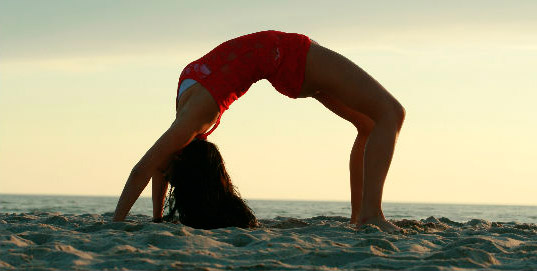
How to get on the bridge in a standing position?

If you have mastered the technique of performing the bridge in the prone and sitting positions, then you can learn how to stand on the bridge in the standing position. This is the most difficult exercise that requires good preparation. At first, you can train at the Swedish wall or just near the wall.
Stand at a distance of about 80 centimeters from the wall, placing your feet at the level of the shoulder joints. After that, begin to bend back until touch with your fingers walls. Continue to bend over while fingering the wall. As a result, you should be on the bridge. Work against the wall until you master the technique of performing a bridge in a standing position.
After that, you need to stop using the wall and for this you should use the mat. It will also be very good if you are insured. It is necessary to become facing the person insuring you, placing your legs at the level of the shoulder joints. Start raising your hands, and at this moment a friend can already begin to insure you, holding you under your back.
Leaning back, it is necessary to maintain a second pause at the end point of the trajectory and, excluding sudden movements, stand on the bridge. To return to the starting position, you should push off the ground with your hands and straighten up. Do not give up safety net until you have fully mastered this technique.
Very often, when performing a bridge in a standing position, the same mistake is made - a movement is performed with the back and shoulder joints. You only need to move your arms to make a bridge. Also, often the bridge is performed only due to the movement of the back and the shoulder girdle is not involved at all in the work. As a result, you will not be able to fully extend your arms, and this will significantly reduce your stability.
How to properly warm up and make a bridge, you will learn from this story:
INThe performance of the gymnastic bridge is a beautiful and graceful demonstration of excellent physical shape and flexibility. And if you do not succeed in doing this exercise, despite the efforts made, then you should not give up. Exist special exercises, the implementation of which will allow you to get up on the bridge as soon as possible.
For beginners, before getting on the bridge, you need to do a warm-up - stretch the muscles of the shoulders and back. You can get up on the gymnastic bridge without preliminary preparation only when its implementation becomes ordinary and familiar, it will not bring any difficulties.
A set of special exercises
Designed to develop the flexibility of the back muscle group. All exercises are aimed at ensuring that the implementation of the gymnastic bridge does not bring pain, but is performed as easily and quickly as possible.
Exercise One

Lying on your stomach, stretch your arms up. Trying to bend as much as possible, the legs are simultaneously raised with the arms. The knees are kept straight. In each upper position, they are held for 30-60 seconds.
Exercise two

Lying on your back, legs are bent at the knee joints, arms are extended along the body. The pelvis is raised to the maximum possible height, lingered in this position for about 5 seconds and smoothly lowered back onto the back.
Exercise three

Kneel down so that the legs are spread across the width of the pelvis. The torso is slowly tilted back, bending in the lower back, and touching the heels with the hands. In this case, the head must be tilted back, and the back must be arched.
Exercise Four

Lie on your stomach, hands holding on to your ankles. Bending, simultaneously raise the legs, chest and head. Hold in the top position for a few seconds.
Exercise five

Performed on fitball. They lie on it with their backs, put their feet shoulder-width apart, raise their hands, and then try to reach them to the floor.
Exercise six

Performed from a prone position. Straight arms are placed at the level of the hips. First, the back is arched back, and then, bending the legs at the knee joints and throwing back the head, touch the toes to the head. In the final position, you need to linger for 30 seconds.
Exercise seven

At the end of the complex, a bridge is performed from the supine position. First bend the arms and legs. Hands are placed as close to the shoulders as possible, and the elbows are pointing up. Then from this position they try to stand on the bridge. Legs with arms straighten and bend in the lower back.
As soon as there comes a feeling that it is no longer possible to bend further, you need to linger in this position for at least two seconds. When the exercise ceases to cause difficulties, it is necessary to complicate it. To do this, the arms are pulled closer to the legs, and then swing back and forth.
These exercises must be performed daily. They will not only allow you to easily stand on the gymnastic bridge, but also relieve problems with the spine. The complex can be performed by absolutely everyone, regardless of age.
Performing a bridge from a standing position
You can proceed to this exercise after you have fully completed and mastered preparatory complex. You can perform it both at the Swedish wall and at the usual wall. The main thing is the availability of free space.
They stand with their backs to the wall or wall, keeping a distance of about 80 cm from its surface, placing their feet shoulder-width apart. From this position, they begin to lean back until the fingers rest against the wall. To go down, fingers are sorted along the rails or along the surface of the wall until the moment when the hands are on the floor and a full-fledged bridge is made.
Hold the final position for a few seconds and then return to the starting position. This should be done in the same way as lowering with the help of fingers, moving them along the wall or slats, but already rising up.
When the execution of the bridge with the wall is brought to automatism, the exercise can be started on a gymnastic mat. At first, the bridge on the mat is best done with a partner who will support your back for safety.
To make a bridge on the mat while standing, they lean back, linger for a few seconds in the accepted position, and then smoothly lower themselves onto the bridge. In the last position, you also need to linger. To take the starting position, it is enough to push off the mat with your hands.
Making a bridge on your own should begin only after gaining full confidence in your own abilities.
How to stand on the bridge correctly and beautifully
Effectiveness gymnastic bridge give the right technique and beautiful performance. There are several common mistakes to avoid:
- There is no need to be afraid of losing balance when going to the bridge with the help of the back and shoulders. When performed correctly, only the hands should be involved.
- Quite often, many do the exercise without transferring the weight of their own body to their hands, that is, through the back, without using the shoulders. As a result, the arms are too arched, and the bridge is unstable and looks ugly.
The correct bridge is performed with the transfer of weight to the hands. The angle between the arms and the floor should be right. This can be achieved by preheating the shoulders. To do this, standing on the bridge, you need to rock back and forth, stretching the shoulder muscles.
How to stand on the bridge - Video
Good day, dear readers of the sportivs sports blog. Alexander Bely is with you. Our today's topic is called how to get on the bridge. At the end you will learn about the most effective exercises for a warm-up and about those methods that will help you learn how to stand on the bridge, being in any position.
Why is the bridge not working?
In the average person, the spine is practically inactive. In addition to the main, supporting function, it does not perform any active actions. The result of this is rough cartilage of the discs, there is an overgrowth of ligaments that limit the movement of the vertebrae.
A frequent case is the inability to bend back, bend down to straight legs, while touching the floor with your hands. In this case, it is necessary to restore as soon as possible. This can be done thanks to exercise. The advantage is that they can be made at home.
Checking the flexibility of the spine
1. We stand with our backs to the mark at a distance of one step. You need to bend back and see the label. If this task is feasible for you, then your spine is in good shape.
2. We turn to the right side, raise the opposite hand up and try to touch the mark. We repeat the test on the other side.
We are warming up
Before developing the flexibility of the spine, it is imperative to conduct a high-quality warm-up, which will help warm up the muscles and joints.
Stretching the shoulder girdle
- We rotate the straightened arms forward and backward at the same time. You can rotate the hands alternately.
- Rotation of the body different sides. We bend our arms at the elbow joint, we place the forearm parallel to the floor.
- Raise your arm up, bend at the elbow joint and place the forearm behind the head. With the other hand, pull the arm to the side and down. Repeat with the opposite hand.
- We close our hands in the lock, raise them up, while carrying out a deflection in the shoulder girdle.
We stretch the lumbar region
It is very important to warm up all the parts of the body involved in the training. in setting up the bridge they play a significant role as they must be strong and elastic.
- We place the palms on the lower back, bending the back backward, while tilting the head.
- We make torso forward bends with the same stretching of straight arms forward.
- Standing, feet shoulder width apart. We touch the floor with our fingers.
Stretching your back
- From a standing position, we rotate the body. Hands are located on the sides.
- Standing on all fours, bend your back up with maximum amplitude.
- Lying on your stomach, close your hands behind the back of your head. Do maximum backbends.
- Lying on the floor, straighten your arms and legs. Try to raise your arms and legs as high as possible at the same time. It is important that they are parallel to the floor.
After a thorough warm-up, you can practice getting on the bridge. Below will be considered the basic principles, following which you will certainly become on the bridge.
If you do not have a Swedish wall, you can use the usual one. Bending back, touch with your palms to be as low as possible. After that, you should return to the starting position. To make this task easier, break your workout into several sets.
You can draw conditional lines with a pencil. Bending to the first line, return to the starting position. After, repeat the same thing, only for the second time bend to the second line. And so in a short period of time you will definitely reach the floor, thereby fulfilling your cherished desire - to stand on the bridge.

People first ask how to learn to stand on the bridge? Immediately, negative thoughts are formed in the head, that it is difficult, and so on. In fact, to get on the bridge you need to do a good warm-up and practice as often as possible.
Bridge from a sitting and lying position
I decided to describe this position because it can be a start for beginners. Having mastered the correct bridge from a sitting and lying position, you can safely move on to a standing bridge.
Before trying to stand on the bridge from a sitting position, it is also recommended to warm up.
Keeping your back straight, you need to bend your knees. We put the right palm back on the floor, while turning the torso.

This is followed by the most basic - leaning on the legs and the right hand, we tear off the buttocks from the floor, while bringing the left hand to the right, while making a bend in the spine. To get on your feet, you need to do all the movements in reverse order.
We don't make mistakes
1. The most common mistake is that people try to get on the bridge using their backs. Proper execution involves only manual work.
2. Some people do the bridge with their backs, without taking into account the shoulders. Thus, a clumsy, clumsy bridge is obtained. Correct technique- transferring body weight to the arms, but before that, you should warm up your shoulders well.
Remember that the ideal bridge is the angle between the arms and the floor at 90 degrees. On this I will complete this article, in the end I propose to fix the material with a video clip. See you later.


