Horse proportions for artists. How to draw a horse
This is additional information for the lesson on the proportions of a horse's head; the drawings were made by me based on the systematization of the knowledge that I have today. In words, how to draw a horse's head from the front looks difficult, but from the drawings I hope it will be clear that everything is done very easily - you just need to know the ratios (Fig. 0). And at the same time, it doesn’t matter at all what you draw with or on. Since the proportions of horses of different breeds vary, the method below is an example of constructing the head of an “average” horse (in reality, the proportions are never so strictly observed).
1) Draw vertical and horizontal lines so that you get a cross on a long leg, O is the point of intersection of the lines. Symmetrically to point O on the horizontal line, mark points A and B so that segment AB is equal to the planned width of the horse’s forehead. Points A and B show the location of the extreme points of the brow arches - in this place the horse's head has the greatest width. The vertical line will give the axis of symmetry of the head (divide it into the left and right parts). (Fig.1) 
2) From point A, measure a distance equal to AB, so as to intersect the axis of symmetry, and mark points Bo and Go - respectively, the points of the beginning of the head (the point of the back of the head) and the middle of the nose. (If the eye is not yet perfect: when drawing with a pencil, mark the points with a compass, drawing arcs of a circle with a center at point A and a radius equal to AB, until they intersect with the axis of symmetry above and below point O. If you draw on a tablet or with a mouse, use the function drawing a circle (in Photoshop this is the Ellipse Tool with the Shift key held down - but you don’t need to circle it)). Measuring from the point Go down along the axis of symmetry a distance equal to VoO, we obtain the point Do - the end of the head (the end point of the horse's lip.) As a result of these constructions, we obtain the length of the horse's head (segment VoDo). (Fig. 2)
With a good eye, you can draw the other way around - first draw a vertical segment equal to the length of the head, then mark its three equal parts, draw a horizontal line through a point at a distance of 1/3 from the top and mark the width of the head at the level of the eyebrow arches (it should be greater than 1/3 of the head length, see construction above)
In the future, focusing on these segments, you can draw other positions of the horse’s head, changing the resulting figure according to the laws of perspective.
Thus, we have the following relationships: the greatest width of the horse’s head is equal to the distance from the brow arch to the back of the head, equal to the distance from the brow arch to the middle of the back of the nose and equal to the distance from the middle of the back of the nose to the end of the lips (AB=ABo=BBo=AGo=BGo=GoDo ). 
3) Connect points A, Vo, B, Go, getting a rhombus. On the lines AGo and BGo (approximately) the inner corners of the horse’s eyes will be located - mark them with points Z and I (you can connect them into a segment). (Fig. 3) Unlike the human face, the horse’s eyes are drawn strictly on the sides of the head under the AB line; do not move them to the center - otherwise the effect “Eyes on the forehead” will appear. In reality, horses' eyes are small, and although increasing their size makes the drawing more expressive, you shouldn't get too carried away. 
Next, on the line of symmetry, slightly above point Go, we place point G1 - it will mark where the horse’s cheeks end. We draw a horizontal line through point G1 and mark segments on both sides equal to half the distance between the corners of the eyes, obtaining points E and F (EG1=ZH1=1/2 ZI). (Or you can simply lower the vertical lines from points Z and I until they intersect with the horizontal line passing through point G1 - as you like). (Fig. 4)
If we draw lines from points E and G to points A and B, respectively, we will get approximate cheek lines. 
I didn't find any information on proportions when drawing the horse's ears and the lower part of the head (the area of the nostrils and lips). Apparently because the horse's ears and nostrils are very mobile, and also because the size of the ears of horses varies greatly depending on the breed. Their drawing, as well as the nose and lips, will be greatly influenced by the angle in which you draw the head. Therefore, everything said below is based only on my observations (photo comparisons, all this is very approximate, and I hope you will correct me if I am wrong).
4) So, the nostrils and lips are facing forward to the head. We divide the segment GoDo into 2 equal parts, obtaining point Ko, draw a horizontal line through it and measure a distance on both sides of point Ko, a little more than 1/4 of the length of segment AB (points K1 and K2). We draw a horizontal line passing through point Do (in the figure it is marked D1D4) and from points K1 and K2 we lower vertical lines to it, obtaining points D2 and D3. The nostrils and lips are located inside this rectangle (К1Д2Д3К2). The width of the lip can be measured as follows - half the width of the horse’s lip is approximately equal to 1/3 of the length of the segment DoD1 (in other words, the width of the lip in its lower part is approximately equal to 1/3 of the length AB). (Fig.5) Drawing top part head (looks like a bell), part with the lip and nostrils and connect it to the lines of the cheeks through points E and F 
5) Move on to the location of the ear line for cases when the ears are directed forward. If the horse’s ears are raised, then their outer edge will be approximately limited by the verticals drawn from points A and B. We mark the location of the tips of the ears - on the axis of symmetry from point O up, place point B3, and select the length of the segment OB3 from the following range - from 1 length AB to 1.3 times the length of AB (in my drawing I placed point B3 so that the length of the segment BoB3 is approximately equal to 1/3 the length of the segment OBo.)
To get the point of the lower edge of the ear (B1 - lowest point visible ear growth), divide the segment OB approximately in half and draw a horizontal line - its intersection with the contour of the head will give the ear growth point. To get the upper point of visible ear growth (B2), draw a horizontal line through point B and mark points B1 and B2 on both sides of the axis of symmetry at equal distances from point B (B1Bo=B2Bo=1/4 AB). Under these points (if you go vertically down) at the intersection with the contour of the head (forehead of the horse), mark the points where the ears begin. Now draw the ears. (Figure 6.) 
portal administrator Natalya Usova
Rice. I. Skeleton of a horse
1 Occipital bone. 2. Parietal bone. 3. Frontal bone. 4 Zygomatic process. temporal bone. 5. Eye orbit. 6. Zygomatic bone. 7. Nasal bone. 8. Maxillary bone. 9. Intermaxillary or incisive bone, 10. Lower jaw. 10'. Corner lower jaw. 11. I cervical vertebra (atlas). 12. VII last cervical vertebra. 13. I thoracic vertebra. 14. XVII thoracic vertebra. 15. I lumbar vertebra. 16. VI lumbar (last) vertebra, 17. I sacral vertebra. 18. V sacral vertebra. 19. I caudal vertebra. 20. XVI caudal vertebra. 21. I rib. 22. VI rib. 23. XVIII rib. 24 and 24". Scapula and scapular cartilage. 25. Scapular crest. 26. Humerus. 27. Greater tuberosity humerus. 27". Anterior tubercle of the humerus. 28. Radius (forearm). 29. Ulna. 30. Olecranon. 31. Carpal bones. 31". Accessory (sesamoid) bone of the wrist. 32. Metacarpal bone. 33. Outer (slate) bone. 34. Sesamoid bone. 35. I phalanx (fet bone). 36. II phalanx (coronoid bone). 37. III phalanx (coffin bone). 38. Ilium. 39. Tubercle of the pelvic bone (moklok). 39". Sacral tubercle of the pelvic bone. 40. Tubercle of the ischium. 41 and 42 Femurs. 43. Third trochanter. 44. Greater trochanter. 45. Patella. 46. Tibia. 46". Knee-joint. 47. Tibia of the leg. 48. Tarsal bones (hock joint). 49. Process of the filar bone. 50. Metatarsal bone. 51. Slate bone (outer). 52. Sesamoid bone. 53. Fetlock (first phalanx). 54. Coronoid bone (second phalanx). 55. Coffin bone.
Rice. 2. Superficial muscles of the horse's body
1. Facial muscles. 2. Elevator of the upper lip. 2". Large masseter muscle. 3. Cervical part and thoracic part of the trapezius muscle. 4. Rhomboid muscle. 5. Plaster (belt) muscle. 6. Thoracic part and 6". Cervical part of the serratus muscle (corresponding to the human serratus anterior muscle). 7 and 7'. Brachiocephalic muscle. 8. Sternocephalic muscle. 9. Cutaneous cervical muscle. 10. Brachial part of the superficial pectoral muscle (corresponding to pectoralis major human muscle). 11. Prescapular part of the deep pectoral muscle (corresponds to the human pectoralis minor muscle). 11". Shoulder part. 12. Supraspinatus muscle. 13 and 13". Deltoid muscle. 14. Long head and 14". External head of the triceps muscle. 15. Shoulder muscle. 16 and 16". Latissimus dorsi muscle. 17. Serratus dorsalis muscle. 18. External oblique abdominal muscle. 18" Aponeurosis of the external oblique abdominal muscle. 19. External intercostal muscles. 20. Gluteal fascia. 21. Muscle that strains the fascia lata of the thigh. 21'. Fascia lata of the thigh. 22. Superficial gluteal muscle. 23, 23", 23". Biceps femoris muscle. 24. Semitendinosus muscle. 25. Dorsal and 25". Lateral sacrococcygeal muscle. 26. Coccygeal muscle. 27. Extensor carpi radialis. 28. Extensor digitalis commonus. 28". Common digital extensor tendon. 29. Ulnar head of the deep digital extensor. 30 and 30". Elbow extensor wrists. 31. Extensor carpi oblique. 32. Calf muscle (outer head). 32". Gastrocnemius tendon. 33. Deep digital flexor. 33". Deep digital flexor tendon. 34 and 34". Tendon of the superficial digital flexor. 35. Long digital extensor. 35". Extensor digitalis longus tendon. 36. Lateral digital extensor. 36". Lateral digital extensor tendon. 37. Ligament.
Rice. 3. Stati horses
1-2 Forehead 1'. Supraorbital pits. 3. Bangs. 4. Back of the head. 5. Ears. 6. Temple. 7. Brow ridge. 8. Eye. 9. Nose (snoring). 10. Nostril. 11. Mouth. 12. Upper lip. 13. Lower lip. 14. Chin. 15. Ganache. 16, 17. Neck, 18. Throat. 19. Neck comb. 20. Withers. 21. Chest (falcon). 22. Shoulder blade. 23. Shoulder. 24. Elbow. 25. Jugular groove. 26. Underarm. 27. Chestnut. 28. Wrist (in the hostel it is incorrectly called the knee). 29. Pastern. 30. Fetlock joint. 31. Grandma. 32. Corolla. 33. Hoof. 33". Hoof toe. 34. Heel. 35. Back. 36. Loin (kidney). 37. Rump. 37". Croup 37". Tail ridge. 38. Tail. 39. Ribs. 40. Belly (belly). 41. Groin. 42. Molok. 43. Buttock. 43". Ischial tuberosity. 44. Thigh. 45. Shin. 46. Knee. 47. Hock joint. 48. Foreskin. 49. Metatarsus. 50. Brushes.
There are several measurement systems; We present the simplest and most suitable diagram for the artist’s tasks, where the so-called “square” proportion of the horse’s body is taken as a basis, that is, the ratio of the height to the length of the body is equal to one.
Rice. 12. Horse body measurements
The equality of the height of the horse at the withers and its oblique length of the body (from the shoulder-scapular joint to the ischial tuberosity) assumed here is also convenient for visually checking the proportions of the horse. Let not all riding horses, and especially draft horses, be able to fit into a square. This is something the artist must always keep in mind in order to make the necessary adjustments. You need to use measurement data only in the initial period of studying how to draw a horse.
HORSE BODY MEASUREMENTS
The length of the head AB (Fig. 12) is almost exactly equal to the distances:
1. From the back to the lower abdominal wall DE (depth of the body).
2. From the highest point of the withers to the humeral tubercle VG (scapula).
3. From the upper end of the knee fold to the heel tubercle of the pancreas.
4. From the heel tubercle to the ground ZhZ.
Two and a half head lengths are almost equal.
1. The height of the withers above the ground is VK.
2. The height of the highest point of the croup above the ground is LM.
3. Very often the length of the body from the humeral tuberosity to the ischial tuberosity is GI (oblique body length).
The length of the croup (measured from the anterior protrusion of the molock to the ischial tuberosity) is approximately equal to the distances:
1. From the top of the buttock to the lower end of the knee fold IP.
2. From the junction of the neck with the chest to the beginning of the withers OH (the width of the neck at its lower end).
Fig. 13. Horse head measurements
HEAD MEASUREMENTS
Head in profile (Fig. 13 a). With head length AB, measured by the distance from the occipital crest to the end of the lips:
1. The depth of the VG from the front surface (head) to the angle of the lower jaw is equal to half AB.
2. The width of the neck at its narrowest part is also half AB.
3. Distance ZH is equal to half AB.
4. The distance from the back of the head to the inner corner of the eye AJ is equal to the depth of the head IR, taken perpendicular to the profile.
Head viewed from the front (Fig. 13 b). The greatest width of the head AB (between the two extreme points of the eyebrow arches) is approximately equal to:
1. Distance AB from the brow arch to the occipital crest,
2. The distance AG from the eyebrow arch to the middle of the bridge of the nose.
3. GD - from the middle of the bridge of the nose to the end of the lips.
4. The distance between the zygomatic ridges of the EJ is equal to the distance ZI between the inner corners of the eyes.
When using horse measurements in his practice, the artist should in no case forget that they can only be used as some kind of help, in special cases. We must try to study and assimilate the horse’s proportions purely visually, by eye, through long-term practice of drawing from life.
 |
 |
MATERIALS FOR DRAWING AND SOME ISSUES OF DRAWING TECHNIQUES
In order to start drawing a horse on the move (while moving slowly), you need to have a hanging tray with an emphasis on the stomach, suspended over the shoulder on a belt.
You can draw while holding the tray or in horizontal position, or at a slight angle to the horizontal. The sketchbook can be of different sizes.
Inside the box are placed: paper and, in a special side compartment, pencils, watercolors, etc. When painting with watercolors, it is good to hang a water container on the right side of the belt. All these devices require standing work, but they are, of course, quite convenient for working in a sitting position. The most comfortable chair for camping work is a three-legged chair. It can be stable on uneven ground surface.
Drawing materials are very diverse. You can draw:
1) lead pencils of varying softness;
2) inking (Italian) pencil;
3) colored pencils;
4) ink (wet and dry brush, as well as pen);
5) sauce (wet and dry);
6) sanguine;
7) pastel (two or three colors);
8) plain watercolor (sepia, umber, vandyk, black watercolor)
9) charcoal (regular and oiled).
Each type of material has its own advantages and difficulties. It makes sense to try all types of technology in order to choose the most suitable one for yourself. Good knowledge of materials and skillful use of them determine the success of the work.
Since the drawing is made on paper, we need to become familiar with the properties of all types of paper at our disposal. Each material listed above requires a certain type of paper due to certain technical methods. The combination of paper and drawing material can sometimes be varied depending on the drawing technique. Sketches, for example, require the most flexible means of execution (best is a soft lead pencil on slightly rough paper).
BRIEF CHARACTERISTICS OF MATERIALS
The simplest, most accessible and widespread material is a lead pencil, preferably a soft one. The softer the pencil and the coarse-grained paper on which the drawing is made, the juicier and looser the stroke will be, and, conversely, the finer-grained the paper and the harder the pencil, the clearer and drier the stroke will be.
Black ink (ordinary) is used for pen technique. It is advisable to have a pen with a good elastic end so that you can make thin and thick strokes. It is best to take smooth, well-glued paper for pen technology, since the roughness of the paper can make it difficult for the pen to move.
The ink wash fits well on paper that is not afraid of moisture, that is, well glued.
Chinese ink produces a particularly fine wash and comes in beautiful, varied shades of black. The Chinese work on paper that slightly absorbs moisture. This technique is difficult and too individual.
The sauce (dry) provides a rich tonal opportunity. It has a deep velvety black color, sticks quite firmly to paper, and blends well with your finger and shading. Used mainly in large drawings.
Sanguine resembles a hard brown pastel. Its properties are approximately the same as those of the sauce. The material is very beautiful.
Pastel (colored chalk) is similar in properties to the previous material, but when shaded it is much softer.
Single color watercolor and gouache. This material, which adheres most firmly to paper, has a variety of capabilities. They can solve both purely tone problems and linear ones, that is, work in both wet and semi-dry methods.
In this technique, you can easily apply large tonal spots, conveying a variety of tonal gradations, and then process the drawing down to the details.
For watercolors, from existing papers it is best to take whatman paper or half-whatman paper, that is, paper best quality, allowing for rinsing. Another advantage of watercolor is that it does not require fixation and adheres firmly to the paper.
Charcoal (regular), used by painters in the preparation of paintings, has significant drawing qualities. This is a very plastic material, it lays easily and beautifully on paper, gives a rich velvety touch, is convenient for shading (with a finger, shading) and can be easily erased with an eraser or even a rag. Its big disadvantage is that it is very fragile on paper.
Without fixation, a charcoal drawing cannot be preserved for long. The fixer, no matter what the recipe, still noticeably coarsens the subtlety of shading and unifies the tonal gradation. For educational purposes, coal is indispensable.
An inking pencil and hard sauce (black chalk is very beautiful) are good for solving pictorial problems in drawing, but, unfortunately, this material is not widely used in our country.
In image practice, I would recommend diversifying your execution technique. A variety of technical materials can be associated with general imaging tasks. Nature often suggests what and how to do it, what format to choose, and, consequently, the drawing material. Thus, the feather technique is most suitable for small designs, charcoal and sanguine - for large ones. For sketches, a simple 5B soft graphite pencil is indispensable. It glides easily and smoothly across the paper, is flexible and beautiful when executed.
A pen is also good for sketching. The stroke in the pen technique is the most naked and clear, which forces the artist to avoid any accidents and be both emotional and strict in his techniques.
COLORED PRIMERS
It's good to draw on colored paper. This tradition of the old masters has great meaning and rich technical possibilities. Colored paper provides a tonal medium for the drawing in advance, on which you can work in both dark and light at the same time. You can prepare such paper yourself using finely crushed pastels or some other coloring powder, rubbing it evenly over the entire sheet with a cotton swab.
Along with the main drawings, you can also work on this primer without using chalk with an eraser, cleaning out light spots or light strokes.
Colored paper is also made using a solution of tea or coffee or filled with plain watercolors and gouache.
You can fix the drawing completely with skim milk or a very light solution of film in acetone.
It would be good for large, especially easel drawings, to pre-wet the paper and stretch it on the board and after drying, make the drawing. This protects the finished drawing from warping when damp and prevents it from shrinking too much when drying, as it significantly reduces the deformation of the paper.
Choice technical means must be done in accordance with one or another task of the drawing. So, when sketching, the material should be as flexible and easy to handle as possible in order not to complicate or create unnecessary tension in this form of work.
The book contains only the most necessary information on how to draw a horse. For a more in-depth study of the issue and familiarization with special works and materials on horse breeding, we recommend contacting:
to the Museum of Horse Breeding at the Timiryazev Agricultural Academy, which houses a large collection of paintings by Russian artists depicting horses, sculptural groups, anatomical exhibits, skeletons, albums of natural sketches, photographs and other materials;
to the All-Union Scientific Research Institute of Horse Breeding, where there is a special library containing scientific works, albums with photographs, anatomical atlases and other materials related to the horse.
Sketches can be made at hippodromes, in cavalry units, in experimental demonstration stables, in arenas, at stud farms, on collective farms, and horse breeding farms.
Output:
Gudok printing house 1994
I prepared and sent all the material
01.2007
I know that many who read my diary are creative people and very, very loving animals. I am posting a very valuable and useful book especially for you. I have re-read and reviewed so many of them, but in my opinion, only Laptev shows and describes the entire process of drawing a horse in the most detail, competently and clearly.
It is no secret that the horse has been and remains a favorite of many, many generations of artists. So on our portal there are very numerous images of these beautiful animals. However, not every artist today can afford or have the opportunity to work with nature. To help you understand the main points in drawing a horse, and to avoid annoying inaccuracies and mistakes, you have to turn to photographs, drawings by masters, and specialized literature. But, unfortunately, it is not always at hand. Today on the portal we publish excerpts and illustrations from A. Laptev’s book “How to Draw a Horse,” which has been reprinted several times and has become a real bestseller in domestic animal art.
portal administrator http://www.animalist.ru/ Natalya Usova
Horse skeleton
1 Occipital bone. 2. Parietal bone. 3. Frontal bone. 4 Zygomatic process. temporal bone. 5. Eye orbit. 6. Zygomatic bone. 7. Nasal bone. 8. Maxillary bone. 9. Intermaxillary or incisive bone, 10. Lower jaw. 10'. Angle of the lower jaw. 11. I cervical vertebra (atlas). 12. VII last cervical vertebra. 13. I thoracic vertebra. 14. XVII thoracic vertebra. 15. I lumbar vertebra. 16. VI lumbar (last) vertebra, 17. I sacral vertebra. 18. V sacral vertebra. 19. I caudal vertebra. 20. XVI caudal vertebra. 21. I rib. 22. VI rib.
23. XVIII rib. 24 and 24". Scapula and scapular cartilage. 25. Scapular crest. 26. Humerus. 27. Greater tuberosity of the humerus. 27". Anterior tubercle of the humerus. 28. Radius (forearm). 29. Ulna. 30. Olecranon process. 31. Carpal bones. 31". Accessory (sesamoid) bone of the wrist. 32. Metacarpal bone. 33. External (slate) bone. 34. Sesamoid bone. 35. I phalanx (fetlock bone). 36. II phalanx (coronoid bone). 37. III phalanx (coffin bone). 38. Ilium. 39. Tubercle of the pelvic bone (moklok). 39". Sacral tubercle of the pelvic bone. 40. Tubercle of the ischium. 41 and 42 Femurs. 43. Third skewer. 44. Greater trochanter. 45. Kneecap. 46. Tibia. 46". Knee joint. 47. Tibia of the leg. 48. Tarsal bones (hock joint). 49. Process of the filar bone. 50. Metatarsal bone. 51. Slate bone (outer). 52. Sesamoid bone. 53. Fetlock bone (first phalanx) 54. Coronoid bone (second phalanx) 55. Coffin bone.
Superficial musculature of the horse's body
1. Facial muscles. 2. Elevator of the upper lip. 2". Large masseter muscle. 3. Cervical part and thoracic part of the trapezius muscle. 4. Rhomboid muscle. 5. Belt muscle. 6. Pectoral part and 6". The cervical part of the serratus muscle (corresponds to the human serratus anterior muscle). 7 and 7'. Brachiocephalic muscle. 8. Sternocephalic muscle. 9. Cutaneous cervical muscle. 10. The shoulder part of the superficial pectoral muscle (corresponds to the human pectoralis major muscle). 11. Prescapular part of the deep pectoral muscle (corresponds to the human pectoralis minor muscle). 11". Shoulder part. 12. Supraspinatus muscle. 13 and 13". Deltoid muscle. 14. Long head and 14". External head of the triceps muscle. 15. Brachialis muscle. 16 and 16". Latissimus dorsi muscle. 17. Serratus dorsalis muscle. 18. External oblique abdominal muscle. 18" Aponeurosis of the external oblique muscle of the abdomen. 19. External intercostal muscles. 20. Gluteal fascia. 21. Muscle tensor fascia lata. 21'. Fascia lata. 22. Superficial gluteal muscle. 23, 23", 23". Biceps thigh muscle. 24. Semitendinosus muscle. 25. Dorsal and 25". Lateral sacrococcygeal muscle. 26. Coccygeal muscle. 27. Extensor carpi radialis. 28. Common digital extensor. 28". Tendon of the common digital extensor. 29. Ulnar head of the deep digital extensor. 30 and 30". Extensor carpi ulnaris. 31. Extensor carpi oblique. 32. Calf muscle (outer head). 32". Gastrocnemius tendon. 33. Deep digital flexor. 33". Deep digital flexor tendon. 34 and 34". Tendon of the superficial digital flexor. 35. Long digital extensor. 35". Extensor digitalis longus tendon. 36. Lateral digital extensor. 36". Lateral digital extensor tendon. 37. Ligament.
Stati horses
1-2 Forehead 1'. Supraorbital pits. 3. Bangs. 4. Back of the head. 5. Ears. 6. Temple. 7. Brow ridge. 8. Eye. 9. Nose (snoring). 10. Nostril. 11. Mouth. 12. Upper lip. 13. Lower lip. 14. Chin. 15. Ganache. 16, 17. Neck, 18. Throat. 19. Neck comb. 20. Withers. 21. Chest (falcon). 22. Shoulder blade. 23. Shoulder. 24. Elbow. 25. Jugular groove. 26. Underarm. 27. Chestnut. 28. Wrist (in the hostel it is incorrectly called the knee). 29. Pastern. 30. Fetlock joint. 31. Grandma. 32. Corolla. 33. Hoof. 33". Hoof toe. 34. Heel. 35. Back. 36. Loin (kidney). 37. Rump. 37". Croup 37". Tail ridge. 38. Tail. 39. Ribs. 40. Belly (belly). 41. Groin. 42. Molok. 43. Buttock. 43". Ischial tuberosity. 44. Thigh. 45. Shin. 46. Knee. 47. Hock joint. 48. Foreskin. 49. Metatarsus. 50. Brushes.
There are several measurement systems; We present the simplest and most suitable diagram for the artist’s tasks, where the so-called “square” proportion of the horse’s body is taken as a basis, that is, the ratio of the height to the length of the body is equal to one.
Horse Body Measurements
The equality of the height of the horse at the withers and its oblique length of the body (from the shoulder-scapular joint to the ischial tuberosity) assumed here is also convenient for visually checking the proportions of the horse. Let not all riding horses, and especially draft horses, be able to fit into a square. This is something the artist must always keep in mind in order to make the necessary adjustments. You need to use measurement data only in the initial period of studying how to draw a horse.
HORSE BODY MEASUREMENTS
The length of the head AB (Fig. 12) is almost exactly equal to the distances:
1. From the back to the lower abdominal wall DE (depth of the body).
2. From the highest point of the withers to the humeral tubercle VG (scapula).
3. From the upper end of the knee fold to the heel tubercle of the pancreas.
4. From the heel tubercle to the ground ZhZ.
Two and a half head lengths are almost equal.
1. The height of the withers above the ground is VK.
2. The height of the highest point of the croup above the ground is LM.
3. Very often the length of the body from the humeral tuberosity to the ischial tuberosity is GI (oblique body length).
The length of the croup (measured from the anterior protrusion of the molock to the ischial tuberosity) is approximately equal to the distances:
1. From the top of the buttock to the lower end of the knee fold IP.
2. From the junction of the neck with the chest to the beginning of the withers OH (the width of the neck at its lower end).
Horse head measurements
HEAD MEASUREMENTS
Head in profile (Fig. 13 a). With head length AB, measured by the distance from the occipital crest to the end of the lips:
1. The depth of the VG from the front surface (head) to the angle of the lower jaw is equal to half AB.
2. The width of the neck at its narrowest part is also half AB.
3. Distance ZH is equal to half AB.
4. The distance from the back of the head to the inner corner of the eye AJ is equal to the depth of the head IR, taken perpendicular to the profile.
Head viewed from the front (Fig. 13 b). The greatest width of the head AB (between the two extreme points of the eyebrow arches) is approximately equal to:
1. Distance AB from the brow arch to the occipital crest,
2. The distance AG from the eyebrow arch to the middle of the bridge of the nose.
3. GD - from the middle of the bridge of the nose to the end of the lips.
4. The distance between the zygomatic ridges of the EJ is equal to the distance ZI between the inner corners of the eyes.
When using horse measurements in his practice, the artist should in no case forget that they can only be used as some kind of help, in special cases. We must try to study and assimilate the horse’s proportions purely visually, by eye, through long-term practice of drawing from life.
MATERIALS FOR DRAWING AND SOME ISSUES OF DRAWING TECHNIQUES
In order to start drawing a horse on the move (while moving slowly), you need to have a hanging tray with an emphasis on the stomach, suspended over the shoulder on a belt.
You can draw by holding the tray either horizontally or at a slight angle to the horizontal. The sketchbook can be of different sizes.
Inside the box are placed: paper and, in a special side compartment, pencils, watercolors, etc. When painting with watercolors, it is good to hang a water container on the right side of the belt. All these devices require standing work, but they are, of course, quite convenient for working in a sitting position. The most comfortable chair for camping work is a three-legged chair. It can be stable on uneven ground surface.
Drawing materials are very diverse. You can draw:
1) lead pencils of varying softness;
2) inking (Italian) pencil;
3) colored pencils;
4) ink (wet and dry brush, as well as pen);
5) sauce (wet and dry);
6) sanguine;
7) pastel (two or three colors);
8) plain watercolor (sepia, umber, vandyk, black watercolor)
9) charcoal (regular and oiled).
Each type of material has its own advantages and difficulties. It makes sense to try all types of technology in order to choose the most suitable one for yourself. Good knowledge of materials and skillful use of them determine the success of the work.
Since the drawing is made on paper, we need to become familiar with the properties of all types of paper at our disposal. Each material listed above requires a certain type of paper in connection with certain technical techniques. The combination of paper and drawing material can sometimes be varied depending on the drawing technique. Sketches, for example, require the most flexible means of execution (best is a soft lead pencil on slightly rough paper).
BRIEF CHARACTERISTICS OF MATERIALS
The simplest, most accessible and widespread material is a lead pencil, preferably soft. The softer the pencil and the coarse-grained paper on which the drawing is made, the juicier and looser the stroke will be, and, conversely, the finer-grained the paper and the harder the pencil, the clearer and drier the stroke will be.
Black ink (ordinary) is used for pen technique. It is advisable to have a pen with a good elastic end so that you can make thin and thick strokes. It is best to take smooth, well-glued paper for pen technology, since the roughness of the paper can make it difficult for the pen to move.
The ink wash fits well on paper that is not afraid of moisture, that is, well glued.
Chinese ink produces a particularly fine wash and comes in beautiful, varied shades of black. The Chinese work on paper that slightly absorbs moisture. This technique is difficult and too individual.
The sauce (dry) provides a rich tonal opportunity. It has a deep velvety black color, sticks quite firmly to paper, and blends well with your finger and shading. Used mainly in large drawings.
Sanguine resembles a hard brown pastel. Its properties are approximately the same as those of the sauce. The material is very beautiful.
Pastel (colored chalk) is similar in properties to the previous material, but when shaded it is much softer.
Single color watercolor and gouache. This material, which adheres most firmly to paper, has a variety of capabilities. They can solve both purely tone problems and linear ones, that is, work in both wet and semi-dry methods.
In this technique, you can easily apply large tonal spots, conveying a variety of tonal gradations, and then process the drawing down to the details.
For watercolors, from existing papers it is best to take whatman paper or half-whatman paper, that is, paper of the best quality, which makes it possible to wash it off. Another advantage of watercolor is that it does not require fixation and adheres firmly to the paper.
Charcoal (regular), used by painters in the preparation of paintings, has significant drawing qualities. This is a very plastic material, it lays easily and beautifully on paper, gives a rich velvety touch, is convenient for shading (with a finger, shading) and can be easily erased with an eraser or even a rag. Its big disadvantage is that it is very fragile on paper.
Without fixation, a charcoal drawing cannot be preserved for long. The fixer, no matter what the recipe, still noticeably coarsens the subtlety of shading and unifies the tonal gradation. For educational purposes, coal is indispensable.
An inking pencil and hard sauce (black chalk is very beautiful) are good for solving pictorial problems in drawing, but, unfortunately, this material is not widely used in our country.
In image practice, I would recommend diversifying your execution technique. A variety of technical materials can be associated with general imaging tasks. Nature often suggests what and how to do it, what format to choose, and, consequently, the drawing material. Thus, the feather technique is most suitable for small designs, charcoal and sanguine - for large ones. For sketches, a simple 5B soft graphite pencil is indispensable. It glides easily and smoothly across the paper, is flexible and beautiful when executed.
A pen is also good for sketching. The stroke in the pen technique is the most naked and clear, which forces the artist to avoid any accidents and be both emotional and strict in his techniques.
COLORED PRIMERS
It's good to draw on colored paper. This tradition of the old masters has great meaning and rich technical possibilities. Colored paper provides a tonal medium for the drawing in advance, on which you can work in both dark and light at the same time. You can prepare such paper yourself using finely crushed pastels or some other coloring powder, rubbing it evenly over the entire sheet with a cotton swab.
Along with the main drawings, you can also work on this primer without using chalk with an eraser, cleaning out light spots or light strokes.
Colored paper is also made using a solution of tea or coffee or filled with plain watercolors and gouache.
You can fix the drawing completely with skim milk or a very light solution of film in acetone.
It would be good for large, especially easel drawings, to pre-wet the paper and stretch it on the board and after drying, make the drawing. This protects the finished drawing from warping when damp and prevents it from shrinking too much when drying, as it significantly reduces the deformation of the paper.
The choice of technical means must be made in accordance with a particular task of the drawing. So, when sketching, the material should be as flexible and easy to handle as possible in order not to complicate or create unnecessary tension in this form of work.
* * *
The book contains only the most necessary information on how to draw a horse. For a more in-depth study of the issue and familiarization with special works and materials on horse breeding, we recommend contacting:
to the Museum of Horse Breeding at the Timiryazev Agricultural Academy, which houses a large collection of paintings by Russian artists depicting horses, sculptural groups, anatomical exhibits, skeletons, albums of natural sketches, photographs and other materials;
to the All-Union Scientific Research Institute of Horse Breeding, where there is a special library containing scientific works, albums with photographs, anatomical atlases and other materials related to the horse.
Sketches can be made at hippodromes, in cavalry units, in experimental demonstration stables, in arenas, at stud farms, on collective farms, and horse breeding farms.
All material was prepared and sent by Natalya Rymar
01.2007
Horses are beauty, strength, grace... Horses are unusually smart animals and loyal friends of humans.
Horses inspire artists and poets, horses heal people through hypotherapy, and besides, they are truly beautiful animals! They are admired by the vast majority of adults and children. And if your child really loves fine art, then sooner or later he will want to draw a horse.
Doing this is not at all as difficult as it seems. Today you will find out what the most simple ways drawing a horse with a pencil. With their help, you can easily cope with the task assigned to you, helping your child in this matter. Start drawing today!
Instructions for kids on how to draw a horse
To help kids draw a horse with a pencil, a schematic image is usually enough. Such a horse is more reminiscent of a fairy tale or cartoon character, rather than a real graceful animal. The following visual diagrams will show you how to quickly and easily draw a horse for very young children.


How to draw a horse with a pencil step by step
1. First of all, to draw a horse with a pencil, mark the boundaries of your drawing. Of course, it is better to immediately determine the rectangle in which the animal will be located. This makes drawing much more convenient.

2. Now you need to draw the base of the future horse's head. To do this, draw a medium-sized triangle in the upper left corner of the picture. The corners of your triangle should be rounded. Do exactly as shown in the picture.

3. Now you need to draw two ovals, positioning them relative to each other at an angle. They will later become the basis of cereals and chest horses.

4. Connect your two ovals to create the horse's belly. Make the lines smooth, avoid sharp transitions and breaks.

5. Now you need to work on the image of the horse's legs. First, mark the places where they bend with dots, and then connect your points with straight lines. Try to make the proportions of the horse's body harmonious, pay attention to the drawing. Remember that the horse's knees are quite high.

6. Now you have to finish drawing the legs, make them quite muscular, full, draw the hooves. The heels are slightly raised, the hooves should be depicted in the form of trapezoids, the animal’s knees protrude slightly forward. For now, focus on the front legs.

7. You can begin to finish drawing the animal’s hind legs. Remember that a horse's hind legs are much fuller than his front legs above the knee. If the front and back legs are the same in your drawing, the proportions will be disrupted.

8. Draw the horse's neck. Here you will have to remember the golden mean in order to draw the horse correctly. The fact is that a neck that is too thin will look bad in the drawing, but an overly thick, massive neck will also spoil the impression of your horse. The neck should be quite powerful, but at the same time it is important to convey the gracefulness of the horse. To do this, you need to draw with smooth lines, be sure to indicate the transition from the body to the head, gradually making the neck thinner. Let it be slightly curved.

9. Once again draw the torso, legs, neck and head of your horse.
10. Take an eraser and remove all unnecessary lines left over from building the horse. Don't let them distract you. Erase the lines carefully, without leaving streaks or marks.
11. Now comes the most interesting stage. You have to draw a horse's head. In this drawing, the animal stands in profile towards the audience. Try to make the muzzle more expressive. Draw the ears, mark the large nostrils. Be sure to make the horse's eyes big.

12. It's time to draw your horse's tail. Sometimes the tails are cut, someone braids them and ties them with elastic bands. In our drawing, the horse’s lush, long tail flutters freely in the wind, which gives the drawing dynamism. You can immediately see that your horse is moving.

13. Update your drawing again, removing all the extra lines and unnecessary strokes.
14. Draw the horse's muscles. Outline them with strokes in the neck, back and front legs. If in doubt, completely follow the lines drawn in the drawing. A horse with such muscles will look more realistic and powerful.

15. Now decorate your horse with a lush mane that is lifted by the wind. Remember that you shouldn’t try to draw every hair or curl. Just mark the line of the mane, give it volume, and with a few strokes you can divide the mane into curls.

16. Add a few more neat strokes to indicate the bends of the joints on the horse's legs.
17. Now you can make your drawing more voluminous. Use pencils and shade them. Notice in which places the horse is darker and in which places it is given lighter shades in the sample. Do the same.
All! Your horse is completely ready. You can color it and make a background.
How to draw a beautiful running horse step by step
To draw a running horse with a pencil, you will have to work a little, but with the help of the instructions below you will definitely succeed.
1. First, draw the body of the future animal, vaguely reminiscent of a potato in shape.


3. Now - the outlines of the head.

4. Using thin lines, outline the legs of a horse that is galloping.

5. Detail the horse's head and also draw the mane.

6. Now draw the muscular legs.
7. Draw a tail and make a few strokes at the bottom of the page to imitate grass.
8. Outline the drawing with a pen, and erase unnecessary lines with an eraser. Your horse is ready! If you wish, you can color it with felt-tip pens, paints or colored pencils.

How to draw a rearing horse
To draw a horse on its hind legs with a pencil, use the following instructions.
1. Schematically draw the contours of the chest, pelvis and head of the future horse.
2. Using thin lines draw the rest of the body.
3. Use simple geometric shapes to add volume to your image.
4. Draw the horse's hind legs in detail.
5. Draw the front legs, neck and head.
6. Complete the 3D sketch.
7. Outline the horse's body with a smooth pencil line.

8. Draw the legs and hooves in the same way, simultaneously removing more unnecessary lines.
9. Finish drawing the outlines of the body and detailing the head.
10. Finally, draw the mane and tail, outline the drawing with a bright line and delete all the auxiliary segments. Your horse is ready!

How to draw a horse's head with a mane
Perhaps the greatest difficulty during drawing in most cases is the image of a horse's head. To carefully draw this element, use the following detailed diagram.
1. Using thin and light pencil lines, draw a rhombus, and on its basis - a schematic image of the horse’s muzzle.
3. Add a cheekbone with one smooth line, and also draw a neck and small area backs.
4. Detail the front of the horse's head and draw one eye.
5. Lightly shade the image as shown in the diagram and add shadows.
6. Sketch the approximate location of the hair and mane.
7. Gradually add more and more dark strokes, giving naturalness to the hair.
8. Make the mane even thicker and shade the image.
9. Finally, add a few strokes to create the background and remove any unnecessary construction lines. Your drawing is ready!
How to draw a horse's eye
If you want to draw a horse's head step by step, it is important Special attention pay attention to the image of the eye. You should remember all the nuances so that your horse’s eyes are as realistic as possible, reminiscent of real ones.
1. First, just outline the eye. Exactly repeat the lines shown in the figure.

2. Now you need to cover the eyeball with dark tones. Be sure to leave a light spot. It will be a glare from the incident light.
3. Select the central area of the eye. This will be the pupil. Remember that to make the pupil too clear, there is no need to outline it. You should only define it in a darker tone.

Running horses are beautiful and graceful creatures. However, they are one of the most difficult animals to draw. I'll show you how to draw these majestic creatures, providing you with knowledge of their basic anatomy so you can create a natural pose. You will also learn about horse gait and be able to draw realistic and dynamic poses.
You can look at the photo on Envato Market.
1. Horse skeleton
Step 1
The skeleton is the basis for the entire body, so it must be studied to understand the movements and postures of the animal. But don't worry - you won't need to count the ribs. Just look closely at this picture.

Step 2
Use the skeleton to see the underlying structure of each pose. Remember all the joints (circles) and bones (lines), their location and proportions between them, and you will be able to draw any horse!

Step 3
It is important to remember that hooves are not feet, but toes. True feet begin at joints that look like knees and elbows. That's why horses don't have knees on their front legs - they're wrists!

Step 4
A pony is also a horse. Remember that she has a shorter neck and legs - the rest is the same.

Step 5
A foal is the opposite of a pony - just look at these disproportionate long legs!

2. Overview of horse poses
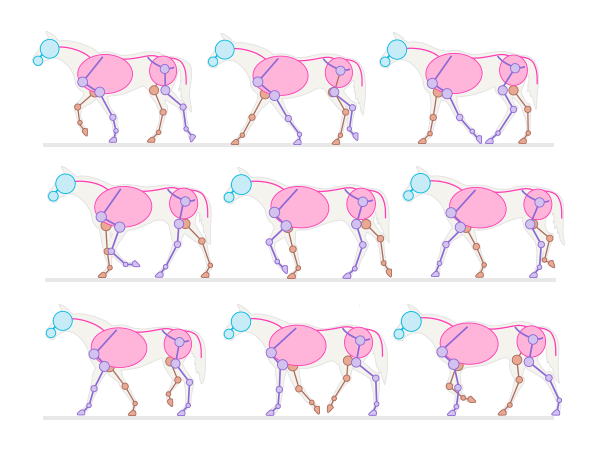
Now you know how to draw a stationary horse, but let's face it - it's boring. To bring a pose to life, you need to understand how horses move, and more importantly, how they don't move. By guessing a pose, you can suddenly confuse a trot with a gallop, making the drawing unrealistic, no matter how much time you spend drawing the muscles and light reflexes.
Step 1
The "walk" is the horse's first and slowest movement. In this position, the horse stands on the ground on three legs while one leg is raised. This is a quadruple gait (you can hear four knocks).

 Step
Step Step 2
The trot is a type of gait that a horse uses for long distances. In this position, the horse moves its legs diagonally in pairs, in a double rhythm.

 Lynx
Lynx Step 3
The canter is faster than the trot, but slower than the canter. This is a three-step gait in which the horse uses one of its hind legs to propel the others forward.

 Kenter
 Step 4
The gallop is very similar to the canter, but it is faster and its rhythm is fourfold. Painting masters made one mistake. Do you remember those pictures of horses galloping with all their legs stretched out in the air? That's not how it works. When a horse stretches its legs, at least one of them remains on the ground. The "suspended" stage occurs when all legs are bent under the body.

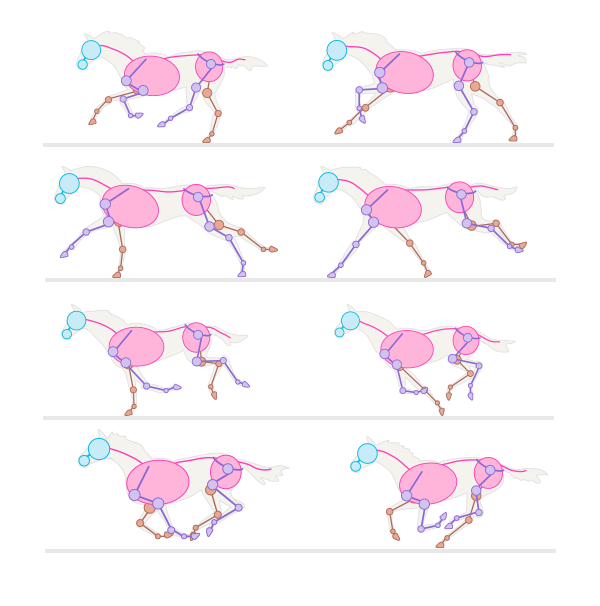 Gallop
 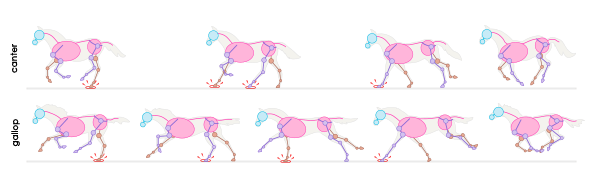 Difference between canter and gallop
  Never don't draw this pose
 Step 5
A very effective, but not entirely comfortable pose for a horse is rearing. This position is difficult to maintain for a long time, and the horse makes this jump when it is excited. To draw it natural, you need to place the back legs at the right angle.

Step 6
Horses can sleep standing up, but that doesn't mean they can't lie down. In fact, they sometimes need to lie down to truly rest. They usually lie on the same side as legs bent, but they can also lie “flat”, relaxing the whole body.


Step 7
Horses look very graceful when they jump. Also, when the horse is suspended in the air, this pose is ideal for drawing a flying Pegasus.


Step 8
That's all I wanted to tell you about the poses. Now you can choose any of them for your drawing.

3. Horse muscles
Step 1
Muscles give the body its shape, so they also need to be studied. Unfortunately, the muscle frame of a horse is very visible under the skin, so if you want to skip this step, your horses will never look realistic.
If you want to quickly draw a horse, here is a simplified diagram. She'll let you draw good shape bodies, without going into detail.

Step 2
Here's a more complex structure. This is everything you need to know to build a believable body. You may think you'll never need it, but without muscles, your skin will look flat.


Step 3
Add muscles to the chosen pose.

Step 4
Next stage- this is skin. It covers the muscles, hiding the sharp boundaries between them. The bulges of muscle under the skin reflect light differently, making the surface uneven and full of depth.

Step 5
Horse breeds are divided into hot-blooded, cold-blooded and warm-blooded. Hotblooded horses are lean, long-legged and noble-looking (like Arabian horses), fast and smart. Coldbloods are typical draft horses (like those from Skyrim), large and muscular, but slow-witted and quiet. Warmbloods are a mix of both breeds.

Step 6
Erase the muscle lines that touch each other.

4. Draw horse hooves
Step 1
In fact, hooves are horse nails. Horses are odd-toed ungulates, which means their hooves are not cloven. Drawing cloven hooves is only acceptable if you are going to draw a unicorn.
To draw the side view of the hoof, draw a line extending the length of the leg. Then draw a diamond touching the line at one corner.

Step 2
Cover the diamond with something like a cap.

Step 3
Cover these shapes with an outline.

Step 4
Add some hair and paint a rough nail texture.

Step 5
To draw the front of the hoof, draw a rounded shape that tapers slightly at the bottom.

Step 6
Cover it with a "cap".

Step 7
Also cover with contour.

Step 8
Add hair and textures. Ready!

Step 9
Drawing the back of the hoof is also easy. Start with the same rounded shape, but this time make the "cap" large and falling.

Step 10
Create an outline.

Step 11
And add hair and texture again.

Step 12
My horse now has hooves.

5. Draw a horse head
Step 1
To draw the head in profile, start with three circles - one for the main part of the skull, one for the muzzle and one for the nostrils.
Step 2
Connect the circles and add an ear.
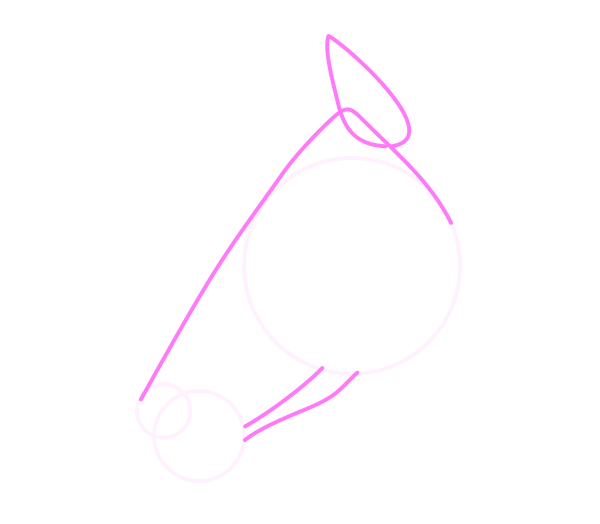
Step 3
Divide the circle of the muzzle into three parts to create the lips.

Step 4
Draw a nostril in the "nostril" circle and two lines from the nostril to the ear.

Step 5
Draw a line across the two muzzle circles, then divide the main circle into halves and a line parallel to them.

Step 6
Again, divide the top half into two more halves. Use these guide lines to place the eye. If you are drawing a foal, make the eyes bigger.

Step 7
Now you can sketch out the details, including the muscles under the skin. Remember that cheeks are not actually round, but flat.

Step 8
To draw the head from the front, start with an oval and a circle.

Step 9
Add nostrils using guide lines across the circle.

Step 10
Connect an oval and a circle, add ears and a forehead.
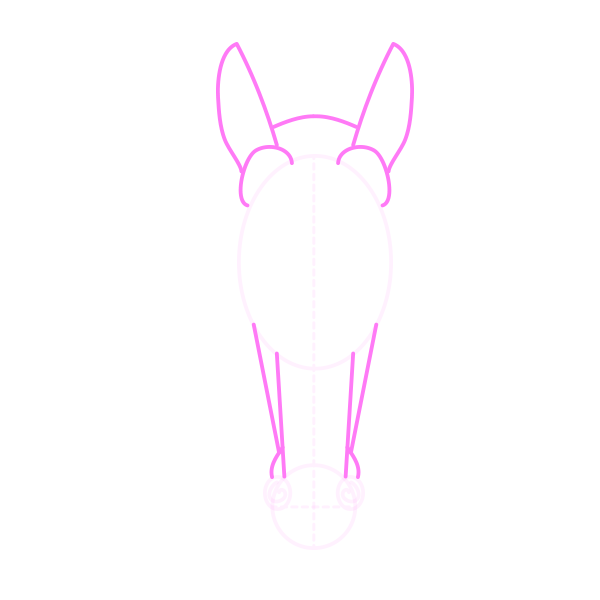
Step 11
Add the eyes using guide lines dividing the oval into four parts.

Step 12
Add details according to the anatomy of the head for a more realistic look.

6. Draw horse eyes
Step 1
Draw a circle and divide it into four sections. Divide it into halves with a line, then add another line above the previous one.

Step 2
Draw the shape of a lemon using guide lines.

Step 3
Draw the eyelids.

Step 4
Draw eyelashes. They should be straight and thick.

Step 5
The pupil should be horizontal, but most likely it will not be visible from a distance, because Horses have rather dark brown eyes. If you are drawing the whole horse and the eye is just a detail, paint it completely black. You need to draw the pupil only if the eye is blue.

Step 6
Draw and shade the area around the eye. This is very important for the overall shape. To highlight your eyelashes, add shine to them.

Step 7
To draw the eye from the front, start with a vertical ellipse and suitable guide lines.

Step 8
Add eyelids.

Step 9
Draw the eyeball covered upper eyelid.

Step 10
Add eyelashes.

Step 11
Draw the pupil.

Step 12
Polish your eye.

7. Draw horse ears
Step 1
To draw a horse's ear, start with a circle (or half a circle if it's a front view), then divide it into four sections and use them as guide lines.


8. Draw a horse's face
Step 1
Horses' nostrils are large enough to open even wider when more oxygen is needed. The easiest way to remember their shape is that they look like the number 6 or an inverted comma. Therefore, always start with an oval and place a “6” (or an upside-down “9”) inside, adjusting its roundness to the desired size.

Step 2
When drawing the face, emphasize only the lower lip, leaving the corner omitted. Also don't forget about the whiskers - horses have a lot of them!
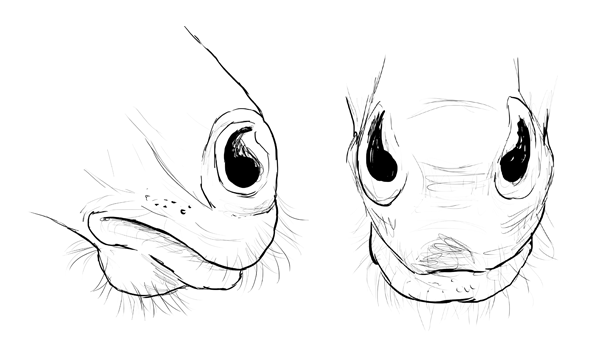
Step 3
Here is my horse with a painted head.

9. Horse mane
Step 1
The horse's mane grows straight. The strands are usually consistent in length and thick enough to cover one side of the neck.

Step 2
A horse's tail is much shorter than it looks. Long strands of hair grow from it and are driven by the tail.
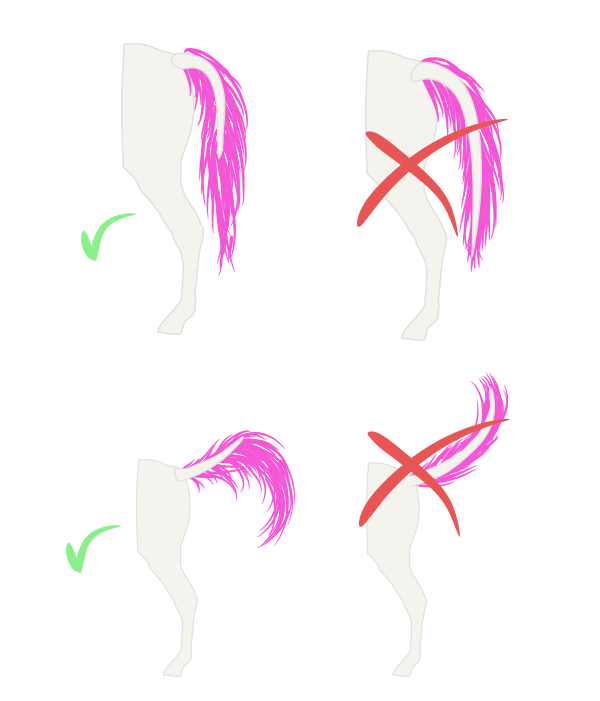
Step 3
Very long hair covering the hooves are called brushes. They are typical for draft horses.

Step 4
The wind makes the mane look incredible!

Ready!
The guide turned out to be long, but now I'm sure that you are an expert in horses!


