How to make a bike trainer at home. How to make a homemade trainer out of a bicycle
If you don't want to give your old bike in for repairs, try making your own exercise bike out of it. So you get almost the same product, but in a new quality. Even a homemade exercise bike from a bicycle has the characteristics necessary for productive activities, and in some situations it surpasses its fellow.
But before you want to make an exercise bike out of a bicycle, you need to decide what exactly you want to get in the end. Sports equipment is diverse, which means that making a choice in favor of one or another will not be so easy.

Despite the fact that the range is huge, if you refused to repair and decided to build an exercise bike with your own hands, you should concentrate on only two of its types.
The simplest can be called an ordinary machine on a stand. Making it yourself is quite simple, even without special repair skills. The second type - the driving path - is more difficult, but is wildly popular. It will take a little more time and knowledge to build such a structure, but the result will definitely please.
Stand trainer

So, let's consider how to assemble a bike rack on a stand from a bicycle with your own hands. There are not many parts needed for this case, some of them can be purchased at a sports store and in the repair department.
The front wheel can be removed, and mono and left. If you decide to remove it, the front of the future exercise bike will be fixed to the corners, if not, by analogy with the back.
Boards are the foundation of the structure, on which everything else will rest. Pegs are attached to them, and a bicycle is already attached to the pegs. You must immediately make sure that the product is stable. Instead of the front wheel, we mount dural racks, and the work is almost ready.
This is not the only, but the easiest and most economical way to make an exercise bike at home from a bicycle quickly and easily.
As you can see, in order to turn one object into another, it will not take much time and money. Perhaps the repair of the bike cost much more.
driving path
The second type attracts much more, but in order to make a driving path at home, you will need more effort, money and skills. To do this, you will need special rollers, because it is thanks to them that rotation will occur and similar to what we see on factory exercise bikes. How to make an exercise bike from a bicycle at home?
The material of the rollers can be almost any, the main thing is that it is durable and meets all the requirements. Metal tubes are often preferred, but sometimes this role is played by such "exotic" devices as wringer rollers taken out of a washing machine unsuitable for repair.
They are needed not only for the rear, but also for the front wheel. A drive belt is fixed between the rollers. A big plus of this simulator is the ability to adjust the load with your own hands. This can be achieved by installing a tie rod in the rear rollers.
So, with a little work, you can get a completely working unit. Of course, it will be inferior in a number of points to branded products, but it is realistic to perform the main tasks on it.
Benefits of homemade exercise bikes

Homemade simulators have their own positive sides, although they are inferior in functionality to a bicycle. But you cannot ignore the fact that when using a work bike, you will become the owner of two products at once. In the cold season, it will be possible to practice at home, and as soon as the time comes to get out for walks, you can simply disassemble the bike rack with your own hands and go for a ride on the street.
A big plus homemade is also compact. It is easy to move from one place to another, disassemble and reassemble. Repair of this design will be much cheaper than purchased. You can even completely change a few parts and get a completely different type of product.
- To create an additional load, install the brake. Its presence affects the rotation of the wheel and your efforts while pedaling.
Needless to say, such activities are beneficial for health. Training is effective in the fight against overweight, but in this case, carefully consider the material of the parts on which the bicycle is mounted so that you do not have to repair sagging tubes or rollers. They just can't bear the weight.
Disadvantages of converted bikes

Unfortunately, homemade simulators also have disadvantages, and they should not be forgotten. If something turns out to be a significant obstacle for you, it is better to think about buying a finished product or to think through your assembly work in more detail.
The main disadvantages are:
This important point for overweight people, and in fact many decide to train for this very reason. Please note that an exercise bike assembled by yourself can be dangerous for you. The device may not withstand the pressure and break, harming you as well. While the goods purchased in the store will keep you firmly in the saddle, homemade construction will just fall. It’s not worth risking yourself, because your goal is to maintain health, and not harm it;
The effect of training, of course, is not the same as from training on a special simulator, because you will not have the opportunity to monitor the load and take into account other parameters. The maximum that is in your power is to pedal. Based on this, calculate the final result. Certainly the benefit of physical activity it will, but there is no need to be under any illusions.
Although it is not so difficult to assemble a simulator with your own hands, not everyone can do it. There is nothing wrong with this, but you must soberly assess your abilities, otherwise there is a danger not only not to do what was intended, but also to spoil regular bike. Possible injury during assembly in the absence of experience in repair work.
Now that you know the pros and cons of this event, it will be easier to make a decision. If you are not planning to buy a new sport equipment, and you have an old, but working bike, you can try to give it a second life.
http://yvelo.ru/velotrenazherii/velotrenazher_iz_velosipeda_svoimi_rukami.html
Is it possible to assemble an exercise bike with your own hands from a bicycle - 2 basic schemes (photo)

Cyclists and just fitness enthusiasts sometimes prefer to ride a bike, but the weather or some other conditions do not always favor this. Of course, in such a situation, an exercise bike is a very relevant solution, but such a purchase also imposes some restrictions.
For example, many simply do not want to spend money, because they consider such an acquisition to be not entirely relevant. Others cannot make the optimal choice of exercise bike and consider more simple solution use a homemade addition to the bike.
In addition, making an exercise bike out of an ordinary old bicycle is quite easy, and can be an interesting pastime. In this article, we will consider two options for how you can make this simulator with your own hands.
Is it possible to make an exercise bike yourself at home?
In fact, this process is quite affordable. To make a homemade exercise bike from a frame, you will need almost any bike, but it is better to use designs like mountain bikes (with a straight frame). In addition, you will need a relatively small amount of building materials and tools and about half a day of time.
6 disadvantages of a homemade option compared to a purchased one
Let's try to analyze the most basic possible disadvantages of such a design. After all, you just need to know about the intricacies of this process before proceeding with it.

As you can see, there are drawbacks, but if you are determined to make a homemade exercise bike, there are quite optimal options for this.
How to make a bike rack for home - 2 drawings
There are many more options for creating an exercise bike from an old bicycle, but they are either difficult to perform, or overly specific, or not very effective. Therefore, we will focus on the most applicable schemes.
1. On a stand
An elementary option that does not require significant time and financial costs. To do this, you will need to make a stand out of wood, but if you get along with welding and plumbing, then you can quite make an identical design out of metal.

- Foundation. Take thick (at least 2.5 centimeters thick) boards and create something that looks like a rectangle or square that stands on the side thinnest edges. In general, you will need to make the base a little larger. rear wheel your bike. You end up with a pretty low base #8212; stable square.
- Side parts. Now you need to take two boards that are attached upright to the two side parts of the base opposite each other. You need to get two side racks. Moreover, in the upper part of these racks, you need to make a cut-recess, which will allow you to install pegs.
- Peggy. This term refers to steel flasks that are used on BMX bikes. You can get these pegs at a bike shop for a relatively low cost. The pegs will need to be mounted on your bike's rear wheel axle. After that, you can put the wheel in the recesses, and it will be suspended.
The simulator is actually ready #8212; you only need to fix the structure so that no slopes form (although a bicycle in such a structure can stand evenly simply resting on the front wheel). Of the shortcomings here it should be noted the need to create a load. Of the merits#8212; ease of creating such a design (even for people without any carpentry experience).
Regardless of the model of the exercise bike, the effectiveness will depend on how you exercise correctly.

Photo of the end result.
Also watch the instruction about this option on the video:
And here is another type of stand:
2. Roller track
This option is also called a bike rack, and it is more difficult to make: it will take more time and materials. In particular you need to purchase first :

- boards for the base;
- self-tapping screws for fasteners, bearings, pins and other elements for bushings;
- thick pvc pipes for rollers or other suitable materials (e.g. pipes).
- base- make a rectangular frame a little smaller than the length of your bike, use thick boards no more than 10 centimeters high;
- rollers- make rollers that will have side bushings; use, for example, pins that can be installed in the grooves that rise on the sides of the frame;
- installation of rollers– Set the rear rollers in such a way that the distance between them ensures normal rotation and stability of the rear wheel; the front roller is located almost at the very front edge of the frame (to stop the front wheel).
 Advantage of this simulator is only the ability to immediately install a mechanism for regulating the load, but otherwise the advantages here are not so obvious.
In addition, you need to somehow adjust the stability, since initially on such a platform you need to catch the balance, which also needs to be adjusted by the steering wheel. How easy it is to understand #8212; with intensive rotation, stability may decrease, and in general it is not suitable for many practitioners. Therefore, it is best to use additional supports. For example, to make axles from the platform to the bicycle frame.
For more good results you need to remember about proper nutrition.
Attention! When you build any type of homemade trainer, always think about reliability and safety and improve on those features. Also, don't forget #8212; The benefits and harms of exercise are very individual.


Photo of the end result.

Also see how it all looks in dynamics in the video:
And some information about the choice of roller machines for this option:
How to create a load?
If you want to get more performance from your homemade exercise bike, use various options for increasing the load:
- wheel weight- an elementary option that allows you to very accurately control the load: just fasten the various weights evenly (we emphasize, evenly, but not on one side and not in the middle of the spoke, but along the entire rear wheel) and vary the load;
- pinch rollers- you can make them yourself, or you can buy them (the cost is quite affordable); such rollers are attached to the bottom of the rear wheel and provide friction;
- electric generator- the hardest and most interesting option: it will require a car generator and pressure rollers, in addition to this, technical skills are needed; this element will allow you not only to train, but also to generate electricity.
Exercise will help you burn more calories. As a guide, you can use the table of energy costs.
Most full review everything related to training on an exercise bike is at the link.
In conclusion, I would like to say about the availability of commercial analogues for each version of exercise bikes from a bicycle. We will not name specific brands, but there are well-known companies that have made significant progress in creating applications for bicycles.
There are special stands and rollers in the offer, which are equipped not only with measuring devices, excellent multimedia elements, but also with a mechanism for generating electricity (something like advanced dynamos), which will allow you to charge various electrical devices during training.
Please note! Even if you make your own exercise bike at home without financial costs, you are wasting other valuable labor and time resources.
Therefore, the answer to question #8212; which option to prefer and what expenses to make #8212; we leave it to your choice.
http://prostofitness.com/dlya-pohudeniya/cardio/trenazhery/velotrenazher/vel-svoimi-rukami-iz-velosipeda.html
Exercise bike: buy in a store or create it yourself?
Exercise bike - buy ready or make?
slender, taut figure This is the goal and dream of many people. Regardless of the season in the yard, many people regularly have the same thought in their heads: “Lose weight!”. There are many reasons for this: New Year, birthday, vacation, March 8, a trip to the sea or an amazing dress in the window, which is clearly not in size. Regularly, a month before each of these events, we set ourselves the goal of losing weight, but in conditions of constant employment, this is not very successful.

Exercise bike based on a Salute bike on homemade rollers
known to be effective and fast way to make your figure fit and slim - cycling. But cycling is good in the warm season, but what about in winter or rainy autumn? You can buy an exercise bike in a specialized sports store, or you can make an exercise bike with your own hands. This will allow you to play sports in your free time in the apartment, on the balcony, in front of the TV, and you yourself will not notice how you lose weight.

Homemade exercise bike can be installed anywhere
A simple and economical way out is to make an exercise bike with your own hands from a bicycle. Making it is easy enough. There are two most common and relatively simple ways.
Exercise bike on a stand
The first way is an exercise bike from a bicycle on a special stand that will not allow the wheels to touch the floor. To do this, for each wheel on both sides you need to install boards, the height of which must exceed the radius of the wheel. A semicircle is cut out in the planks from the top in the center, special pegs are installed on it, which are sold in the store, like other spare parts for exercise bikes. They are screwed to the wheel and mounted on a stand. For stability, the stand should have a fairly wide base, it will not be superfluous to use metal corners.

Scheme and elements of an exercise bike on a stand
You can simplify the process by removing the front wheel and attaching the bike to a special fork.
Exercise bike on a roller track
The second method is more laborious, but for experienced craftsmen it does not present significant problems.
In addition, classes on such an exercise bike are more effective, as they are closer to natural conditions, and you will soon lose weight.

Rollerblade exercise bike in the hallway
This method consists in making a roller track for an exercise bike. As in the previous version, one wheel (rear) can be used, or both can. If you want to make a roller trainer for one wheel, then the front wheel is removed, the front of the bike is mounted on a special stand, and a special box is made for the rear wheel, in which two rollers are fixed. The rollers must be durable, you can take wooden ones, or you can take pieces of a metal pipe, the squeeze rollers of an old washing machine will do (if anyone has them). By turning the pedals, you set the wheel in motion, which sets the rollers in motion (gears in mechanisms work according to this principle).

Roller part of a homemade exercise bike
A more difficult option is to build a two-wheeled exercise bike yourself. To do this, the frame must be half a meter longer than the bike. Two rollers are also installed for the rear wheel, and one for the front. You can fix the bike itself, then you get a semblance of a stationary exercise bike; if you want to lose weight and constantly train the skills of balancing and maintaining balance, you can not fix the bike. The bicycle before the start of classes is installed so that the front wheel is on the roller. Leaning your hand against a wall or a nearby chair, start pedaling, trying to achieve balance (falls are also possible).
Ready rollers for exercise bike
The advantages of this model are that the load is regulated by changing the ease of rotation of the rollers.
But get ready for the fact that a homemade exercise bike can have a number of disadvantages:
- it will take up a lot of space;
- it will not be as stable and safe as factory exercise bikes;
- you will not be able to change the load, regulate the speed of movement, control the “mileage” and the state of your own body.

Exercise bike on a finished stand
Whether these shortcomings will cover the main advantage of a homemade exercise bike - its economy, is an individual question. But if desired and the right approach, an excellent result is possible in the form of a noticeably thinner figure.
A slender, toned figure is the goal and dream of many people. Regardless of the season in the yard, many people regularly have the same thought in their heads: “Lose weight!”. There are many reasons for this: New Year, birthday, vacation, March 8, a trip to the sea or an amazing dress in the window, which is clearly not in size. Regularly, a month before each of these events, we set ourselves the goal of losing weight, but in conditions of constant employment, this is not very successful.
Exercise bike based on a Salute bike on homemade rollers
It is known that an effective and quick way to make your figure fit and slim is cycling. But cycling is good in the warm season, but what about in winter or rainy autumn? You can buy an exercise bike in a specialized sports store, or you can make an exercise bike with your own hands. This will allow you to play sports in your free time in the apartment, on the balcony, in front of the TV, and you yourself will not notice how you lose weight.

Homemade exercise bike can be installed anywhere
A simple and economical way out is to make an exercise bike with your own hands from a bicycle. Making it is easy enough. There are two most common and relatively simple ways.
Exercise bike on a stand
The first way is an exercise bike from a bicycle on a special stand that will not allow the wheels to touch the floor. To do this, for each wheel on both sides you need to install boards, the height of which must exceed the radius of the wheel. A semicircle is cut out in the planks from the top in the center, special pegs are installed on it, which are sold in the store, like other spare parts for exercise bikes. They are screwed to the wheel and mounted on a stand. For stability, the stand should have a fairly wide base, it will not be superfluous to use metal corners.

Scheme and elements of an exercise bike on a stand
You can simplify the process by removing the front wheel and attaching the bike to a special fork.
Exercise bike on a roller track
The second method is more laborious, but for experienced craftsmen it does not present significant problems.
In addition, classes on such an exercise bike are more effective, as they are closer to natural conditions, and you will soon lose weight.

Rollerblade exercise bike in the hallway
This method consists in making a roller track for an exercise bike. As in the previous version, one wheel (rear) can be used, or both can. If you want to make a roller trainer for one wheel, then the front wheel is removed, the front of the bike is mounted on a special stand, and a special box is made for the rear wheel, in which two rollers are fixed. The rollers must be durable, you can take wooden ones, or you can take pieces of a metal pipe, the squeeze rollers of an old washing machine will do (if anyone has them). By turning the pedals, you set the wheel in motion, which sets the rollers in motion (gears in mechanisms work according to this principle).

Roller part of a homemade exercise bike
A more difficult option is to build a two-wheeled exercise bike yourself. To do this, the frame must be half a meter longer than the bike. Two rollers are also installed for the rear wheel, and one for the front. You can fix the bike itself, then you get a semblance of a stationary exercise bike; if you want to lose weight and constantly train the skills of balancing and maintaining balance, you can not fix the bike. The bicycle before the start of classes is installed so that the front wheel is on the roller. Leaning your hand against a wall or a nearby chair, start pedaling, trying to achieve balance (falls are also possible).

Ready rollers for exercise bike
The advantages of this model are that the load is regulated by changing the ease of rotation of the rollers.
But get ready for the fact that a homemade exercise bike can have a number of disadvantages:
- it will take up a lot of space;
- it will not be as stable and safe as factory exercise bikes;
- you will not be able to change the load, regulate the speed of movement, control the “mileage” and the state of your own body.

Exercise bike on a finished stand
Whether these shortcomings will cover the main advantage of a homemade exercise bike - its economy, is an individual question. But if desired and the right approach, an excellent result is possible in the form of a noticeably thinner figure.
In this article, you will learn several ways to quickly and inexpensively convert your bike into a home exercise bike.
We remind you that in our store at the best prices.
How to make an exercise bike for 700 rubles?
Do it yourself out!
The exercise bike is a great heart trainer and a powerful weight loss tool!
But if you are not eager to buy a ready-made exercise bike and your hands grow from right place yes and u bac is idle in winter season bicycle - try to make an exercise bike yourself!
We offer the most a simple circuit manufacture of an exercise bike. From the photos it is clear how it works! Pipes - rear wheel supports can be bought at the store. Manufacturing costs - less than 1000 rubles and one evening of work.
A few boards and three hours of work and ready!

The device is clear without a drawing:

If you don’t want to mess with support tubes, buy so-called pegs from the store:

We remove the tire and the rear wheel chamber, take an old car or motorcycle generator, select the desired belt. Now the exercise bike not only increased the load, but also produces electricity (Chubais is resting).
Now set a goal for yourself, write a lesson plan, determine the incentive and go!
We remind you that in our sports shop you can find affordable home exercise bikes.
Another option is how to make an exercise bike yourself from plywood and PVC pipes
If necessary, you can build an exercise bike with your own hands. The basis is a roller device. Rollers for an exercise bike are made of pipes or round wooden logs with a diameter of 10-15 cm. Roller bearings with axles are mounted at the ends of the rollers, and the axles are fixed in racks.
Depending on the tasks that the student sets for himself, he chooses heavier or lighter rollers. On an exercise bike with heavy rollers, power qualities are developed, and on a bicycle machine with light rollers, pedaling speed is developed. If there are no roller bearings at hand, you can drill or burn holes in wooden blocks, insert metal axles with a diameter of 18-20 mm into them and strengthen them in the racks. Such rollers must be systematically lubricated with grease or technical petroleum jelly. The dimensions of the frame on which the exercise bike is mounted depend on the model.
However, everything becomes clear from the photos:
Under the size of the PVC pipe, we make plywood inserts for mounting bearings and strengthening the pipe (buy a PVC pipe in a plumbing store with a diameter of 75 mm - 100 mm):
The size of a homemade bike rack in inches for a standard mountain bike:
Glue limiters for the drive belt on the front wheel on the roller pipes:
Pick up the diameter of the bearings (from the wheels of the rollers) and the axle.
The frame of the exercise bike is preferably made of hardwood or plywood. Pay attention to how the roller clamps are made:
Sew the drive belt to the front wheel roller to fit (this will increase the load on the exercise bike and allow you to keep balance):
The exercise bike is almost ready!
Footrests for comfort. If you want to increase the load, make a brake device out of felt on the exercise bike rollers:
Ideas on how to make an exercise bike yourself cheaply:
One of possible ways bike load adjustment:
Wish do it yourself the exercise bike is understandable - it saves space, and the use of an existing bike, and the desire to save money!
Let's take a close look at the advantages of a purchased exercise bike and the disadvantages of a homemade model:
- A homemade exercise bike will take up more space in the apartment.
- Not everyone in the family will be able to practice on a homemade one: stability problems, difficult to sit down, high seating position, risk of tipping over.
- As a rule, a home-made version is noisier - the neighbors will rejoice at your sports success!
- It is difficult to make an adjustable load with a homemade simulator.
- It is not possible to monitor the parameters of the training: pulse, calories, pace.
- As a rule, home-made technically (smoothness, convenience, comfort, load adjustment, training efficiency) will be at the level of the simplest belt exercise bike for 2000 rubles.
- Not every interior will fit homemade.
- Rapid wear of a bike used as an exercise bike (factory model is almost eternal with proper technical care).
Petersburg is not such an expensive pleasure (the price of two pairs of shoes). Many people can afford it.
It is enough to buy an exercise bike and train regularly on it, and you will get excellent health and the figure of your dreams!
How to increase the load on a homemade exercise bike
On the exercise bike, install the blades to create a load due to air resistance.
It generates electricity!
Exercise bike + generator equals power plant:
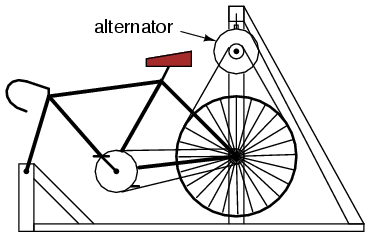
The implementation of the electrification plan:

We make a bicycle simulator ourselves!
With the onset of cold weather, many of you disassemble the bike and put it away. But it turns out that you can ride it ... even in winter. Of course, not on snow or ice, but on a special device that simulates road conditions.
Usually such a device is called a bike rack. cyclists train on it. It can be assembled and installed at home or in gym schools.

The base of the bicycle station consists of a platform 2 of a square shape, sawn from plywood 15–20 mm thick and an extension 5 made of a thick board. These parts can be fastened together, for example, with metal corners or glued with locking glue.
At the end of the extension, with the help of triangular pieces of plywood 6, which act as a bracket, they strengthen the rack 7, made, like the extension, from a thick board. In the upper part of the rack, a screw 8-10 mm thick is passed through the hole, on which the front fork of the bicycle will be installed in the future.
On the platform, metal racks 3 with stiffeners are strengthened. It is convenient to use ready-made aluminum corners here. The ends of the racks should be flat and bent at a certain angle. So, the ends with two holes are bent at an angle of 20˚, and with one hole - at an angle of 60˚. Perhaps this work will cause you difficulties. Therefore, we advise you to use template 8, sawn from a thick duralumin plate or cut from a wooden block.
Snobs 4, sawn from aluminum, duralumin or steel 3 mm thick, are attached to the ends with two holes.
Next, prepare the bike - remove the front wheel, loosen the rear wheel and remove the shield above it. On both sides of the wheel, a bracket 4 with racks 3 is attached to its axis. Moreover, on the sides of the bracket, a washer is put on the axle and only after that the axle nuts are tightened.
Putting the rear wheel with racks on the platform, attach the front fork to the extension rack. After that, you can fix the ends of the racks on the site with thick screws or bolts. But at the same time, it is necessary to ensure that the wheel tire is 15-20 mm from the platform.
If you now sit behind the wheel of a bicycle and start pedaling, the rear wheel will turn easily. To train in such a ride, of course, is not interesting. It is necessary to bring the training closer to real road conditions. For this, rollers 1 are used, which are installed under the wheel tire so that braking is created. The rollers are mounted on brackets 14 with longitudinal slots. The axis of each roller is a screw with a nut.
The rotation of the roller will become silent if a bearing is inserted inside it (the roller itself can be made of hard rubber). The roller bracket is screwed to the metal plate 15, which, in turn, is rigidly fixed to the site. Slots in the bracket allow you to move it along the site so that it is pressed against the wheel with the necessary force.
But that's not all. You know that climbing a mountain or driving on a bad road requires a lot of effort from the athlete. And this increase in load should also be simulated during training. For this, a special brake device is used, which rests on top of the rear wheel. By changing the force of pressure on the wheel, the braking effect is increased or decreased. The braking device consists of two crossbars 9, a holder 10, a rod 11, a load 12 and a roller 13.
The metal crossbars are mounted on the rear wheel fork, a screw is passed through their holes, which attaches the holder to the crossbars. Then the end of the rod is inserted into the holder and fixed with a screw - it serves as an axis around which the rod can turn slightly, rising up or falling down.
From below, a roller with a groove along the rim is attached to the bar using a bracket. At the end of the rod, a load, such as weights, is installed. During training, the roller will be pressed against the rear wheel of the bike with a load. By removing or adding weights, they regulate the pressure on the wheel, and hence the braking force.
It is advisable to install the simulator on a rug, for example, made of foam rubber, so as not to spoil the floor. You can also nail small rubber support legs to the bottom of the platform and the extension and do without a rug.
Morning exercises, jogging, skiing in winter and hiking in summer, cycling - effective means health promotion. However, the Go bike depends a lot on the conditions. traffic, the vagaries of the weather. In such cases, an exercise bike will help, the simple design of which I want to offer. It is simple and affordable to manufacture, easy to use, has a small mass (within 10 kg), there is a place for it in any apartment, since it takes up little space (300 x 1300 mm).
The assembly does not require a lot of time or scarce materials. And what is important - the main part of it is ... the bike itself, and any available in the house. Turning it into a simulator takes literally two to three minutes and comes down to removing the front wheel and fixing the fork on the simulator rack.

The base of the simulator is a frame made of steel corners 36 x 36 mm: two lateral longitudinal ones 1300 mm long and two transverse ones 230 mm long. Two duralumin flocks are screwed to the front side ones with an axle between them, on which the front fork of the bicycle is attached.
At the other end of the base, a support assembly with rotating rubber rollers is installed - the rear wheel rests on them. The axes of the rollers enter the bearings installed in the duralumin cheeks of the assembly. Old wringer rollers from a washing machine are used as rollers.
It is also possible to adjust the load: change the effort required to rotate the rear wheel and rollers. To do this, a tie rod is installed between the latter: by tightening its nuts, we increase the load, unscrewing it, we reduce it.
OWN HANDS from a bicycle
Usually the bike is used five to six months a year. In the autumn slush and winter cold, he stands (or hangs) idle, waiting for the new season. But it can be used with health benefits all year round, although optional, ride it. Equipping it with simple fixtures and supports, you will get an excellent exercise bike for the muscles of not only the arms and legs, but also the back and the press. On the simulator, instead of the steering wheel, a carriage assembly is installed (without frame pipes).
The steering column bearings are pre-removed and the front fork is tightly tightened with a clamping cone, which prevents it from turning. The left crank of the standard bottom bracket has been replaced by a crank with a sprocket connected by a chain to an upper sprocket with the same number of teeth. At the ends of the shafts of the foot and hand carriage units, on one side, additional through grooves (flats) were cut out using an abrasive wheel so that the connecting rods could be turned 180 ° and secured with a wedge.
The pedals on the hand cranks are replaced with bushings, and the foot cranks are equipped with self-made touklips (see "Model Designer" No. 5 "2000), which allow not only pushing, but also pulling the pedals up. For reliable chain tension, a fixing sleeve is put on the steering stem. Its the length and length of the hand drive chain depends on the type of bicycle and is determined locally.The chain links are disassembled in this sequence.
Having placed the chain on the vise jaws, moved apart by 4-5 mm, the desired axis is knocked out with a center punch with a diameter of 3 mm, but not completely, but so that it remains in the lower outer plate. Slightly bending the top plate, disconnect the chain and remove (or add) links. Connect the links in reverse order, hitting the protruding axle with a hammer until it completely enters the outer plate from the other side.
In order for the exercise bike to stand stably on the floor, a support stand was made in the form of an isosceles triangle from a half-inch steel pipe 1.5 m long. The ends of the pipe are flattened and bent, holes are drilled in them for the diameter of the rear wheel axle. A longitudinal stop from a piece of the same pipe is welded to the rack. A footrest is attached to the front fork under the crown with an M6 bolt. Rubber tubes are put on both ends of the support. The brake pads have been removed from the hub of the rear wheel of the road builder to enable reverse rotation.
The simulator is equipped with a rear hand brake, the rubber pads of which are pressed against the rim so that the required load on the pedals is created, that is, the necessary “track resistance” is provided. This is achieved by turning and locking the adjusting screw, through which passes a metal cable mounted on one of the brake levers. As the pads wear, the screw is slightly tightened, restoring the load.
The trainee, sitting in the saddle (it should be softer) and moving his legs from below under the support on the front fork, slowly takes the body back and down and returns to its original position, thus “shaking” the press. By rotating the appropriate handles and pedals with your arms and/or legs, you can successfully develop the muscles of your arms and/or legs.
If you rearrange the left cranks by 180 °, then, making reciprocating oscillatory movements with your arms and legs, like a rower, you can train big muscles back. The exercise bike is simple and reliable. It's easy to make. And if you are smart, then improve it, which will allow you to load other muscle groups.

exercise bike: 1 - front fork; 2 - clamping cone; 3 - steering rod; 4 - fixing tube; 5 - remote clamp; 6 - manual connecting rod; 7 - manual carriage assembly; 8— manual drive chain; 9 - steps; 10 - additional asterisk; 11 - seat; 12 - brake; 13 - tuklipe; 14 - stand-support; 15 - stop rack; 16 - brake pads; 17—brake levers; 18 - adjusting screw; 19 - cable.

Finalization of carriage shafts: 1 - carriage shaft; 2 - flats (grooves).

Disassembly of the chain link: 1 - inner plates; 2 - center punch; 3 - outer plates; 4 - vise jaws; 5 - axis
But frankly, it is much more profitable to choose and buy a good and inexpensive exercise bike than to spend a lot of time, disfigure the bike and, as a result, get a simulator that is impossible to work out on.
So, we choose:
Cyclists and just fitness enthusiasts sometimes prefer to ride a bike, but the weather or some other conditions do not always favor this. Of course, in such a situation, the solution is quite relevant, but such a purchase also imposes some restrictions.
For example, many simply do not want to spend money, because they consider such an acquisition to be not entirely relevant. Others can't pull off the optimal one and find it easier to use a homemade bike add-on.
In addition, making an exercise bike out of an ordinary old bicycle is quite easy, and can be an interesting pastime. In this article, we will consider two options for how you can make this simulator with your own hands.
Is it possible to make an exercise bike yourself at home?
In fact, this process is quite affordable. To make a homemade exercise bike from a frame, you will need almost any bike, but it is better to use designs like mountain bikes (with a straight frame). In addition, you will need a relatively small amount of building materials and tools and about half a day of time.
6 disadvantages of a homemade option compared to a purchased one
Let's try to analyze the most basic possible disadvantages of such a design. After all, you just need to know about the intricacies of this process before proceeding with it.

- Reliability. As a rule, a store-bought exercise bike is more reliable, even if you take the cheapest models. For selection, you can refer to. You will need to put in quite a lot of effort to ensure low wear of structural parts, as well as use other elements to increase the reliability of home-made equipment.
- Saddle comfort. It is not always comfortable to sit in a stationary position on the saddle for a long time. Therefore, some need to change the seat or use some kind of add-ons to increase comfort. is an important part of training.
- Sustainability. In many respects it is combined with the previous point. As a rule, a home-made design is not as stable as a purchased exercise bike; and you are unlikely to be able to make convenient elements for carrying and a system for compensating for uneven floors.
- No load. If you turn only the mechanism that is not loaded by anything, you will not get a significant effect. Therefore, for a do-it-yourself exercise bike, it is best to use some additional options for increasing the load. We'll briefly look at these options below, but either way, you won't be able to fine-tune the degree of load (as you can with store-bought exercise bikes).
- Measurement of parameters. You will need to use a bike computer, which is usually mounted on the front wheel. If you are making a machine with only a spinning rear wheel, then you will need to move your cycle computer to the rear wheel, but this is not always possible. Sometimes you will need to purchase wireless equipment.
- Efficiency. Of course, active movement affects the body. For example, in order to restore the body, a simple home-made exercise bike with no load can come in handy. Such activity is also useful in order to simply keep yourself in good shape, but you should not think about a significant increase in your own results. Without a steady increase in load and pedal resistance, one should not hope to achieve such results as losing weight or increasing endurance.
As you can see, there are drawbacks, but if you are determined to make a homemade exercise bike, there are quite optimal options for this.
How to make a bike rack for home - 2 drawings
There are many more options for creating an exercise bike from an old bicycle, but they are either difficult to perform, or overly specific, or not very effective. Therefore, we will focus on the most applicable schemes.
1. On a stand
An elementary option that does not require significant time and financial costs. To do this, you will need to make a stand out of wood, but if you get along with welding and plumbing, then you can quite make an identical design out of metal.

- Foundation. Take thick (at least 2.5 centimeters thick) boards and create something that looks like a rectangle or square that stands on the side thinnest edges. In general, you will need to make the base slightly larger than your bike's rear wheel. As a result, you will get a rather low base - a stable square.
- Side parts. Now you need to take two boards that are attached upright to the two side parts of the base opposite each other. You need to get two side racks. Moreover, in the upper part of these racks, you need to make a cut-recess, which will allow you to install pegs.
- Peggy. This term refers to steel flasks that are used on BMX bikes. You can get these pegs at a bike shop for a relatively low cost. The pegs will need to be mounted on your bike's rear wheel axle. After that, you can put the wheel in the recesses, and it will be suspended.
The simulator is actually ready - you just need to fix the structure so that no slopes form (although the bike in such a design can stand evenly simply resting on the front wheel). Of the shortcomings here it should be noted the need to create a load. Of the merits- the ease of creating such a design (even for people without any carpentry experience).
Assembly drawing.

Photo of the end result.

Also watch the instruction about this option on the video:
And here is another type of stand:
2. Roller track
This option is also called a bike rack, and it is more difficult to make: it will take more time and materials. In particular you need to purchase first:

- boards for the base;
- self-tapping screws for fasteners, bearings, pins and other elements for bushings;
- thick PVC pipes for rollers or other suitable materials (eg pipes).
- base- make a rectangular frame a little smaller than the length of your bike, use thick boards no more than 10 centimeters high;
- rollers- make rollers that will have side bushings; use, for example, pins that can be installed in the grooves that rise on the sides of the frame;
- installation of rollers– Set the rear rollers in such a way that the distance between them ensures normal rotation and stability of the rear wheel; the front roller is located almost at the very front edge of the frame (to stop the front wheel).
 Advantage of this simulator is only the ability to immediately install a mechanism for regulating the load, but otherwise the advantages here are not so obvious.
In addition, you need to somehow adjust the stability, since initially on such a platform you need to catch the balance, which also needs to be adjusted by the steering wheel. As it is not difficult to understand - with intensive rotation, stability can decrease, and in general it is not suitable for many practitioners. Therefore, it is best to use additional supports. For example, to make axles from the platform to the bicycle frame.
For better results, remember to
Attention! When you build any type of homemade trainer, always think about reliability and safety and improve on those features. In addition, do not forget - very individual.Assembly drawing.


Photo of the end result.

Also see how it all looks in dynamics in the video:
And some information about the choice of roller machines for this option:
How to create a load?
If you want to get more performance from your homemade exercise bike, use various options for increasing the load:
- wheel weight- an elementary option that allows you to very accurately control the load: just fasten the various weights evenly (we emphasize, evenly, but not on one side and not in the middle of the spoke, but along the entire rear wheel) and vary the load;
- pinch rollers- you can make them yourself, or you can buy them (the cost is quite affordable); such rollers are attached to the bottom of the rear wheel and provide friction;
- electric generator- the most difficult and most interesting option: it will require a car generator and pressure rollers, in addition to this, technical skills are needed; this element will allow you not only to train, but also to generate electricity.
Exercise will help you burn more calories. You can use as a guide
In conclusion, I would like to say about the availability of commercial analogues for each version of exercise bikes from a bicycle. We will not name specific brands, but there are well-known companies that have made significant progress in creating applications for bicycles.
There are special stands and rollers in the offer, which are equipped not only with measuring devices, excellent multimedia elements, but also with a mechanism for generating electricity (something like advanced dynamos), which will allow you to charge various electrical devices during training.
Keep in mind, even if you make your own exercise bike for home without financial costs, you are wasting other valuable labor and time resources. Therefore, the answer to the question - which option to prefer and what expenses to make - is left to your choice.


