Making a collapsible bow at home. In the footsteps of Robin Hood: how to make a bow with your own hands
Dear friends! We have touched a lot on the manufacture of various edged weapons, including crossbows and bows. But they completely overlooked the bow, which has a block string tension system. Let's fill this gap and think together how to make a compound bow. The Internet is full of information on this issue, but all of it is scattered and, let's say, not entirely clear. Therefore, I chose several options offered by various sites and tried to combine them into one.
The most important thing in a compound bow is the block system, which is quite difficult to manufacture, because it requires the use of professional equipment, such as, for example, a lathe and milling machine.
We will assume that you have the necessary skills to work on this equipment, or have familiar professionals who can manufacture the parts you need. But for those hard-nosed DIYers who like to do everything by hand using simple tools, I post a description of how you can make a bow block at home.
So, in order not to put off work indefinitely, purchase several dural plates and make blocks from them according to the patterns that are suggested below.
Naturally, in order to do everything right, you must have at least some idea of \u200b\u200bhow the string tension block system works. What do the blocks look like? But for this, it’s not enough to look at pictures on the Internet, you need to hold a compound bow in your hands, shoot from it, carefully consider how the details move relative to each other. But, probably, not everyone has the opportunity to study the compound bow visually, so to speak, holding it in their hands. And the desire to make such a weapon does not decrease at all. For such people, this page has been created, designed to help realize this desire.
But I digress a little from the main topic. I want to say that the photographs and diagrams show different blocks, but the main thing for us is to understand the very essence of their work and design.
As I said, it is better to make blocks from pieces of duralumin sheet 5-7 mm thick. Transfer the block template directly onto a sheet of duralumin and cut out the general contours of the block with an electric jigsaw.
Then we drill in each part of the block a center hole for the bearing for the axis of rotation of the blocks.
We connect the parts together and center by inserting one common bearing. We clamp the blanks into the clamps and drill two small holes. We pull the blanks through them with bolts and remove the clamps.
Now we drill the remaining holes, plus additional ones into which the jigsaw blade will be inserted in order to cut out the required shape of the blocks.
We disconnect the parts and with a file at the end of the blocks we grind a groove for the cable.
Where necessary, we cut the thread with a tap and finally connect the block parts with bolts.
Do the same for the second block.
These photos show in detail what parts the bow block consists of.
In general, once again I will repeat. For a beginner who has never seen a compound bow, it is very difficult to make such a system of blocks, but in principle it is possible.
Using these photos, it is quite possible to construct a compound bow on your own, if, of course, you understand its principle of operation. I did not go into detail about how the cables and bowstring work, because for those who have an idea about the work of a compound bow, my explanations will not be needed. Well, whoever hasn’t seen such a bow in his eyes will simply not be able to make a system of blocks. Because it’s quite difficult to navigate using photographs alone, without knowing what this or that part of the block actually represents.
P.S.d
The article is a rewrite. The administrator is not responsible for the accuracy of the information. Everything you do, you do at your own peril and risk
The bow is the most ancient human weapon. Most peoples hunted and fought with him.
Although modern weapons are much superior to a simple bow, in conditions wildlife it will become irreplaceable.
With a real bow and arrows, children will be happy to play. You can buy it at the store or build it yourself.
What does it consist of
 An onion has only two components:
- Shoulders;
- Handle.
The shoulders of the bow are located above and below the handle. A special shelf is sometimes made on the handle, on which the arrow rests. A bowstring is stretched between the shoulders.
A hole is made in the bow to guide the arrow. The size of the bow and arrow depends on your height. They are easily identified by the span of the hands.
There are fixed sizes:
How to make a shallow strip foundation:
Varieties
Bows for shooting are classified according to several points:
- By the look.
- Simple. It consists of a flexible stick, bent half-fold into an arc. Her shoulders are connected by a bowstring;
- Difficult. Consists of a base that is reinforced with tendons and horny plates glued together. Sometimes its handle is trimmed with bone overlays.
- By shape.
- Straight;
- Curved.
- By the look.

materials
The material from which your bow will be depends on what it is made for. You can make a bow from the following materials:
What can you make a bow out of?

- Tree. The most common variant is ash or white acacia. The tree should not have knots, cracks, chips and other flaws;
- PVC pipe. It is made from a PVC pipe;
- Paper. Suitable for making mini bow or crossbow;
- Skis. The upper parts of the skis are used as shoulders;
- Plywood. Used to make shoulders.
What materials to make a bowstring?

For a bowstring you can use:
- Polypropylene rope;
- Thin nylon thread or lace;
- Kapron, Kevlar;
- Leska;
- Leg-split;
- Kevlar climbing sling (sold in sports stores);
- Lavsan thread.
Most often, the bowstring is made from synthetic threads.
What is the arrow made of?

Arrows are made of wood - pine or birch. Birch is more difficult to process, but in the end the shaft is of better quality. It can be a branch, board or wooden slats.
The tip of the arrow must be sharp so that it cuts through the air well and can stick. You can attach a nail and wrap it with copper wire. To use the bow for its intended purpose, it is better to cut the tip from thin steel (1.5-2 mm).
Preparing and processing wood for onions

Tools needed to make a wooden bow:
- Drill;
- Ax and knife;
- Saw, jigsaw or electric jigsaw;
- Scissors for metal, saw for metal (for making a sharp tip);
- Sanding machine, sandpaper (for grinding parts);
- File;
- Needle file (file for woodworking, metalworking);
- Stapel (to give a curved shape);
- Planer (for processing boards).
Harvesting and processing of wood
First you need to choose what the bow will be made from. The simplest and most affordable option is a tree. For powerful bow deciduous trees (oak, white locust, lemon tree,) are suitable.

- The tree is cut down on a cold, frosty day. You should pay attention to the growths and branches on the tree - there should be few of them. We cut down a large branch, at least 180 cm long. This is a blank for the future bow;
- We do not touch the bark. We cover the ends of sawn wood with paint or impregnation with an oil base;
- To dry, put the branch vertically for 2-3 months. The temperature should be at least 20 degrees and not more than 28 degrees;
- Using a sharpened knife and a sharp ax, we give the workpiece a rectangular shape;
- We steam the shoulders of the onion with steam (it is enough to hold them over boiling water). Both shoulders must be steamed at the same time;
- The steamed blank is placed in a slipway for 14-15 days. In this case, the bark should come off the workpiece on its own. If this does not happen, gently help her with a sharp knife.
- wax. After complete drying, we make notches for attaching the bowstring.
Instructions for creating an arrow

For a good bow, you need to make at least 4 arrows. For their manufacture, we take slats or boards, with a thickness of 2 to 3 cm. The length of the arrow is about 85 cm, but it is better to determine it from a special table, which is located above.
- We do markup. Using a planer, we change the thickness of the board up to 1.5 centimeters;
- We mark the board into squares (from the end) and saw it into arrows;
- We turn squares into hexagons with a file or knife;
- With a grinder or sandpaper, give the shaft a round shape, up to 8 mm in diameter;

- If necessary, we attach feathers (3 pieces per arrow). It is better to take crow feathers, which we cut along. We equalize the pile with scissors, leaving 0.5 cm. We wind them with threads. Instead of feathers, you can make notches for the fingers;
- The tip should be triangular in shape. It can be made independently;
- In the shaft we make a notch under the tail of the tip and fasten it with the same thread.
How to make a string for a bow?
The bowstring can be made by pulling the thread over the notches that we made on the shoulders. Let's make a bowstring on our own. For this we need:
- The wrapping thread should be silk or nylon (#10);
- rubber glue;
- PVA glue;
- Wax (moisture protection);
- Board;
- 2 thick nails.
- We take two round sticks (coated with varnish or tape, from 10mm wide and 20 cm long) and a board (200x40x40). At the distance of the bowstring, we drill holes and fasten the sticks into the resulting holes;
- We take any coil and wind a thread for a bowstring on it;
- Wrap the thread for the warp evenly on the sticks. Enough 2-3 turns. We tie the ends of the thread into strong knots, which we glue with PVA;
- Glue (rubber) is smeared on the nylon thread immediately, then when winding, we lubricate the PVA. For the rest - we coat with PVA, and when winding - with rubber glue;
- The winding is made with dense turns. We wind 10 cm on each thread and shift them half a turn. We wind until loops are formed. It turns out about 20 cm on both sides;
- We make a loop for putting on a bowstring.
 In order to put the bowstring on the shoulders, it is necessary to bend / unbend it several times. This will allow him to get used to the movement and pressure a bit.
After 10-15 actions, you need to put a loop of thread on one shoulder and turn the bow over without releasing the bowstring. Then we bend the shoulders so that there is a bowstring distance between the ends of the bow. We put on the second loop.
Attention! Never rest your shoulder on the floor or any other hard surface! So you can easily break a homemade bow.
Do-it-yourself waterproofing of the strip foundation:
Bow assembly steps

We are considering a simple bow that does not need further assembly.
In order to assemble the parts of a prefabricated shooting bow (if the handle is made separately from the shoulders), you can use ordinary wood glue or thick screws.
Archery care

- Store upright;
- We put on the bowstring before shooting. If the bow will not be used for a long time, it is better to remove the bowstring;
- Before shooting, you need to slowly pump the bow - make 5-10 swinging movements with the shoulders of the bow (let it get used to the load);
- It is impossible to rest the shoulders of the bow on a hard surface when the bowstring is put on;
- Store in a dry place, avoid direct sunlight;
- Do not let go of the bowstring without arrows;
- You can't drag the bow.
Advice! It is better to buy or make a special case for your bow with your own hands.
The video below shows detailed instructions to create and assemble a real bow and arrows for it:
Make a bow with your own hands
Well at the end I add in full another instruction for making a bow with my own hands, which I could find.
For the manufacture of a simple bow, almost any tree that grows in the middle lane of our mother Russia is suitable. Recommended: maple, juniper, hazel, birch, ash, oak, elm, verest.
The proposed workpiece must be cut in winter, in frost ~ 10-15 degrees.
The workpiece should not have large knots (growths, mechanical and thermal damage). The length of the workpiece should be 30 cm longer than the length of your future bow (15 cm on each side for drying cracks, the occurrence of which is not excluded). DO NOT REMOVE the bark from the resulting "log"! Cover the ends of the workpiece with oil paint. Drying of wood should be even, in order to avoid the appearance of internal defects in the material. If this is not done, then the bow will not last long. Dry the processed workpiece in a vertical position at room temperature. The air should not be too dry, otherwise the tree will dry out and work go to waste. Drying time 2–5 months, depending on conditions.
Primary processing
The resulting blank is a log "Figure 1". Our task is to get a board from this log. How to achieve this? There are several options, each of which is quite historical: processing, with an ax, with a saw, by splitting with wedges (from harder wood). The thickness of the board is equal to the width of the bow being made in the handle (for a Slavic bow, about 3 cm). After receiving the board we need, it is necessary to mark it. Visually check it for the presence of an oblique layer and other defects. According to the results of the inspection, make adjustments to the thickness of the bow at the site of the defect in the material (increase it). Further on "Figure 2" the markup scheme is shown. Please note that we did not remove the bark from the workpiece. Don't hurt outer part your future bow!
Picture 1
Figure 2
The excess part is separated from the bow by means of an ax, and then a knife and a planer. With this treatment, you get the side profile of the bow. After separating the bow, begin the formation of its frontal profile "Figure 3". The ratio of the width of the handle to the width of the end of the shoulder is approximately 3/2. At these stages of work, be extremely careful. It depends on the accuracy and accuracy of your work whether the limbs of the bow will work equally evenly or one will be more elastic than the other. At these stages, the bow cannot be bent - this can lead to splitting of the workpiece and its damage. The section of your bow will depend on the thickness of the log you have prepared. It can vary from lentil to almost rectangular "Figure 4".
Figure 3

Figure 4
Steaming onions
At this stage, the bend of the bow is formed. Some manufacturers resort to soaking the workpiece in various infusions and solutions. The wood treated with water vapor has all the properties we need. Why steam onions? There are several reasons to be aware of the manufacturing process:
If the wood dries out during the drying process (therefore, it is not recommended to bend the onion before steaming).
In the case where your primary blank was not straight (which is not uncommon, and which should not be feared. The frontal profile of your weapon does not have to be straight at all. This will not affect the effectiveness of the shooting, unless it will be inconvenient for another person to use your weapon.)
If you are making a relatively short weapon (Slavic version 1 - 1.3 m).
If you intend to make a bow with a reverse bow.
In the case when you are making a "light" (for example, game) bow.
In order to give an aesthetic appearance.
At the beginning of the stage, your workpiece is the following: "Figure 5". You need, for example, to get such a bend: "Figure 6". To do this, you need to steam the shoulders of the bow (the element being steamed becomes plastic and easily takes the bend that you set. Steam the shoulder of the bow until you can easily bend it for captivity). The following parts are steamed, shown in white "Figure 7".
Figure 5
Figure 6
Figure 7
It is best to steam at the same time, so that then the onion shoulders dry out simultaneously and evenly. After steaming the shoulders, the bow is drawn into a special slipway “Figure 8” prepared in advance for this particular bow. Black color shows wooden bars, between which a “hot” bow is forced. The number, shape and location of the clamping bars depends on the shape of the bow you need. In such a slipway, the onion dries up to 1 week. After that, it is removed from the slipway, the ends of the bow are formed for the subsequent putting on of the bowstring (a place is being prepared for horn / bone tips or a “step” is simply cut out under the bowstring loop).

Figure 8
Note that we did not remove the bark from the “back” of the onion! When steaming and captivating in the slipway, part of the bark will peel off from the back of the onion. Separate it with a fingernail or wooden knife. ATTENTION! Do not damage the fibers on the back of the bow! If part of the bark remains, do not worry, gently sand it with sandpaper to a smooth state and your bow will take on a decent appearance.
The bow is almost ready. For the longevity of the bow, it must be protected from drying out or moisture. If you adhere to the historical and reconstructive direction in your work, then it is recommended to impregnate the onion with hot wax or melted fat (do not overdo it! The impregnation should be no more than 3 mm in depth, otherwise the onion will lose its elasticity). Otherwise, you can use varnish, modern paints or mastics.
Making a bowstring
For a bowstring, threads made from strong artificial fibers, such as Kevlar (very strong, but also expensive), nylon, lavsan, are best suited, and silk is also suitable. A good bowstring is obtained from a thin fishing cord in reels (not a fishing line, but a cord). The main thing is that the thread does not stretch and is very strong and resistant to chafing. The thickness of the threads does not really matter, just depending on this, the number of turns will change. The string is made as follows:
Step 1. First you need to make a "winding machine", that is, a simple device with two or four pins, where the bowstring will be wound. L3 (string length) = L1 + L2, with L1 = 15x20 cm. "Figure 9". But there is a simpler way out - to wind the thread around the legs of the stool. With various winding options, almost any length can be achieved, although it may be slightly inaccurate. The ends of the thread are tied with an Achilles knot.

Figure 9
Step 2. On the ears of the bowstring, that is, in the place where it is put on the bow, it is necessary to make a protective winding. This will prevent abrasion. For this, the option with four pins is convenient. Well, in other cases, you can use a spacer. You need to wind it tightly, lay the turns as tightly as possible arcs to each other.
"Figure 10" The winding is done from both ends of the bowstring, approximately 15 cm each. Moreover, on one side, the turns begin in such a way as to hide the knot obtained after step 1.

Figure 10
Step 3. Now we make an eye loop, tightly rewinding its base “Figure 11”.

Figure 11
Step 4. Next, approximately in the middle of the bowstring, you should also make a winding 10 × 15 cm long. This is the place where the fingers will lie. It is also useful to make a “saddle” - a thickening under the arrow shank so that it does not move out “Figure 12”.

Figure 12
Arrow making
Let's start with the manufacture of the shaft. The shaft for an arrow can be made from wood, this is the easiest way. You can go into the forest and cut down a tree, cut boards, etc. You can buy a board and cut an arrow. You can use ready-made square-section wooden slats or even a regular bead, processing them to a round section with a diameter of 8-9 mm. The main thing is to choose the slats as straight as possible and without knots (and hitches J). Now we need to make the sticks round, I did it with a planer. Next, the workpiece must be sanded, first with large, and then with fine sandpaper. To do this, you can use a drill at low speeds, holding the workpiece in its chuck.
Please note that the more even the shaft of the arrow turns out, the more accurate its flight will be. And even better if you manage to find ready-made round slats. For example, used for chopiks (wooden nails) in carpentry.
Arrow Length Determination: (See "Table" and "Figure 13")
Table


Figure 13
Now we need a tip. You can do it simply: hammer in a nail and wrap that place with copper wire. But this is not a very good design. It is better to make such a tip: "Figure 14". It can be cut from steel with a thickness of 1.5 - 2 mm. You can cut it with a knife. At the end of the bow, you need to make a slot, and attach the tip to the glue there, then wrap it with thread.
Next you need to make a shank. For example, like this: "Figure 15". You need to insert a bowstring into the slot, notches - so that your hands do not slip off.

Figure 14

Figure 15
Now you need to make plumage. It can be made from bird feathers. Two or three plumages can be cut from one bird feather (depending on its length). The length of the plumage is in the range from 5.0 to 9.0 cm. The best feathers for arrows are from the wings of a turkey, swan, eagle and goose. The feather is cut with scissors along the trunk, and then pieces of a given size are cut from it.
For plumage should be used the best part pen, closer to the base of the trunk. Feathers can be dyed in desired colors before gluing. The plumage trimmed with scissors has a barrel that is uneven in structure, which must be processed so that it can be glued to the arrow. Processing of the plumage barrel is carried out either on an emery wheel (when it rotates), grinding the core of the barrel, or by grinding with sandpaper. The latter method is simpler and more guaranteed against errors.
Grinding is done as follows: the plumage is compressed between two metal plates about 0.5 × 0.7 mm thick. The part of the pen barrel remaining outside is sanded along the emery cloth, which is located on a flat board. Since the plates are held perpendicular to the board, after grinding the end of the plumage will be pressed against the arrow evenly. The side faces of the plumage rod are also polished. The feathers made in this way are glued to the arrow.
The selection and sticker of plumage on one set of arrows must be made from feathers of the wing of the same name. Incorrectly glued feathers (for example, taken from different wings) can lead to differences in the flight of the arrow compared to other arrows. The feathers glued to the arrows are fired with hot wire to give them a certain shape, for which a special machine is used. At present, archers use feathers purchased from various companies, which are of high quality made for any arrows and various kinds shooting. Feathers can be wound with strong threads (silk, nylon, etc.) "Figure 16"

Figure 16

Put on the string shortly before shooting, and take it off immediately after.
Sew a cover for the bow so as not to damage it during transportation and storage.
Store onions in a room with room temperature and moderate humidity in an upright position.
Shoot your bow at least once a month so that he doesn't get used to shooting.
From the book Finishing and repair for a thrifty owner author Blaze Iosif SamuilovichDo-it-yourself furniture Stained-glass windows in the doors Doors with glass inserts - stained-glass windows look spectacular in the apartment. For such stained-glass windows you will need colored glass. There are several ways to color them. Glass can be painted with conventional oil paints, varnishes, enamels or
From book 3000 practical advice for home author Baturina Anna Evgenievna From the book Decoration of Bottles, Glasses and Candles author Preobrazhenskaya Vera NikolaevnaMaking candles with your own hands Oval candle You will need Cinders of old candles or ordinary household candles, wax crayons, 100% cotton threads, a candle mold with a small hole in the middle for the wick, a stick for stirring wax, a stick for
From the book Fence, fence, gate at their summer cottage [We build with our own hands] author Nikitko IvanChapter 2 We make a fence with our own hands Preparatory work Most fences are a structure based on supporting pillars, logs and a crate attached to the logs (Fig. 2.1). The most maintainable fencing option is the presence of blocks
From the book We sew soft toys, pillows and bean bags author Ivanovskaya Tatyana VladimirovnaOWN HANDS BAG CHAIR Making a pear-shaped bean bag will not be particularly difficult, but the interior of the room will change significantly with such a comfortable and beautiful accessory. You can not deny yourself the pleasure of becoming a designer of your own furniture,
From the book DIY Furniture author Onishchenko VladimirDo-it-yourself furniture You can learn how to make furniture with your own hands for a short time and at any age, for this it is not necessary to have some special training. The main thing is desire and patience. Where to start, what should be the first steps? For example, first
From the book How to make a country house cozy and comfortable author Kashkarov Andrey Petrovich1.22. Installing do-it-yourself double-glazed windows in a village house It may be that installing double-glazed windows instead of old frames seems like a difficult task, but I assure you that anyone can solve it. And such a seemingly unbearable thing is available today even to a housewife
From the book Country Encyclopedia of Experienced Advice author Kashkarov Andrey Petrovich From the book Country House Design author Kashkarov Andrey Petrovich2.1. Do-it-yourself creative design, or do-it-yourself laying out tracks country cottage area in front of the house “looked” or played with new colors, they are trying to give its landscape an original, or, as it is now fashionable to say, creative, design. There is also a "special"
From the book Modern Apartment Plumber, Builder and Electrician author Kashkarov Andrey Petrovich From the book Do it before the child grows up. Adventure, games, experiences author Rizo Elena Alexandrovna From the book Repair. Right! Cheap! Fast! author Kriksunova Inna Abramovna From the book Wardrobes, hallways, slides, walls, shelves, chests of drawers and other prefabricated furniture author Podolsky Yuriy FedorovichDo-it-yourself wardrobe room A wardrobe room is the dream of every housewife. This is a spacious wardrobe for outerwear, and comfortable shelves for underwear, and a place to store many household items, and additional mezzanines for backpacks and suitcases. And also this
From the book Entertaining Electronics [Non-template encyclopedia of useful circuits] author Kashkarov Andrey Petrovich1.4. Do-it-yourself sensitive audio and video amplifier This material will be useful to those who are involved in the use of video monitoring circuits in a limited area. Regarding the possible options for providing protection in enclosed spaces, I noticed that it is not always cost-effective
From the book Cosmetics and handmade soap author Zgurskaya Maria PavlovnaRules for making cosmetics with your own hands 1. Prepare a separate dish that you will use only for the manufacture of cosmetic preparations. These should be enameled, glass and plastic bowls. different size and pans with a double bottom.
From the book Managing and configuring Wi-Fi in your home author Kashkarov Andrey PetrovichArchery can be attributed to those activities that almost everyone can master. This is a very unusual, at the same time affordable hobby, but at the same time it is a prestigious and fashionable hobby all over the world.
For many centuries, people have continued to practice archery. Once essential for hunting, today it is also used for sports and entertainment. But few people thought, looking at this weapon, that it had practically not changed since our ancestors invented it. This is the same bowstring stretched over an elastic rod and pointed arrows.
Buying a sports bow can cost you quite a lot, and not everyone who wants to buy it is an athlete or a hunter. Perhaps this is your hobby in your free time, you want to pick up arrows and try to hit the target, or maybe you want to get a bow for your child and play Indians with him. In this case, the best solution would be to make a bow and arrows yourself. It's really fascinating and creative process, no less interesting than the shooting itself. In addition, the indisputable advantage of a homemade bow will be the ability to save the budget from a serious blow. So, let's figure out how to make a bow and arrow with your own hands.
Materials for DIY bow making
The bow itself can be made from various improvised materials:
- Tree. The most popular and, perhaps, the most reliable option for self-manufacturing. A bow made of wood will have strength and durability. The best breeds ash and white locust are considered, you can also use maple, oak or poplar. At the same time, there should be no knots, processes, cracks and other flaws on the stick. Do not use coniferous trees.
- PVC pipe. Another material that you can use to realize your idea.
- An unusual, but quite suitable material can be ordinary skis. To be more precise, the upper segments of the bow arms are made from skis.
- Plywood, like skis, can be an option for bow limbs.
- Even an old car spring can become suitable for shooting.
- For a small toy, you can use, oddly enough, plain paper.
The next element of the bow is the string. It is important to understand that the choice should be made on a durable, elastic material that can withstand a lot of pressure. Suitable options for her:
- Polypropylene rope
- Nylon thread or cord
- Nylon thread
- Twine or regular thin fishing line
- Thin climbing sling
Of course, we must not forget about the arrow! The best choice The material for its manufacture will be wood. As a rule, these are birch and pine branches, slats or boards. Processing birch is somewhat more difficult, but the result is better.
The arrowhead must be made sharp so that it can pierce the target. For a simple option, a nail wrapped with wire may fit. For a more serious approach, a thin steel tip should be used.
Do not forget to glue feathers or make notches for your fingers at the end of the arrow.
What do you need to know before getting started?
Even if you are making a bow and arrow for fun or as a gift to a child, there are certain sizes that you should consider:
The classic version of the bow consists of:
- The main part, i.e. the handle
- Shoulders
- bowstring
After making the bow, it is necessary to ensure proper care. Don't worry, care is simple and won't take much time:
- Onions should be stored upright.
- The bowstring is put on only when shooting, and after that it is immediately removed. Before shooting, you need to "spring" the bow and string in order to develop.
- You can't pull the bow.
- Store only in a dry place, preferably with a case.
Bow and arrows made of wood
Wood is perhaps the best and most affordable option for making onions. For this you will need:
- Drill
- Axe
- jigsaw
- Metal shears
- Sandpaper
- Regular file and file for working with wood and metal
- slipway
- Plane
To make a bow, you need to stock up on time and patience.
- First, we need to find a branch that matches the parameters. This is best done on a cold day. It is important that the selected branch has as few growths and small processes as possible, and the length is at least 180 cm.
- There is no need to touch the bark. And the sawn ends must be coated with oil impregnation for wood or a special varnish.
- Leave the base of the future onion to dry for a couple of months, placing it vertically in a room with a temperature of 20 to 28 degrees.
- It is necessary to give the workpiece a rectangular shape, this can be done with a well-sharpened knife and a sharp ax.
- Both shoulders of the onion are simultaneously steamed over boiling water.
- To give a bend, we install the freshly steamed workpiece in a slipway for two weeks.
- When placed in a slipway, the bark should come off, but if this did not happen, then at this stage, carefully clean it off with a knife.
- We cover the product with wax.
- We make notches for the bowstring only after drying.

It is necessary to pull the bowstring on our preparation of the future bow. It's not at all difficult to make it. You will need the following materials:
- Silk or nylon (#10) thread
- PVA glue
- rubber adhesive
- Moisture protection, e.g. wax
- Board
- thick nails
It is necessary to take two round short pegs with a thickness of 20 mm or more. On the board, the dimensions of which are 200 * 40 * 40, in accordance with the distance of the bowstring, we drill two holes and set the pegs. The next step is to wind the thread on the spool for the future bowstring. Wind the thread around the pegs, which will be used as a base. Enough 3 turns. Tie the ends of the thread firmly and coat with PVA.
Spread rubber glue immediately on a nylon thread, coat with PVA when winding. Make the winding as tight as possible. At the ends, make loops for pulling the bowstring over the shoulders of the bow.
Before you string the string directly over the limbs of the bow, bend it a little about 15 times. This will allow the product to get used to the movement.
You can't do without arrows either. Since we make a bow with our own hands, let's look at how they are made. At least we need 4 arrows.
You will need for the future arrow:
- Laths or boards about 3 cm wide and 85 cm long

Manufacturing process:
- Using a planer, narrow the workpiece (rail or board) to 1.5 cm.
- Saw it into squares of 1.5 cm on each side.
- With sandpaper or a grinding machine, give a round shape, with a diameter of not more than 8 mm.
- We can also attach feathers. Crows are best suited for this. Cut the feather in half and use a thread to attach to the end of the arrow.
- The tip is better to buy in a special store. You can make it yourself by cutting it out of a thin sheet of iron or by winding a sharp nail with a strong fishing line.

Homemade bow from PVC pipe
Despite the fact that wood is the most suitable and affordable material for onions, it can also be made from PVC pipes. Making a wooden bow takes a long time, and it will take much less to work with a pipe.
You will need:
- PVC pipe
- Building hair dryer
- knife for metal
- Blocks
- molding board
- slipway
Manufacturing process:
- First, you need to select a pipe.
Please note that we need pvc pipe, not PP or PE.
- Mark the center in the middle of the future bow and set aside 6 cm from it in each direction. This will be the pen.
- Also, you need two bars in height like a pipe.

- Now you need to heat one shoulder of the bow with a building hair dryer until it becomes evenly soft.
- Lay the molding board and attach with clamps.
It is important to recall that the board lies on the bars at the handle.
- The board is removed after the pipe has cooled.
- All the same is repeated with the other shoulder.
- The next step is to shape the handle. It also heats up and forms in a plane perpendicular to the compressed shoulders.
The handle should be shaped to fit the palm so that it is comfortable to hold.
- Not without a bowstring. Therefore, the next step is to fasten the bowstring. From the very edge at the end of the shoulder, retreat about 8 cm. Heat and bend at an angle of 60 degrees.
- After cooling, cut out the "holder" for the bowstring.
- We do the same with the second shoulder.
- For a bowstring, you can use a rope made of polypropylene.
The material for arrows is still better to choose wood. For their manufacture, you will need boards or slats, the diameter of which is up to 15 mm. The manufacture of arrows is discussed in detail in the previous version of the wooden bow. ***** Instead of bird feathers, you can use reinforced tape *****! PICTURE 43 - “Plumage of arrows”!
Do-it-yourself bow from old skis
Skis- An excellent material for making bows. They have their undeniable advantages: already prepared curved ends, while the bending of the shoulders is the same.
To work you need:
- Bolts, nuts
- Thick wooden block
- Thread made of nylon or some other material that does not stretch well
- Drill
- Scarring
- Hacksaw
- Hammer
- Chisel
- File
- Sandpaper
- You may need a band saw and planer
Work process:
- First you need to make a handle template. It is important to understand that it is necessary to take into account the place for gripping by hand and the presence of flat surfaces at a slight angle for attaching skis.
- We transfer the finished template to the bar and carefully cut out the future handle.
- The skis can be very long and not suitable for the bow in size. Therefore, according to the parameters given at the beginning of the article, the length of the bow is calculated, and the extra piece is cut off from the length of the skis.
- With the help of bolts, shoulders obtained from skis are attached.
- Then, you need to cut out the grooves for the bowstring. The edges must be rounded, otherwise the bowstring may rub against them.
- The selected thread, if it is too thin, it is desirable to twist. This will give it additional density and extend its service life.
- Arrows are made similarly to the previous versions of the bow.
That's all, the bow from the old skis is ready to shoot.

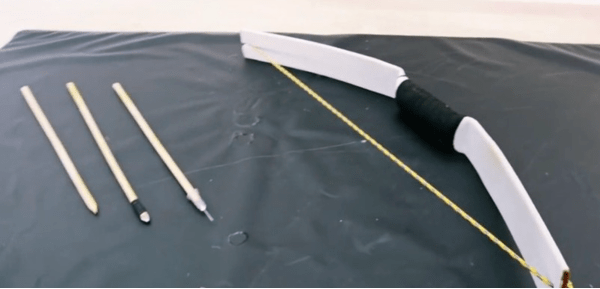
Bow and arrows with their own hands from reinforcement
This requires the following:
- Fiberglass reinforcement with a diameter of 8 mm and a length
- Profile pipe 20 cm long, with a section of 20 * 25 mm
- Plywood, 40 mm thick
- Steel cable for bowstring, the diameter of which is 1 mm
- Furniture bolts
- clamps
- thick thread
- Heat shrink tubing for decoration, you can do without them
Manufacturing process:
- For each shoulder, it is necessary to prepare two pieces of reinforcement 50 cm long and one 70 cm long.
- Fold the reinforcement together so that there is a long section in the middle and wrap it tightly with synthetic thread.
It is important to do this along the entire length so that the pieces of reinforcement become a single whole.

- Then it is necessary to impregnate the shoulders of the future bow with epoxy.
- For beauty, you can prepare a heat shrink tube. Putting it on your shoulder, blow it with a hairdryer. Do the same with the second shoulder. It is possible that this may cause a slight decrease in the elasticity of the shoulders, and apart from a decorative function, this procedure does not give anything.
- Then it is necessary to cut the profile pipe along. Measure the middle, and after making cuts, fold in half. Next, you need to drill holes and, using bolts, compress the resulting boxes. The figure shows what should be the result.
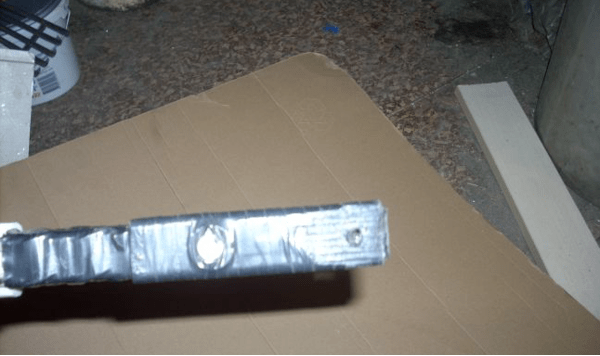
- Without delaying your shoulders, you can immediately make bowstring holders. To do this, it is enough to step back from the edge of the shoulders by 1 cm, wind the wire and strengthen it with electrical tape. Get a kind of tubercle for fastening.
- The handle is best made from wood.
Do not use conifers, as they will not withstand the load. Oak will do. Or you can get by with plywood at least 4 cm thick.
- Cut out the handle blank according to the template chosen on the Internet. Sand and paint.
- Using furniture bolts, connect the shoulders and the handle of the future bow.
Then you need to move on to making a bowstring. It can be made from a steel cable, the diameter of which is 1 mm. Fasten the loops with crimps, and stretch the heat shrink film over the entire length of the cable.

Arrows can be made from window glazing bead and tape. With the help of a planer, plan the bead, and make plumage from adhesive tape. Instead of a tip, it will be enough to sharpen the arrow and dip it in paint. Such a bow cannot be used for hunting or professional shooting. But it's perfect for outdoor activities!
Homemade bow from a car spring
If a car spring is suitable for making a crossbow, then why not try using it as a material for a homemade bow? Anything can be at hand, and you should not neglect it.
To work, you will need an automobile spring, for example, from an old Lada or Muscovite, and a grinder.
- The spring needs to be sharpened. The narrower it is, the more pliable the bow will be. In this case, it is necessary to ensure that the shoulders of the bow are the same.
- The handle can be made of foam. To do this, you need to cut a piece of foam and tape it to the spring with electrical tape.
- Towards the ends, the shoulders of the future bow need to be narrowed even more with the help of a grinder, as well as to make shallow recesses for the bowstring.

Now we turn to the manufacture of arrows. This requires thin fittings. It must be sharpened, but in such a way that it does not lose its elasticity and does not bend. On the one hand, the arrow is sharpened a little sharper, and plastic plumage is attached to it. A linen cord is suitable for a bowstring.
Bow made from automotive spring very tight and may not suit everyone. But it will be an excellent tool for developing hand strength.
When using this version of a homemade bow, do not forget about thick gloves so as not to injure your hands.
Homemade paper bow
This option also has the right to exist if you have paper at hand and a desire to shoot. For hunting, of course, it is not suitable, but it is suitable for fun.
You will need:
- Paper
- Scissors
- Rods from handles
- Scotch
- Rope
- cocktail straws
How to make a paper bow:
- Cut out a square shape from a sheet of paper.
- Take 2 identical rods from the handle.
- Wrap one of the rods in a square piece of paper. Then, twisting from the corner of the workpiece, make sure that the paper fits snugly. Secure with tape. Do the same with the second rod.
- Gently roll up the paper not to the end. A couple cm should remain free. It is necessary to squeeze these ends so that they become flat.
- Put them on top of each other and secure tightly with tape.
- For the bowstring we fix the elastic rope.
For arrows, you can use straws from cocktails, wrapping them in the same way with electrical tape.
That's all. Paper bow and shells are ready!

It doesn't matter what kind of bow you want to make. Whether it's elvish, asian, short or whatever, it's important to stick to the basic rules and then everything will work out!
For an ordinary onion, virtually any tree growing in Russia is suitable.
So, the bow can be made from maple, juniper, ash, hazel, birch, oak and elm.
The workpiece must be cut in winter in frost from 10 to 15 degrees.
The workpiece must be free of thermal and mechanical damage, and not have unnecessary growths.
The length of the bow blank should be 30 cm longer than the length of the bow, as cracks may appear, for this, 15 cm are left on both sides.
There is no need to remove the bark from a sawn log.
It is necessary to cover the ends of the workpiece with oil paint. This is done so that the drying is uniform and there are no internal defects in the wood. If this is not done, then you can not get enough of the onion for a long service.
After processing, the workpiece must be dried at room temperature and in an upright position. At the same time, the air in the apartment should not be very dry, because the tree can dry out and everything that has been done will be in vain. You need to dry from 2 to 5 months, depending on the conditions.
First processing.
So, the existing blank is a log.
From it it is necessary to make such a board as in the following figure.
You can do this using one of the options below:
- Process with an ax
- Cut with a saw
- Split with wedges.
The board should be as thick as the future bow in the handle, approximately 3 cm.
After the board is of the required thickness, markings must be made on it.
You also need to carefully inspect the board for defects and oblique layers.
In the following figure, you can see how to correctly make a markup scheme.
You should pay attention to the fact that the bark has not yet been removed, so you need to be extremely careful not to damage the outer part of the onion.
All excess must first be separated with an ax, and then continue to work with a knife and planer. Once done, you will have the side profile of the bow in your hands.
Now you can start forming the frontal profile.
The ratio between the width of the handle and the width of the end of the shoulder should be approximately 3/2. At the first stages of work, you need to be very careful. The uniformity of the work of the bow shoulders will depend on the accuracy and accuracy with which everything is done. In the early stages, do not bend the bow, as this can lead to splitting of the onion blank and spoil it.
The cross section of the bow directly depends on the available thickness of the workpiece. It can be lentil or almost rectangular.


Steam treatment (last stage)
At this stage, the bend of the bow will be formed. There are manufacturers who at this stage soak the workpiece in various solutions and infusions. But having processed the workpiece with steam, the tree also acquires all the necessary properties.
So, why do you need to steam onions?
- When the wood dries out during drying (that's why you can't bend the onion before steaming)
- In the case when the primary harvest was not straight. This happens often, do not be afraid of it. The front profile of the bow does not need to be straight. It won't affect shooting.
- If you need to make a short bow (for example, one of the Slavic options 1 - 1.3 m).
- When making a bow with a reverse bow.
- When a "light" bow is made (for example, a game bow).
- In order to give it an aesthetic appearance.
At the very beginning of manufacturing, the workpiece looks like this:
It is necessary to obtain such a bend:
To do this, you will need to steam the shoulders of the onion (when they are steamed, they become very plastic and can easily be given this shape)
You need to steam the shoulder until it can be easily bent.
Only the parts that are shown in white need to be steamed.
It is necessary to steam at the same time so that the shoulders of the onion dry out evenly and simultaneously.
After steaming the shoulders of the bow, you need to captivate it in a special, pre-prepared slipway.

The bars are shown in black, between which the "hot" bow should be drawn. The shape, quantity, as well as the location of the bars, depends on the desired shape of the bow.
You can do it in another way and steam the onion in the center.

Then put boards under his shoulders, and tighten the middle with a clamp.

In the slipway, the bow should dry for about a week, after which it should be taken out and the ends of the bow should be shaped to pull the bowstring. You need to prepare a place for horn / bone tips or just cut a "step" for the loop of the bowstring.


