How to remove links in a bicycle chain. How to remove the chain with
The condition of the chainsaw chain must comply with technical requirements its operation. Any defect, whether chain slack or poor cut quality, is often due to chain stretch.
From the point of view of operator safety, further operation of the chainsaw is not permissible. At the most unexpected moment, a slack chain can break and cause injury to him. It must be replaced with another spare chain, or shortened in a workshop or workplace.
Does the chain always need to be repaired?
Sagging chainsaw chain is not always the basis for its repair. You must first make sure that it is finally not subject to tension (adjustment).
Here are some typical cases:
- Chain stretch.
- Mismatch of the new existing circuit with a short bar.
Learn how to make a router from a drill with your own hands:
Chain stretch due to continuous operation is a typical case. During operation, the metal of the chain heats up, and the links gradually stretch due to the expansion of the metal in volume. That is, the chain is pulled out each time, which can sometimes be eliminated by partially reducing the cutting time. However, this is not an option when she has to work intensively all shifts in industrial conditions or when preparing firewood for the winter.
Another circumstance that does not allow the saw to operate normally even with a new chain is a mismatch in length. This can only happen when buying inattentive users, or is caused by the current lack of the desired chain. Which, in principle, is not so dangerous, since you can always find a way out by shortening it manually. At the same time, the strength of the connection of the chain links will remain at a sufficiently high level.
Chain tension is usually adjusted manually using the saw's tension bolt located in the area of the toothed stops.
Using a straight screwdriver installed on the bar and drive chain, after closing the side cover, begin to gradually tighten.
It is not worth pulling the chainsaw chain all the way, as you risk stretching the links again soon. Usually leave a small margin of chain broach, checked by hand. It should be slightly retractable from the tire by about a millimeter.
If there is a need to shorten
 Often in a forest or remote job site environment, you will not be able to find a replacement for a stretched chain.
Having taken into account all the tips, and making sure that it is necessary to shorten the chain, it is important to know the sequence of actions and possible ways replacements.
There are not so many of them and depend on how many links need to be removed, and in what conditions the repair will be carried out.
Each link (cutter and links connecting them) has two such rivets. In case of damage to nearby "native" connecting links, you can use elements from any other similar chain of any, even automotive, equipment. It is only necessary to fit the profile with a file, especially from below, where it has a small groove.

The easiest way is to take a long chain, in which several segments can be removed without problems. So, at least, it becomes possible to use native links. They are removed with a hacksaw, but it is better to use emery.
Initially, it is necessary to grind off unnecessary rivets, and then cut off the excess section. To do this, pry off with a knife and knock out riveting from unnecessary links using a homemade punch.
When connecting a new chain, you have to make home-made riveting of the links. The rivets themselves can be bought at the store, but in the absence of such, use steel wire, and preferably a short bolt with a flat head. Riveting is done on a rigid base (metal workbench or vise). Alternately passing through the elements of future rivets, flare them with a hammer from the back side.
Selection of a chain taking into account stretching
 There are no special solutions in this regard. You just need to remember about the complex wear of the equipment of the chainsaw itself. You should either change it entirely during prolonged operation, or take care to extend the life of its main part, that is, tires and sprockets.
The performance of the chainsaw will be longer only in an additionally equipped composition in the form of several chains. Professionals, in particular, do not neglect this circumstance and purchase an additional bar and (or) several chains along with the saw.
It should be remembered: By alternately changing the chains in time and turning the tire over, you can push back the moment of wear of the cutting equipment as much as possible, which means less likely to resort to shortening the chainsaw chain.
From this video You will learn how to shorten the chain on a chainsaw:
For the correct operation of the chainsaw, it is important not only the condition of its main elements, engine, carburetor, oil pump, but also the condition of the saw chain. Every saw owner should know how to maintain and repair the chain. In this article, we will talk about what to do if the chain on the chainsaw is stretched and how to shorten it.
The chain on the saw broke, this is a common thing and you should not be upset. Manufacturers made sure that it was possible to repair and shorten the chains. Spare links for chains are available for sale different types and dimensions, chain rivets, riveting and riveting machines.

With the help of machines, even those who have never done anything like this can rivet a chainsaw chain at home.
Important: chain repair, even the highest quality, does not guarantee that it will last forever. The links wear evenly, so the chain can break elsewhere at any time.
On sale there are chains in bays of 50-100 meters, which you can buy and rivet yourself.

Bays are beneficial for professionals who work with a chainsaw every day, for example, fellers or sawmill workers.
When to shorten
It is possible to shorten the chainsaw chain when it has stretched so much that the adjusting screw is not enough for the correct tension. You need to remove no more than two working links. Also, you can reduce the chain if, for some reason, you changed the tire of a longer length to a smaller one. If necessary, it is permissible to build up, additional links can be bought at a specialized store or used from a donor suitable for all characteristics, pitch, thickness, shape of cutting teeth.
Why stretch
Saw owners often ask the question: “why does the chain on a chainsaw stretch?” Let's try to answer it. The saw headset can stretch for several reasons.
- The oil pump is defective or incorrectly set. Limited or no oil supply leads to excessive heat during operation. The hot chain is pulled several times faster.
- Work in adverse conditions. Dust, dirt, earth get on the headset during operation. Dirt particles act as an abrasive material and gradually rub the junctions of the links, as a result of which it is stretched.
- Use of poor quality chain lubrication. Often, not recommended by the manufacturer oil is used to lubricate the chain, but used oil from the car engine. In the "working off" there are particles of metal, which can also give the effect of an abrasive material.
- The chain is new. Chainsaw manufacturers specifically make adjusting screws on the saw, as the stretching process is inevitable.
- Natural stretch, as a result of prolonged work.
Stretching is inevitable, the question is how quickly it will happen. You can extend the service life by using quality lubricating oils, diagnosing the oil pump in a timely manner and taking breaks from work.

Such measures can significantly reduce the likelihood of stretching, but not completely eliminate it.
The chain is stretched, what to do
If the chain is stretched, but the wear of the links still allows it to be used, you can re-rive it and continue to work. It is not difficult to determine the number of links that need to be removed. To do this, a tire is installed on the chainsaw, the tension screw is twisted to its extreme position and measurements are taken. Having determined the required length, you can proceed to riveting.
Riveting chains for chainsaws is carried out using auxiliary tools and special machines. Let us consider in more detail what tools will be required in order to reduce or increase the length of the chain.
Tools needed for work
When starting riveting, the first step is to remove the link from the chain, for this you will need to rivet the rivets. For riveting, you will need an anvil, a hammer, a thin beard, a vise, a grinder with a grinding wheel or emery. These tools do not allow you to do quality work, but everyone will find them. A more civilized and gentle way is to remove the rivets with a special punch.
There are several designs of punches, let's talk about the most popular.
Rivet punch
A punch is a machine used to remove rivets.

It is mechanical, works on the principle of a press. The kit includes a special anvil, in which grooves are selected for installing a headset with different pitches. There are also interchangeable tips that extrude the riveting.
Important: the size of the rivets in different types of chains is different, so when buying a punching machine, make sure that there are several tips in the kit that are used to different types headsets.
We suggest watching a video that shows how to rivet a saw chain using a mechanical punch.
After the chain is riveted, it is necessary to remove the old link, install a new one and rivet. For this, a riveting-running machine is used. It is electric, so it costs much more than a punching machine.
Riveting machine
The machine is equipped with a high torque gear motor.

It is used for riveting and rolling of the headset in increments from 1/4″ to 0.404″. The depth of cut of chains that can be riveted with this machine is from 1.1 mm to 2 mm (0.043″ - 0.080″). Special rotating inserts and anvils for different types are supplied with the machine. Inserts and anvils are marked. Marking "A" means that the inserts are designed for a headset with a pitch of 3/8″ and 0.404″. "B" - for 1/4 "and 0.325".
The machine works as follows. The saw chain with a new link and rivets is installed in the guide inserts. The repair link with the rivets installed in it is pressed against the anvil by the working roller, after which the engine is turned on and the roller begins to rotate, gradually crushing the rivet, at this moment, the machine operator slightly increases the roller pressing force by turning the adjusting screw. For clarity, we suggest watching a video about the operation of the riveting and rolling machine.
It is not profitable to use such a machine for riveting at home, because it is expensive. If you need to rivet not regularly, then you can do without it. Consider how to shorten a chainsaw chain with your own hands without using expensive machines. You need to start by riveting and removing the link.
The advantages of the machine are that the rivets riveted with it practically do not differ in quality from those that were riveted in the factory.
How to remove a link without using a machine
There are several ways to remove rivets.
- Sharpen with sandpaper. Carry out the work carefully, trying not to damage the neighboring, whole link.
- Grind with a grinder.
- Cut with a chisel. To do this, the chain must be clamped in a vise for the guides, so that it would be possible to cut the rivets on the connecting link.
After the heads of the rivets have been ground off or cut down, to separate the link, it is necessary to carry out the following actions. Install a beard between the plates of the connecting link and hit it with a hammer with a sharp movement. The plates should come off the body of the rivet that goes through them.
Important: if it is necessary to replace the working tooth, then the connecting links will have to be riveted from the left and right of it.
Now let's figure out how to rivet back.
How to rivet
You will need a repair link to connect. Spare links can be found at any store that sells chainsaws and consumables for them. When buying spare links, it is imperative to take into account the type of chain, pitch and profile. Links from different types of headset are not interchangeable. It is not recommended to use a donor link with the old one. The rivets on it are already ground off and for a normal connection, you will have to undermine the top plate.
The link with rivets is mounted on the chain and placed on the anvil with the open side up. After that, the top plate is put on the rivets and lightly tapped with a hammer so that it sits as tightly as possible. After that, you can start flattening the rivets. For this, an anvil, a beard and a hammer are used.
The headset is placed on the anvil, the beard is set on the rivet and a sharp blow is made with a hammer. The second rivet is riveted in the same way. As a result, in the protruding part of the rivet, a thickening should be obtained, which will securely hold the upper link plate, preventing it from disengaging.
At the last stage, it is necessary to check that the chain link is moving and that it has not been clamped during riveting.
Important: if the work is not done correctly and the repair link does not go, then you cannot install such a chain on a chainsaw.
Consider what can happen if riveting is not correct.
The consequences of poor quality repairs
The consequences of poor-quality repairs can be very sad, the chain at the time of the break can injure the operator. Of course, modern saws are equipped with all kinds of protection. For example, they are equipped with catchers that are designed to protect the operator in an emergency, and right hand, which is on the chain line, is hidden behind the case.

But, protection does not give a 100% guarantee, therefore, before using a repair chain with maximum load, you need to try it on light work, saw a couple of branches or boards.
Also, the consequences of poor-quality repairs can affect the performance of the chainsaw. Consider what mistakes can be made during repairs and how they will affect the operation of the saw.
Errors when repairing chains
- Does not match step. The reason is that a working link is installed that is not suitable in terms of the main parameters: step, link thickness. If such a headset is used for work, then as a result it will be necessary to replace the drive sprocket and the saw bar, since the sprocket on the tire will break.
- Another option for mismatch in pitch is the installation of a working tooth in the opposite direction. It is extremely rare, but it still happens, especially for those who repair for the first time. The consequences are similar to the first point.
- The chain is longer than the bar. With these, everything is clear, the adjusting screw is not enough for tension, the chain will hang out and the wear of the drive sprocket will increase.
- Briefly speaking. Such a headset cannot be installed; it will need to be riveted and lengthened.
- The connecting link is slightly longer. Similarly to the first point, the pitch will change, which will lead to the destruction of the driving and driven sprocket.
In conclusion, I would like to give Special attention the quality of articles on the topic. On the pages of sites on the Internet there is information on how to repair a saw chain by welding. Such instructions are written by incompetent authors who themselves do not understand what they are writing about.
It is possible to repair by welding, but these are not saw chains, but gear chains designed to transfer force from one sprocket to another.

Such can be found in the mechanisms of agricultural machines, conveyors and other units.
Conclusion
We considered all issues related to self-riveting, paid attention to tools and machines. We advise you to buy expensive repair equipment only if you work with a saw all the time. We draw your attention to the fact that an incorrectly riveted chain can cause harm not only to the tool, but also to the operator.
If, after reading, you still have questions on the topic of the article, you can write them in the comments, we will definitely answer.
The chain is the main part of the bike drivetrain assembly. Passing through the teeth of the sprocket, the chain transmits torque to the rear wheel. This explains why the bike is moving. The dynamic loads on the assembly are quite large, so the chain mechanism wears out during operation. In this article, we will look at how to remove the chain from the bike and how to put it back.
 The working life of the singlespeed chain mechanism is designed for the entire life of the bike. The bike chain runs smoothly, without deviating. The situation is somewhat more complicated with bikes designed for several speeds. The load on the chain mechanism is greater here relative to parallel gears, since the bicycle chain is located at an angle with respect to the bicycle frame. Compared with parallel transmission, the impact on the links is several times greater. To avoid damage to the entire transmission mechanism, the chain must be replaced in a timely manner.
You should not think that you can not remove the bike chain from a single-speed bike. It is removed in order to clean or repair.
When do you need to remove the chain from the bike?
 Let's figure out how to know that the chain assembly of a multi-speed bike is faulty. You can estimate the mileage of a two-wheeler, but other factors also affect the health of the bike chain.
- Correct selection of gears;
- Road quality;
- Driving speed.
 The appearance of suspicious sounds (provided that the lubrication is in order) and difficulty shifting gears are the first signs of a malfunction of the chain assembly. The simplest way assessment of the health of the links is as follows:
- Bend the bike chain away from the largest sprocket;
- If it moves away freely from 3 or more teeth, then the bike chain must be replaced. Two prongs are a kind of warning. You can still ride for some time, but it will be removed soon.
The same method works for single speed bikes.
An informative method is measuring the length of the bike chain.
- 30.5 cm - the best length value;
- 30.6-30.8 cm - medium wear, high maintainability;
- More than 30.8 cm - links and sprockets are heavily worn. The entire transmission is damaged.
To correctly measure elongation, the chain must be completely removed from the bike.
Types of bicycle chains
Consider 2 main types of bike chains:
- keyhole;
- Solid.
 Its peculiarity is that it has a special clamping device. Taking it off the stars, as well as putting it back on, is easy. To do this, just unplug the lock.
The location of the split link can be determined by visual inspection. If the links are clean, finding the connector is easy. As a rule, the brand of the manufacturer is embossed on the connector.
Solid
It is impossible to completely remove such a bike chain. If you completely remove it from the sprockets, it just hangs on the frame. Of course, compared to the option equipped with a lock, a solid design is less convenient. However, there are also benefits. The lock can weaken, the connecting tick can be lost. The links are disengaged. With a continuous chain, there are no such problems. If it is torn, then this is exclusively the cost of quality.
 It is not difficult. Follow the algorithm.
- Pry the clip with a screwdriver or a knitting needle. It is important not to break the clamp, since it will not work to connect everything back without it;
- Disconnect the link.
Now you can freely remove the bike chain and perform the necessary manipulations on it: shorten it, clean it, or, if it is hopelessly damaged, throw it away.
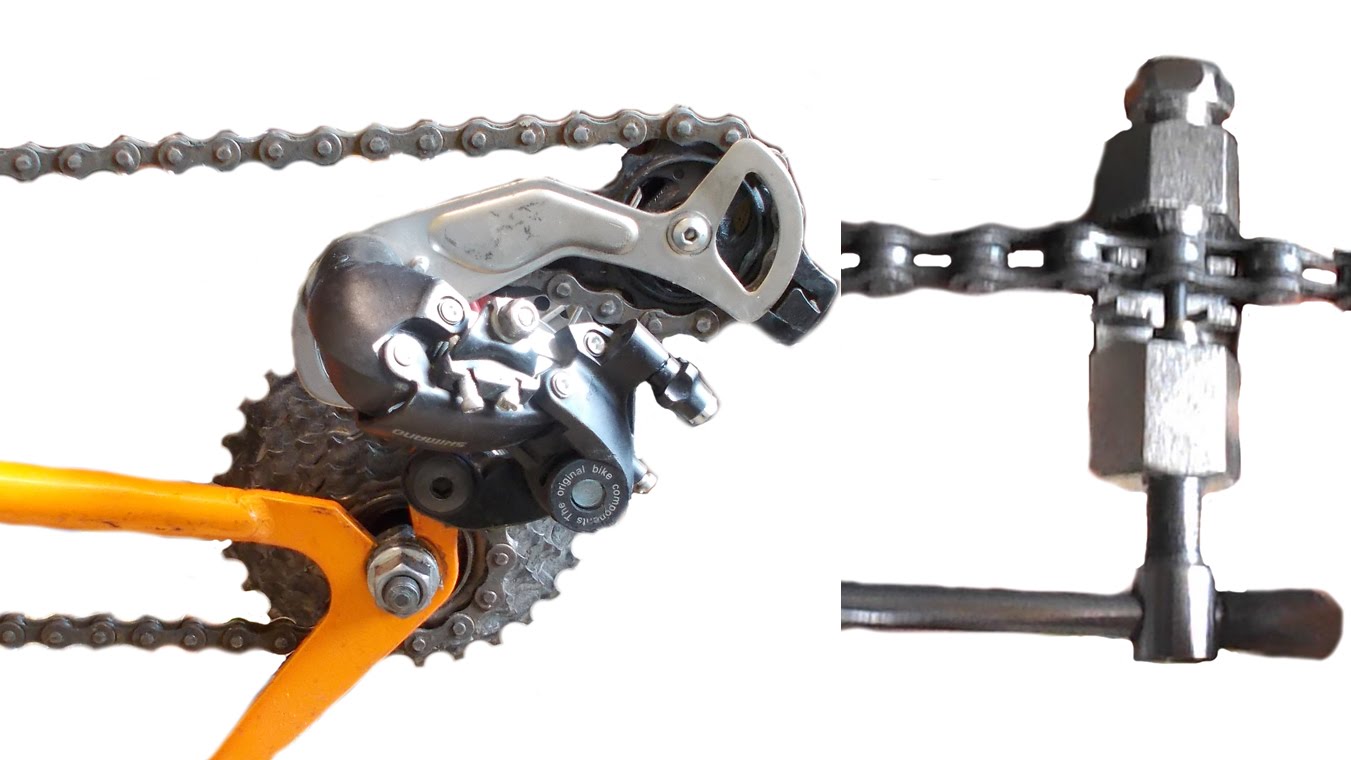
To disconnect a solid structure, you will need a special tool called squeeze. Using this tool will allow you to remove the link without damaging it. The algorithm is the following.
- Select the link to be disassembled;
- Put the bike chain in position to press out and press in the link axis, or pin;
- Tighten the screw and pull the axle towards you.
It is not necessary to completely pull out the pin, as it will not be easy to insert it back into place. Manipulations with squeeze slightly loosen the axis. To re-disengage, select another link. Press the axle in reverse order.
- Connect adjacent links to each other;
- Push in the pin with the screw.
Repairing a bicycle chain
 The most common defect for a bicycle chain is its sagging due to an increase in length. Of course, you can remove the stretched bike chain and replace it with a new one, but you can try and restore it. Due to the loosening of the axles, the bicycle chain expands in the transverse and longitudinal directions. It is impossible to eliminate the transverse expansion, but with the longitudinal one, perhaps something will work out.
It is necessary to remove the extra links in such a way that the bike chain passes freely, without undue tension, along the large sprocket. When shortening, also use a squeeze. It is important not to overdo it by pulling out the extra links.
It helps to install so-called dampers on a bicycle, which prevent the chain from flying off the sprocket when riding. Of course, if you put a damper as a temporary measure, it’s a good solution, but you shouldn’t forget about replacing the bike chain.
 Putting a bike chain on a singlespiel is quite simple:
- Hang the bike chain on both sprockets;
- Snap the lock (as an option - press the pin).
So speed bike will take a little longer.
Often, during the operation of a chainsaw, the saw chain is stretched, which makes it impossible to continue using the tool. Today, there are specialized workshops that provide services for shortening chainsaw chains, but it is possible to shorten the chainsaw chain with your own hands at home or right at the workplace.
Reasons for chain stretching
A chainsaw chain, regardless of manufacturer, can stretch for several reasons:
- Oil pump not working properly. To overheat the chain and its rapid stretching leads to the supply of oil in insufficient quantities.
- Natural wear. Occurs as a result of prolonged operation of the tool.
- Use of poor quality lubricant.
- Violation of the rules for operating a chainsaw.
Important: If irregularities in the operation of the oil pump are detected, it is necessary to eliminate the malfunctions and ensure normal lubrication of the saw blade. Failure to do so may result in drive sprocket failure. You should also pay attention to the quality of the oil. The presence of various kinds of abrasive microparticles in the oil is not allowed.
Tools needed for cutting
You can properly shorten the chainsaw chain with your own hands using special tools.
Rivet Removal Machine
For disassembly, a specialized machine is used - a punch. The machine is made in the form of a small mechanical press. In its lower part, a removable anvil is installed, which has grooves different size. The working rod of the device also has nozzles of different diameters. This makes it possible to use the machine for chains of various manufacturers. The rivet is removed by squeezing it out of the seat.

Attention: the diameter of the removable tip of the working rod must not exceed the diameter of the hole in the side plates.
Rivet Setting Machine
After disassembling and removing the chain element, it is necessary to reconnect the working links. For this purpose, a riveting-running machine is used. The assembly process takes place with the help of a special working roller, which is driven by an electric motor.

The rivet is clamped between the fixed anvil and the working roller. The operator independently sets the pressure of the working roller using the adjusting screw. During the rotation of the roller, the edge of the rivet is gradually crushed, which makes it impossible to detach the links from each other.
Reference: the use of machines in order to shorten the chainsaw chain allows you to bring the build quality as close as possible to the factory sample. However, these devices are quite expensive, and their purchase for home use is unprofitable. In addition, it is not always possible to use specialized devices directly at the workplace. In this regard, you can shorten it with improvised tools.
Rivet removal methods without the use of specialized devices
Rivets can be removed without the use of specialized tools in several ways:

Removing a rivet with a file
- Grind off the protrusions on the emery. Using this method it is necessary to control the degree of pressure on the rivet in order to avoid damage to the working parts.
- Cut off with the cut-off wheel of an angle grinder. It should be borne in mind that in this case the metal heats up, which will affect its properties.
- Cut off the heads with a file or needle file. With this method, the risk of damage to the links is minimized.
- Cut down with a chisel. Before starting work, you will need to securely fasten the chain in a vise.
After the outer protrusions are completely cut off, you will need to knock the rivet out of the seat. To do this, you need to choose a punch, the diameter of which will correspond to the diameter of the hole. The punch must be put on the rivet and knock it out with a sharp blow hammer. After completing these steps, the circuit will be disconnected.
Attention: To avoid damage to the links, you need to securely fasten them. In addition, the punch should be installed strictly perpendicular to the cut of the rivet.

How to rivet a chainsaw chain
To assemble the chain, you will need to install a repair link on it. It must be borne in mind that its dimensions must strictly correspond to the dimensions of the working links. Installing a replacement part with a different pitch or profile may damage the drive sprocket, driven sprocket, and saw blade of the chainsaw.

The repair link is sold with rivets that simply need to be attached. To do this, lay the chainsaw chain on the anvil. After that, point the punch on a new rivet and flatten the head with a sharp hammer blow. It is necessary to rivet until the resulting thickening closes the hole in the outer plate.
When flattening, the degree of clamping of the side plates should be controlled. After assembly, the installed link must move freely along the axis. Installing a chain with a jammed link on a chainsaw is not allowed. Neglect of this rule may lead to more serious damage to the device.
Some people use electric arc welding machines for assembly. In this case, the edges of the rivet are welded to the outer plates of the link. The use of electric welding involves heating the metal to a high temperature. As a result of overheating, the properties of the metal change, it becomes less wear-resistant.

From the above information, it follows that chain stretching on a chainsaw is a fairly common occurrence. It is quite possible to shorten the chain at home, you just have to enlist the traditional tools that almost every owner has.
In order to effectively transfer torque from the pedals to the rear axle of the bicycle, the chain must be tensioned without sagging or warping. If, due to wear or a change in the design of the bike, it began to dangle, scroll and fall off the sprockets, even if you constantly looked after it, and cleaning it, you can achieve good tension by removing a few extra links. To do this, it is not necessary to contact the service, since you can shorten the chain on a bicycle with your own hands at home.
Chain shortening tools
In order to open the links, you need to prepare a special tool - squeeze. It combines an emphasis that prevents the link plates from bending in the process of pushing out the connecting pin (pin), and a screw that squeezes it out.
In sports equipment stores you can find professional tools designed for bike workshops and made of durable steel grades. It can be used for a very long time, sorting through the transmission at least daily, and it will not break. However, in order to shorten the bike at home, a simpler squeeze option is enough - built into cheap multi-tools. The reliability of this tool is lower than that of professional models, but such a squeeze is quite suitable for personal use.
Important! In addition to the tool, prepare a rag and kerosene or WD-40 to clean the shift system before operation.
Step-by-step instruction
When answering the question “how to shorten a chain on a bicycle”, it is worth remembering that all actions are performed in the following order.

The most difficult thing in this work is to make sure that the holes match, and the pin freely enters its place. In this case, after the work has been done, it will also be necessary to adjust the speed switches.
Another difficulty is to determine the required chain length.. To do this, you need to shift the gear on the bike in such a way that both the front and the back of the chain lie on the most big asterisk. After that, the links open, and the part is pulled together until it stops. A mark should be made on it by adding a couple of links so that the transmission does not overstrain.
How to shorten a chain without squeezing?
If there is no special tool, you can use any sharp object of small enough diameter to push out the connecting pin. It can be a nail, an awl, or any other strong steel pin that can withstand a hammer blow. In addition, you will need a stand - for example, a brick.

Be careful not to bend the chain link plates. To ensure safety, the top plate must be supported by inserting a nut or other strong piece of metal into the link. Most likely, the chain will first have to be removed from the bike. And for prevention it will be possible with rear wheel, clean it, lubricate it and install it in place.
Video
If there is a squeeze, the child will also cope with the work; without a tool, it is much more difficult to shorten the chain on a bicycle - a video showing this process in detail will help you figure it out.


