Do-it-yourself crossbow detailed drawing. Homemade crossbow
Twenty years ago, a bow or crossbow for individual use did not exist in nature. Some eccentrics and fanatics of historical reconstructions undertook their manufacture at their own peril and risk, having absolutely no idea what they would get in the end. And all because the process of accumulating experience and honing skills in the manufacture and use of throwing weapons, which lasted several tens of thousands of years, was once interrupted and anathematized in our time.
Now all this rare knowledge has been taken out of dusty chests, they have learned how to make bows and crossbows using modern technologies, and the army of followers of William Tell and Robin Hood is growing exponentially. And today we have prepared for you drawings and diagrams that will tell you how to make a crossbow at home.
Despite the abundance of online stores selling throwing weapons, as well as the fantastic breadth of the product range, there are many who want to make a crossbow on their own. Most of them don't know where to start. Today we will tell you about the main design features crossbow. This knowledge will help you avoid manufacturing errors, as well as frustration and injury when using it.
Before starting work, you should know two main points.
- In our country, a crossbow is recreational and sporting weapons. Hunting with him is prohibited. Any throwing weapon with a pull force of more than 43 kilograms is considered combat, the right to use which is given by the licensing authorities of the Ministry of Internal Affairs.
- The crossbow is design that experiences enormous loads during operation. Therefore, any carelessness in its manufacture is likely to result in injury. Any part of it must have a multiple margin of safety.
So, let's find out how to make a simple crossbow at home.
The video below will tell you how to make a crossbow at home:
Onion
The energy source of the crossbow is a bow - an elastic plate of complex shape, which has one main bend and, as an option, two additional ones at the ends. It is necessary to start making a crossbow with this part and adjust everything else to it - the choice of the type of tension (recursive or block), the size of the stock, the type of trigger mechanism.
Wood and composite
There is an acute question about what to use as a material for a bow: wood, composite or metal?
- Tree is the worst choice. Available "wood" lying underfoot is garbage, suitable only for kindling stoves. Branches cut down in the forest, as they dry out, lose their elasticity, crack and fall apart. From this material you can only do something for short-term entertainment in the country. Of the models sold in stores, and having a tree in their composition, it is very popular, as well as.
- Composite, created from fiberglass and epoxy binder, is very tempting and outwardly simple. But there is an obstacle - the need for scrupulously precise adherence to the technology of all work. The proportions of the mixture, drying, exposure. At home, this is almost impossible.
Metal
There remains one uncontested option - metal. If you have an old Moskvich with a set of leaf springs on hand, then consider yourself lucky. One sheet is taken from the entire package - the second. If you are not too afraid of the dimensions, then the first one will do. Moreover, he has at the ends of the tube - an almost ready-made bracket for attaching blocks or strings.
A block is used to attach the bow to the stock. This is a U-shaped design, clasping the box in front. It can be welded tightly to the spring leaf, but in this case, when the bow is bent, the welds will experience excessive pull-off stress. Therefore, it is better to fix the ball joint from the VAZ 2108 on the block. The bow is attached to its pin. This is also convenient because there is a hole on the spring leaf.
If you are very strong, then you can stop at the recursive method of pulling the bowstring (as in, etc.). But it is better to choose a block one (as in models, etc.). To attach blocks to the bow, if you have chosen a second spring leaf, you need to fix the brackets at its ends. A bolted (and even better riveted) connection is preferable to welding, since this assembly experiences strong vibration loads. As pulleys, use the parts of the glass lifting mechanism of the same Moskvich.
Regarding the bowstring, an obvious solution suggests itself: a thin metal cable. But it is not entirely true, since steel cables do not withstand variable loads well. It is better to choose a climbing cord with a diameter of 5-8 mm.
Having made a bow and fastened a bowstring to it, you can conduct natural bending tests. It’s great if at the same time you have a dynamometer of kilograms for 100-150. As a result, you will find out two parameters necessary for further work: the length of the bowstring and the load.
How to make a stock on a powerful crossbow at home, read below.
Lodge
For this part of a homemade crossbow, a tree is an uncontested option. But not everyone. In any case, not aspen, alder, spruce or pine. Better beech, elm, oak. A blank dried for twenty years. It is clear that you will never find anything like this anywhere. Therefore, use moisture-resistant plywood with a thickness of 7-9 mm. 3 or 5 contours of the stock are cut out of it, and then this package is glued with epoxy. Not very pretty, but extremely reliable.
- Regarding the form - give up the semi-pistol, use a straight English box. It is not only easier to manufacture, but also stronger.
- When assembling a stock package, both the course of the bowstring and the load must be taken into account. The first determines the distance from the shoe to the groove for the trigger. The second is the thickness of the stock walls at the place of its attachment. It is a straight English stock that will allow you to avoid excessive thinning when moving from the forearm to the butt.
- The most important detail of the crossbow lodge is the arrow guide. It should be smooth and durable. For it, you can use plates framing the side windows of the Moskvich, furniture fittings, and other parts similar in shape.
- If you are using a block type of bowstring tension, then in the fore-end under the guide there should be a groove for the cable system. This is another element that weakens the stock, so give up on the thought of making the forearm graceful. High will protect your fingers from falling under the bowstring and traumatic amputation of the phalanges.
Usually crossbows have a plastic stock, such as models, and others.
We will talk about how to make a homemade trigger for a crossbow at home below.
This video will tell you how to make a crossbow out of wood (plywood) with your own hands:
Trigger mechanism
If you are not a mechanic of the sixth category, then give up the idea of \u200b\u200bmaking this element yourself. Apply force and find the trigger from any spring-piston air rifle. In the most difficult case, you only have to modify its tooth holding the piston - it may be small for a thick bowstring.
Above the trigger mechanism, a casing with a height of 2 to 5 cm is arranged, which is necessary in order to protect it from moisture and dirt, and which is also the basis for sighting devices - slats for optics or a rear sight. Weaver, Picatinny or dovetail rails can be bought at any online store that sells pneumatics.
The front part of the casing above the trigger mechanism is made in the form of a long (no more than 10 cm) elastic "tail" with which the rear part of the arrow is held on the guide.
Arrow making
 Canonically correct ammunition for a crossbow is called "bolt". But many online stores sell crossbow arrows. For crossbows with a rifle stock, lengths of 14, 16, 20, 22 inches are suitable. To be absolutely frank, you won’t find better store arrows. Unfortunately, none of them costs less than 150 rubles. Therefore, it is worth trying to make them yourself.
They can be made from wood, straight-grained, without knots. As an option - use furniture details - balusters from chairs, railings of cribs. Good arrows are made from aluminum tubes up to 2 cm in diameter. If desired, even electrodes of the maximum diameter can be used, but they hopelessly bend when hit and it is difficult to screw plumage to them.
For plumage, thin plastic is used. Natural bird feathers can give an unexpected effect of a chaotic change in flight direction, since they have natural curves that must be taken into account.
The main condition for a good, smooth flight is balancing. The center of gravity of the crossbow bolt should be after the first third of the length from the tip. If it is not metal, then the end of the arrow can be loaded with lead wire wrapped around the shaft.
The issue of equipping an arrow with a tip should be treated without fanaticism. Turning metal on lathes, milling and polishing, giving exquisite forms - these operations are accessible to a few. In addition, such a tip is extremely dangerous. If you do not need to pierce knight armor, then a wooden bolt can simply be sharpened at an angle of 30 degrees using a regular knife.
We will tell you how to make a crossbow that shoots with your own hands from paper, pencils and other materials.
Cool shooting games
A toothpick or match shooter can be made from a wooden clothespin. To do this, disassemble it and redo it:
- expand the narrow groove for the spring of one half to 1 cm, on the second make the same, but indented by 1 cm;
- at the front ends of both halves, from the side of the narrow grooves for the spring, make a longitudinal groove 1-2 mm deep;
- collect the halves of the clothespin "inside out" by twisting them with a thread;
- install the clothespin spring with the paws in the cut grooves, and with the spiral outward;
- insert a toothpick into the hole between the halves;
- press the spring coil, shifting it into a semicircular cutout;
The foot of the spring will slide down the long slot, snapping the toothpick and causing it to fly out.
To learn how to make a mini crossbow out of pencils with your own hands at home, see the video below.
Video instruction on how to make arrows for a crossbow
Video instruction on how to make a toy crossbow
One of the most popular species small arms is the crossbow. And although hunting with such a device is prohibited in our country, there are still many who want to acquire such a “toy” in order to shoot at targets. At the moment, you can buy such weapons on many sites or in stores, but such a purchase will be very expensive. It is much more profitable to make a crossbow with your own hands at home, and you will find out what is required for this.
Preparation
To date, there are many varieties of this sporting weapon. First of all, these are classic models familiar to us from historical films and block crossbows - modern weapons equipped with complex mechanisms. The last option to create houses will be quite difficult, so let's focus on the classic.
What parts does a crossbow consist of:
- Trigger mechanism;
- bowstring;
- Crossbow stock;
- Bolts and arrows.
Making a crossbow at home will be much easier if you immediately stock up on all the necessary materials and tools. For this you will need:
- Well sharpened knife;
- Hammer;
- Drill or brace;
- An ordinary hacksaw, which can be replaced with a grinder with a wood disk;
- Plane;
- Chisel.
How to make a crossbow with your own hands
In addition to the tools, you will need a piece of wood 900mm long and 30mm thick to make this ranged weapon. In this case, fit:
- ash;
- hazel;
- poplar.
- birch.
First of all, you need to prepare a wooden blank. To do this, cut the branch of the desired size and paint over the cuts. This is necessary so that the liquid from the wood comes out slowly and evenly. Please note that the wood must lie in a dark place for at least a year, only in this case the weapon will shoot with special power. After that, the bark is removed from the workpiece and left to dry for another week. Further, the log is sawn into two parts and from the northern - the most durable, they make the actual crossbow.

Draw the stock of the weapon on the board and cut it out with a hacksaw or grinder, then make a small arrow chute on the top of the workpiece. From the front side, cut a groove in which you will fix the arc. If knots or chips appear on the bed during the process, then remove them with a knife and treat the place with sandpaper.
How to make an arc
This part will require a flat board with a length of at least 750 mm and a width of 200 mm, a thickness of 60 mm. We dry the workpiece well and stand for several days, and equalize it. The width of the part in the middle is 40 cm, and narrows at the edges to 15 cm.
At a distance of 100 mm from the cut groove for this part, we create a through hole through which we stretch the rope - it will become the main fixator for the crossbow arc. Then we insert the part into the groove and firmly fasten it with a rope, as shown in the lower figure.

This detail plays a rather significant role in the “lethality” of the weapon, and to create it you will need the following materials:
- kapron threads;
- wooden plank;
- two nails without a hat;
- rubber glue.
First of all, you need to make a special machine for weaving this part: take a rope and measure the length of the bowstring. After that, saw off a board with dimensions slightly larger than this parameter. Next, mark the length of the string on the board and drill two holes in these places - this is where you need to insert your nails.
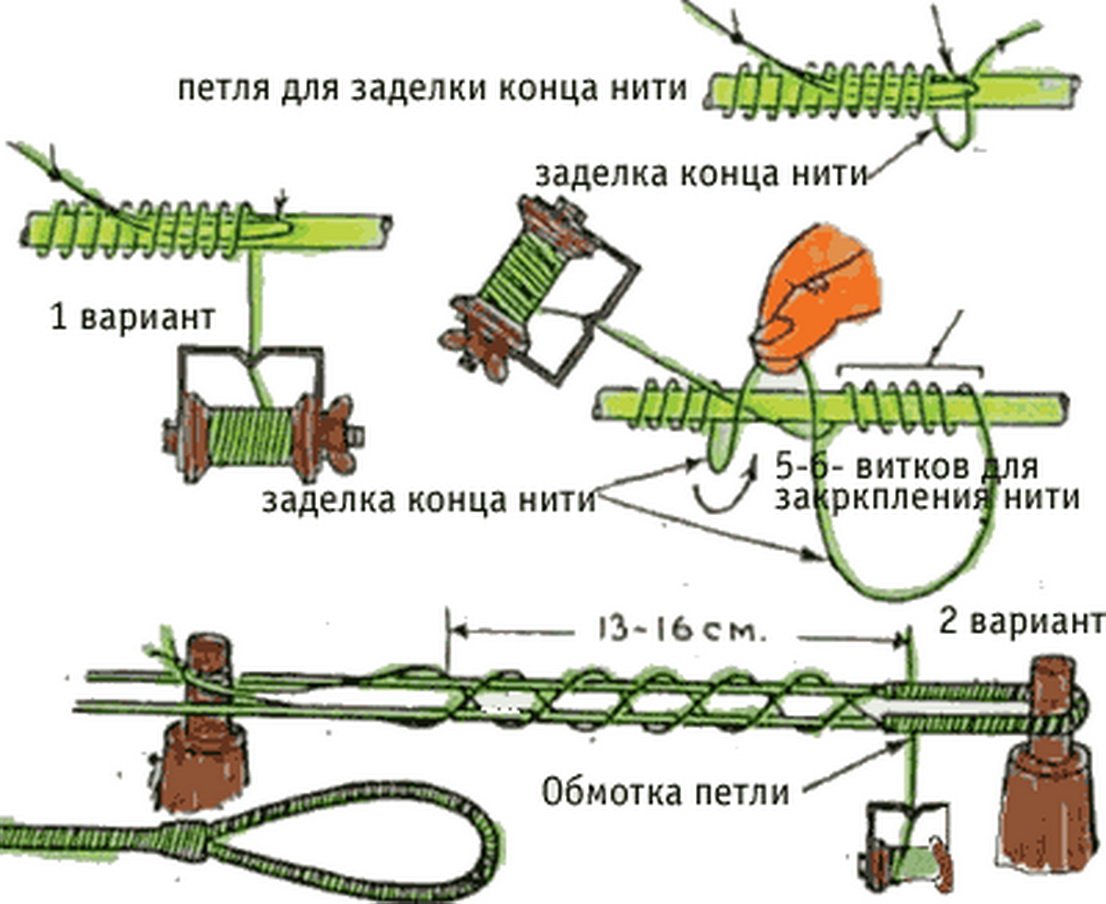
Take a thread, tie it to one of the nails, and leave a margin equal to the length of the bowstring. After that, start wrapping the threads evenly around the nails (lavsan ones are best). Continue this process until the base of the string reaches 5mm. To do this, you need to make 5-6 full turns. Try to keep the threads evenly stretched.
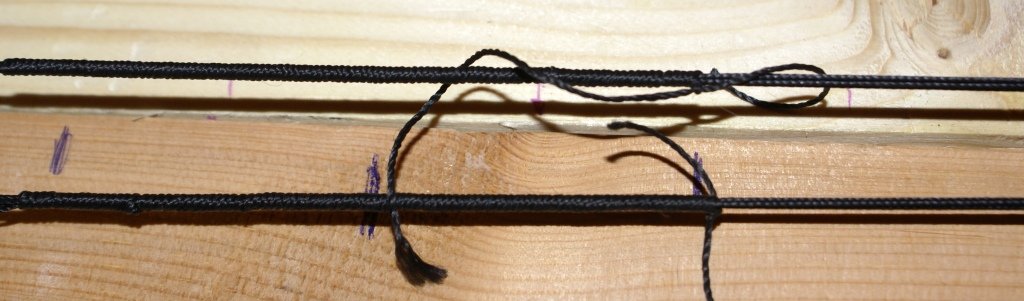
Next, wrap the base several times near the nails on both sides with wrapping material. This will give you loops at the ends. You can understand how to do this from the diagram above. Don't forget to wind the middle of the bowstring, because this part suffers a lot from friction. Tie the cut ends of the threads with a marine knot and grease well with glue so that the whole structure is strong. After that, you can pull the bowstring on the arc and adjust the degree of its tension.
How to make a trigger
The simplest option would be a pin-type lock, which we will choose for our weapons. Pull the bowstring to the maximum distance and drill a through hole in this place. Also make a small transverse recess in the upper part of the crossbow bed. Now fasten the lever at the bottom of the part. Make a wooden axle and secure it with wire.
Fix the stock and lever with ropes so that the latter moves with maximum friction. The depth of the “ammunition” groove should be equal to 1/4 of the volume of the arrow, and this recess must be “cut through” from the top of the lock to the front edge of the crossbow.

How to make arrows
In order to get ammunition for your small arms, you don’t have to run to a sports store, because they can be easily made at home. To do this, you will need several ordinary wooden blanks that need to be well planed and processed with fine sandpaper. For arrows, it is better to choose light woods, in which case the shooting will be more accurate. As for the tip, if you don’t have special ones, then sharpen the tip of the arrow - it will be quite possible to shoot at targets with such ammunition. You should not drive nails into the head, because in this case there is an increased chance that the arrow will be able to split when it hits the target.
Be that as it may, you should remember that in our country shooting from crossbows is equated with the use of firearms. So if you want to make such a device, then in no case do not use it for its intended purpose. Treat the crossbow as a beautiful souvenir, and then there will be no claims from the law against you.
The crossbow belongs to small arms. The principle of shooting is similar to archery. Nowadays, crossbow shooting is a fairly popular sport. But the cost of a crossbow starts from a few tens of dollars. Therefore, many adherents of the crossbow try to make it with their own hands, at home.
Pull it only if you need to. Wilbur shook his head, grinning. "I think soon one of us can tell you more, you don't have to talk like a hunter." "Hope so". Mia took the crossbow and the tremble and walked over to the small alcove at the back of the room where her bed lay. When she returned, Wilbur had already cleared the bowls.
Even if you do it just for me. "Now don't think about anything." Mia chuckled at him, ignoring the suffocating feeling in her stomach. Wilbur got up. You will see. The church will send help. Or, if you decide to write this letter, your father will be back soon.
Consider what components the crossbow consists of:
- Bed;
- Trigger mechanism;
- bowstring;
- Arrows or bolts.
What do you need to make a crossbow out of wood with your own hands?
Minimum set of tools:
- Very sharp knife;
- Drill;
- Bulgarian with a disk for wood or a regular hacksaw;
- Hammer;
- Plane;
- Chisel.
To craft a crossbow, you need a piece of wood. The tree is desirable to take:
"If there is". Mia couldn't help herself. Wilbur accepted her remark gratefully. "I hope my father will do everything to protect us." Wilbur looked at her seriously. Mia walked over to him until her nasal tips were almost touching. She then placed her hand on his forehead and gave him a gentle push.
Wilbur laughed in surprise as he stumbled backwards. Wilbur grinned and waved his hand before turning around and leaving the hut. Mia went to the door and watched him disappear at night. It was the right answer to his stupid face. The serenity of this evening did not last long. The days were weeks that were cold and overcast. As winter approached, the mist extended its gray arms farther and farther from the lake to reach the village before the weak sun could carry it back to the shore.
- hazel,
- ash,
- poplar.
You can also use birch or oak. The wood of these trees is more resistant to moisture, viscous, does not splinter and is beautiful. The wooden blank should be about 900 mm long and 30 mm thick. Coniferous wood must not be used.
To make a crossbow, the wood must be properly prepared. Only from the “correct” wood will the crossbow shoot for a long time with great power. Having cut a tree trunk or a branch of the required length and thickness, the saw cuts must be painted over. This is done so that the moisture from the wood comes out gradually, and, therefore, the wood will dry more slowly and evenly. Clogged branches will be laid away from sunlight. They stay like that for about a year. A year later, the bark is removed from the blanks, and it dries for another week. And only after all these procedures have been completed, the branch is sawn lengthwise, and they begin to manufacture a crossbow. From the two parts of the branch, they take the northern one, guided by the annual rings. On this side, the fibers lie closer to each other, which means that the material will be stronger.
On a cold morning, he even made it to Mia's cabin on the hill. Mia kept her crossbow near her bed at night and took her time to practice her safety. During all this time there was no church huntsman. Soon the merchants' carts were completely lost, and more and more fishermen were squeezed, moaning and whispering around the market place. Mia gave in and wrote to her father. Ten projects crushed her before sending a brief and formal request for help.
Not long after this, Postreiter did not return to the village. Within two days, the story that Gitrog ate from rumor to narration became fact. Mia thought that the poor fellow didn't want to make the difficult trip to some remote village before the cold. He probably decided instead to spend the winter in Durnau.
photo.correctly carved tree for a crossbow
On the board, draw the shape of the future base and cut it out with a grinder or a hacksaw. Make a groove for the arrow on top. On one side, a groove is cut to secure the arc. If knots or chips appear during work, they must be processed with a sharp knife, and then with sandpaper.
However, there were many rumors about Gitrog, for which Mia did not find such a simple explanation. Three more sheep disappeared before the first snowfall. Every time the fence was destroyed in a different place - as if someone was trying to use the resilience of his horse. Or, as Mia reminded herself, the frightened sheep had simply broken through at various points along the fence. The last time she heard that the fence had burst at night, but when she ran out of the hut, crossbow in hand, there was nothing to be found but split wood and a distressed bleating.
After that, she finally intervened to ask a local carpenter to help her strengthen her horse's fence and pay off the money her father left her. Although she hated spending something she didn't deserve herself, she knew she was lucky to have such a nest egg. The fishermen, who have been driven from the lake since the start of the season, have struggled to find a livelihood with the snow. Many trusted their neighbors' willingness to help, but the village's sparse fields barely provided enough food for everyone. The number of battles in the village administration has increased.
The second step is to make the arc. For her, take a board with a thickness of 20 mm, and a length of at least 750 mm. The board must be taken even, without knots. The board must be well dried, kept for several days, and only then trimmed. The width of the arc is approximately 40 mm in the middle, towards the edges its width decreases to 15 mm.

The curses on Githrog grew louder. More and more villages retired early and early in the evening to their homes, shutting their doors and nailing down their windows as the stubborn fog grew thicker and denser than ever before. Wilbur seemed to be right when he thought his father was going to do something. As the winter became more severe, armed men and women began patrolling the streets. Some carried torches and blades, but many carried only a dung fork or a butcher's knife. They always wore heavy coats, the hood of which was drawn deep into their faces - on the one hand, as protection from the cold, but also as a uniform.
photo.string of a homemade crossbow
Arc for powerful crossbow can be made from a petal spring of a UAZ car. Using a grinder, cut an arc out of the spring. Its dimensions are as follows: length 850 mm, width from the ends to 15 mm, and in the middle 30 mm. Next, using a whetstone, bring the thickness to 8 mm in the center and 4 mm on the periphery. Drill holes for fastening with a drill bit
Mia didn't know what the baker should do with the Bread Knife against Gitrog. It gnawed at her until one afternoon she made the mistake of asking Wilbur for it. "We'll be careful and alert when we see something." Wilbur looked irritated, his lanky design dripping with moisture from the rain.
"I'm just wondering if it's actually useful." Mia wondered why he refused to take off his coat and boots. "Some of us have to worry about something else." Wilbur crossed his arms over his chest, and Mia thought as he overhead. Do you need to walk around and swing your fishing rod to protect people? The words were already there before her heart begged her, but please be silent.

We are preparing a groove for the arc. We make a hole for fastening from a rope, at a distance of 100 mm from the cut groove for the arc. We insert the arc into the groove, and fix it with a rope. Or you can make a metal frame that will cover both the stock and the bow. The next step is to fasten the bowstring to the ends of the arc, using pre-made incisions for this. Stretch the string as you would when shooting. Thus, we will find the most distant point. After that, we determine the optimal size of the crossbow, which is equal in length to your forearm.
You have only a superficial understanding of what we are doing to protect the village and keep the people alive, and everything you do is derisive. The truth in his words scraped her off like sandpaper on her heart, leaving her bloody and shattered.
"Why are you still here, Mia?" Mia looked at the stern line of her mouth, at her wrinkled forehead and cold, questioning eyes. Her stomach rumbled with laughter of anger and sadness as her throat burned. Wilbur continued, "Why didn't you show up at Shields headquarters to take the test and leave us like your father did?"
We will make a bowstring from lavsan or fastflight. You can use thin wire. Wind the threads stretched between two nails, and at the ends we make loops for putting on.

We wind the threads up to a thickness of 5 mm. Then, without removing the threads from the studs, we wrap the threads once so that they are tight to each other. After that, at the first carnation, we collect both halves of the bowstring, and again tightly wrap it up to the second nail. As a result, we got a bowstring with loops at the ends. The middle part of the bowstring must be wrapped very carefully, since a very large friction force acts on this part. The cut threads must be well coated with glue so that all the threads are monolithic. We stretch the bowstring with a stirrup made of wire. Having fixed the bowstring, we adjust the degree of its tension. If the bowstring is too thick, then the strength of the shot decreases, and if it is too thin, it will break. Therefore, you need to make a bowstring of medium thickness. You can make a bowstring in the likeness of sports models.
Wilbur laughed, and Mia's heart sank. She had never heard of him and she was full of joy and dagger. You knew there would be snow before your birthday. You knew that after that, the passage would go through the passage. If you really wanted to take the exam, you would have already gone. His words were as cold and biting as the cluttering cold air. You are afraid. Be afraid that you can no longer remember all these rules and play you.
Mia grabbed a bundle of wool and threw it at him. Take it. Wilbur reached for the cat on his belt, but Mia pushed him hard. I said, "Get out of here!" Keep your father's money. "You mean you don't need it." It was her fault that he knew exactly how to hurt her.

photo.crossbow trigger
An important step is necessary to make a homemade powerful crossbow
And so, we came to the most critical node of our design. We will make the trigger mechanism of the crossbow. It will be a pin type lock. To do this, drill a through hole in the place of maximum tension of the bowstring. Make a transverse recess in the upper part of the bed. The next step is to fix the lever at the bottom of the crossbow. The axis is made of wood, and fastened with wire.
Wilbur turned around with the wool under his arm and dropped his purse behind him as he crossed the threshold. Coins fell out and spread across the floor. Despite the cold, she was sweating. This was the third time today that she had to change the water for her sheep and break the ice that had formed in the Trgen River. In addition, all the other assignments and homework that she had to do, she barely had time to breathe. The sun was already sinking below the horizon, throwing a few last faint rays into a sky filled with lead clouds.
The wind howled as she returned to her hut and dragged her through her cloak into the marrow. At least it's not snow, she thought. Two hours later, she was looking out the window as a white whirlwind slowly enveloped the landscape. What a fitting end to a cold and miserable birthday.
Another type of trigger is called a walnut. It consists of a cylinder that freely rotates around its axis. On one side it has hooks for the bowstring, and on the other side, an L-shaped trigger rest. If the power of the crossbow is up to 30 kg, the cylinder can be made of wood, and with a power of over 30 kg it must be made of metal. Make the "nut" that will hold the bowstring out of a piece of iron without welding to make it stronger.
She hoped to get into the village, hoping to find her way to Wilber's house. They didn't talk to each other after their fight. The passage of time weighed heavily with each passing day, maintaining the silence between them and widening the gap that now separated them. Although she has little hope, she believed that her birthday might have forced Wilbur to visit her, as he always did.
She sighed and pressed her forehead against the windowpane. She didn't know when she left. She only knew that something had triggered her some time later. The fire had been burned to warm glowing embers, and outside the pale moonlight outlined the landscape as sharply as with scissors. The storm was clear and the stars sparkled in the sky. But why did she wake up?

We fix the bed and the lever with ropes so that the lever moves with minimal friction.
For an arrow, the groove should be located from the top hole of the lock to the leading edge. The depth of the chute is equal to a quarter of the diameter of the boom.
The wooden crossbow is ready. Now let's work on the details. First, we will process all the details with sandpaper. After that, they can be coated with protein mixed with water. Then check how the lock works. Make sure the mechanism is as strong as possible.
There was a loud explosion in front of the hut. Mia shuddered and with a furious heart. She listened and looked into the silvery semi-darkness - all feelings were sharpened, thoughts were delusional. She took a deep breath and leaned back. Her head rested sleepily on her hand again. It was probably only a frozen tree as its resin expanded in the cold.
Suddenly, Mia jumped up, reached for her crossbow, flung herself on her cloak and ran outside, fear and terror lying around her like bands of iron. The sound did not frighten her. Silence followed. Without bleating, the sheep was afraid. Even when she ran out into the snow, she didn't hear anything. She held the crossbow ready to fire and slowly approached her, getting closer to the handle.
To give the crossbow beauty, open the wooden parts with stain and varnish, and the metal parts with black paint.
Now let's move on to the arrows. You can also make them yourself. To do this, you can make blanks from a regular board. Then these blanks must be carefully planed. Wood is recommended to choose light. In the manufacture of the tip, nails should not be driven in, since if it hits the target, the arrow may split.
The sight of her suggested to her the frozen blood in her veins. The entire side of the horse was in ruins, the fence poles were torn off the ground. Scattered boards lay in the snow, and as she still watched, one of the supporting posts in the dugout, whose trump card had collapsed. Mea approached slowly, still excited and hopeful even though she already knew what she was expecting. When she stepped cautiously, her fears were confirmed.
Not a single sheep is visible. Instead, blood and viscera covered the ground and smeared the few remaining boards. A cold wind blew through the wreckage, and the biting smell of innards hit her. The crossbow fell to the ground as she pressed the sleeves of her coat against her mouth and tried to calm her stomach.
We examined the method of making a conventional "medieval" crossbow.
The crossbow is blocky. It can also be made at home. It is made of fiberglass, 10 mm thick.
First done fiberglass arms. To do this, you need to cut from 30 to 40 strips of fiberglass or Kevlar. Glue them together with epoxy glue and lay under a press until completely dry. After 24 hours or more, these structures must be leveled and well cleaned.
As she caught herself again, the strange shape of the snow caught her attention. She cursed that she hadn't brought the torch and moved slightly to the side to move her shadow. Bright moonlight fell on a huge footprint in the fresh snow. The imprint looked like a large foot with floating pools and three claw-like spikes at one end. As she looked down at the pencil, she saw further impressions of that sight between the sanding marks and the bloodshed.
Mia's heartbeat roared in her ears as she stared into the distance. A wide trail of tracks and thirteen prints led from the pen to the forest by the lake. Fraud threatened to take over. He ate her herd. And that meant he was far enough away from the lake. And that meant he was probably in the village too! She should have told Wilbur. She had to apologize. She started with her boots crunching in the snow on her march to the dim lights in the distance when a stubborn voice in her head stopped her.
photo.mounting a homemade crossbow
The bed, as in the previous case, is made of wood.
Blocks are made of aluminium. Better if they are on bearings. Great for this purpose, the middle parts of the wheels for roller skates. Axes for them need to be taken with a diameter of 5 mm. They can also be taken from skates. Fasteners are made of steel or other durable material. If, when making the shoulders, the ends are made thicker, fastenings are not necessary. next step there will be a trigger mechanism with a trigger and an arrow holder on the crossbow. All this is connected with bolts and washers. In block-type crossbows, the bowstring is somewhat longer and is pulled differently. It seems to cross, and the arrow flies with redoubled energy. A thin cable is used as a bowstring, which can withstand sharp pressure when fired.
If the threat from the monster, and not from the person, is guaranteed, the hunter must follow the monster and render it harmless. Keep him away from villages and cities - avoid the panic and chaos of frightened innocent people. Mia stood there, her breath frozen to pale clouds as she was torn to the point of what she was supposed to be doing. Surely she couldn't handle something like a Jitrog. In order not to warn the village, she seemed incredibly stupid. She had to talk to Wilburg, or rather her father.
Kalim and the elders knew what to do. But could they help her? And even if: what could they do? The gaze of bakers and peasants, armed with bread-knives and marbles, appeared before them. inner eyes. Mia looked at the crossbow in her hand. The silver shone in the moonlight. She ran her fingers over the runes engraved on the side. She reached up to her hip and placed her hand on the handle of a long dagger. The familiar blade was used much more often than knives, but its cutting edge of cold wrought iron was meant to slay ghosts and witches.
Read how:
In order to conduct aimed shooting from a do-it-yourself crossbow at home, you need to adjust the stock. It must be adjusted taking into account the trajectory of the arrow flight. The bed should be at an angle of 5-6 degrees. Better yet, decide on the firing distance and shoot the crossbow made, after each series of shots, changing the angle of the stock.

photo. homemade wooden crossbow
The trigger mechanism can be anything, but so that it does not work prematurely, under the force of the bowstring. The string should, after the shot, return close to the bed, but without much friction.
Video instruction on how to make arrows for a crossbow
Video instruction on how to make a toy crossbow
One of the most popular types of small arms is the crossbow. And although hunting with such a device is prohibited in our country, there are still many who want to acquire such a “toy” in order to shoot at targets. At the moment, you can buy such weapons on many sites or in stores, but such a purchase will be very expensive. It is much more profitable to make a crossbow with your own hands at home, and you will find out what is required for this.
Preparation
To date, there are many varieties of this sporting weapon. First of all, these are classic models familiar to us from historical films and block crossbows - modern weapons equipped with complex mechanisms. The last option to create houses will be quite difficult, so let's focus on the classic.
What parts does a crossbow consist of:
- Trigger mechanism;
- bowstring;
- Crossbow stock;
- Bolts and arrows.
Making a crossbow at home will be much easier if you immediately stock up on all the necessary materials and tools. For this you will need:
- Well sharpened knife;
- Hammer;
- Drill or brace;
- An ordinary hacksaw, which can be replaced with a grinder with a wood disk;
- Plane;
- Chisel.
How to make a crossbow with your own hands
In addition to the tools, you will need a piece of wood 900mm long and 30mm thick to make this ranged weapon. In this case, fit:
- ash;
- hazel;
- poplar.
- birch.
First of all, you need to prepare a wooden blank. To do this, cut the branch of the desired size and paint over the cuts. This is necessary so that the liquid from the wood comes out slowly and evenly. Please note that the wood must lie in a dark place for at least a year, only in this case the weapon will shoot with special power. After that, the bark is removed from the workpiece and left to dry for another week. Further, the log is sawn into two parts and from the northern - the most durable, they make the actual crossbow.

Draw the stock of the weapon on the board and cut it out with a hacksaw or grinder, then make a small arrow chute on the top of the workpiece. From the front side, cut a groove in which you will fix the arc. If knots or chips appear on the bed during the process, then remove them with a knife and treat the place with sandpaper.
How to make an arc
This part will require a flat board with a length of at least 750 mm and a width of 200 mm, a thickness of 60 mm. We dry the workpiece well and stand for several days, and equalize it. The width of the part in the middle is 40 cm, and narrows at the edges to 15 cm.
At a distance of 100 mm from the cut groove for this part, we create a through hole through which we stretch the rope - it will become the main fixator for the crossbow arc. Then we insert the part into the groove and firmly fasten it with a rope, as shown in the lower figure.
![]()
This detail plays a rather significant role in the “lethality” of the weapon, and to create it you will need the following materials:
- kapron threads;
- wooden plank;
- two nails without a hat;
- rubber glue.
First of all, you need to make a special machine for weaving this part: take a rope and measure the length of the bowstring. After that, saw off a board with dimensions slightly larger than this parameter. Next, mark the length of the string on the board and drill two holes in these places - this is where you need to insert your nails.

Take a thread, tie it to one of the nails, and leave a margin equal to the length of the bowstring. After that, start wrapping the threads evenly around the nails (lavsan ones are best). Continue this process until the base of the string reaches 5mm. To do this, you need to make 5-6 full turns. Try to keep the threads evenly stretched.
Next, wrap the base several times near the nails on both sides with wrapping material. This will give you loops at the ends. You can understand how to do this from the diagram above. Don't forget to wind the middle of the bowstring, because this part suffers a lot from friction. Tie the cut ends of the threads with a marine knot and grease well with glue so that the whole structure is strong. After that, you can pull the bowstring on the arc and adjust the degree of its tension.

How to make a trigger
The simplest option would be a pin-type lock, which we will choose for our weapons. Pull the bowstring to the maximum distance and drill a through hole in this place. Also make a small transverse recess in the upper part of the crossbow bed. Now fasten the lever at the bottom of the part. Make a wooden axle and secure it with wire.
Fix the stock and lever with ropes so that the latter moves with maximum friction. The depth of the “ammunition” groove should be equal to 1/4 of the volume of the arrow, and this recess must be “cut through” from the top of the lock to the front edge of the crossbow.

How to make arrows
In order to get ammunition for your small arms, it is not necessary to run to a sports store, because they can be easily made at home. To do this, you will need several ordinary wooden blanks that need to be well planed and processed with fine sandpaper. For arrows, it is better to choose light woods, in which case the shooting will be more accurate. As for the tip, if you don’t have special ones, then sharpen the tip of the arrow - it will be quite possible to shoot at targets with such ammunition. You should not drive nails into the head, because in this case there is an increased chance that the arrow will be able to split when it hits the target.
Be that as it may, you should remember that in our country shooting from crossbows is equated with the use of firearms. So if you want to make such a device, then in no case do not use it for its intended purpose. Treat the crossbow as a beautiful souvenir, and then there will be no claims from the law against you.
Do you want to make a real crossbow that will not only look like it, but will also shoot? Then do not pass by and read our article on the topic of how to make a crossbow with your own hands. In the article, we will not only talk about the intricacies of this case, but also show the whole process in the photo. The topic is especially relevant in the summer, when you can go out into nature and shoot at targets. And a hand-made thing will please not only the eye, but also your friends or acquaintances, who, having seen such a product, will certainly set themselves the goal and desire to possess it!
How to make a crossbow with your own hands
Among the simple tools created by oneself, the bow definitely wins. However, crossbows are also very popular. If you want to make a crossbow with your own hands, you should only read the instructions below. As an example, a medieval construction was chosen due to its simplicity. Such a crossbow does not require metal welding, it can be made at home, it also does not require the presence of springs, as in its other, more advanced variations.
All it takes to make a simple medieval crossbow is the desire to craft. Initially, you need to find a suitable stick for the base of the structure. It is recommended to use bird cherry, as after drying the wood retains good elasticity characteristics. When a suitable branch is found, it should be carefully sawed off, the bark completely removed and left to dry in a warm place.
Usually the drying time is about 5-7 months.
Step-by-step instruction:
In addition, it is recommended to immediately bend the stick so that in the future it does not crack during processing and fixation, as well as during operation. If there is no bird cherry in the area, you can use elm or other alternative wood.
It should be remembered that for good strength, durability and elasticity of the starting part home crossbow you need to take a good stand. Moreover, in this case, the chances of a crack during the operation of the crossbow will be significantly reduced.
To be able to practice and to eliminate the need for repeated waiting, it is recommended to prepare several sticks at once.

On the bed of a homemade crossbow, you can use any type of board or dry wood. It all depends on how accurately you want to repeat the medieval model of the gun.

When the wood is selected and processed, a recess must be made in its front part to accommodate the crossbow bow. You can make a recess with any tool from a metal saw to a regular knife.
The next step in making a do-it-yourself crossbow at home is to drill holes for the bow bolts. They are placed at a distance of 8-10 cm from the front of the bed. Previously, holes were made with red-hot metal, so you can also use this method if you don’t have the right tools at hand.
Moreover, if you don’t have bolts at hand, you can use the same tree.

The upper plane of the bed should have a groove in which the crossbow bolt will be placed. Often such a groove is made round, but it is recommended to cut it triangular in order to increase the accuracy of the bolt.

When everything is ready, you can fix the bow. It is applied to the cut made in the front of the stock and tied tightly with a rope to the previously installed bolts or their wooden alternatives. This will be enough, but for a tighter fixation, it is better to use glue.

The last element of a homemade crossbow is the organization of the trigger mechanism. Usually the simplest lever type is used. The crossbow drawing below shows how such a system works.

When the lever bracket descends, the pin instantly starts up, and it launches the bolt forward. It is important that this system does not have any safety mechanisms, so you need to install the bolt only before firing.

The created crossbow must have a pulling force of about 40 kg, so the design will not fall into the list of melee weapons. The tension of the bowstring is carried out by hand, so additional mechanisms are also not required.
Drawings for making at home

The photo above schematically shows a crossbow with all the necessary dimensions. Its main value is to understand what size its parts should be in relation to each other. Its entire length is 732 mm, with a height of 223 mm at the point of attachment of the sight. The drawing shows a “pistol” handle (shaped like a pistol), for a secure and comfortable grip.
The second hole is made to facilitate the construction, since the total thickness of the plywood handle (can be made of wood) is 30 mm. The arms are 302 mm long, are a universal option, their total length is 532 mm. For the first time, it is enough to make exactly according to the dimensions indicated in the diagram, and after testing, make adjustments.
In addition, it will be interesting to shoot from such a gun yourself. Everything is done quite simply, here you can completely do with hand tools. The crossbow turned out to be quite powerful, as for training shooting. It uses double shoulders, which increases the rigidity of the bow and allows you to throw wooden arrows at high speed. The author uses self-tapping screws as an arrowhead, but you can show your imagination and come up with something more interesting.
Materials and tools used
List of materials:
- timber;
- PVC pipe;
- two self-tapping screws;
- strong rope;
- wooden rods for arrows;
- adhesive tape (for plumage).
List of tools:
- hacksaw or pendulum saw;
- jigsaw;
- belt sander;
- drill;
- marker;
- roulette;
- screwdriver;
- building hair dryer;
- vice;
- oil for wood processing;
- paint for painting onions (optional).
The process of making a crossbow:
Step one. Cut out blanks
First of all, we will cut the wooden beam, it will be used to make the base. We also need to cut the pipe. You should have two pieces, a long one and a short one. See the photo for dimensions.


Step two. We make a bed
We make a bed from a wooden bar. First of all, we will make the necessary markup using a marker. Well, then we cut out the extra parts using a jigsaw, an electric jigsaw will do an excellent job with this task.


Step three. Let's make a bow
Our bow consists of two parts, which increases its rigidity. Everything is made of PVC pipes that need to be made flat. To do this, we need a vise with a wooden insert so that there are no prints on the pipes. We heat the pipe with a building hair dryer until it becomes soft, and then squeeze it in a vise. Step by step we heat the sections and compress. At the end, we form the desired bow profile.


Step four. Bow mount
To attach the bow, we are looking for its center, and then we drill two holes, like the author. For fastening we use two self-tapping screws, as well as washers. But do not fasten the bow tightly yet, it still needs to be finalized.


Step five. We finalize the bow
The essence of the refinement is to make grooves at the ends of the shoulders, to which it will be possible to tie a bowstring. We make the markup and cut out the extra parts with the help of a jigsaw. Concerning short shoulder, then here you need to make grooves at the ends so that the bowstring does not fly off.


Step six. Setting the bowstring
As a bowstring we use a strong synthetic rope. We cut off two pieces of the desired length and melt the ends with a lighter. Well, then we tie the main bowstring to the ends of the shoulder with a little tension. As for the extra shoulder, you will need another rope to use it. How everything is connected, you can see in the photo.


Step seven. Arrangement of the trigger mechanism
The trigger mechanism is of the trigger type. It consists of two parts, one is a trigger, and the second is a part with teeth, one of which holds the bowstring, and the other rests on the trigger. These parts can be cut out of plywood using a jigsaw.


Step eight. Arrow making
We make arrows from wooden rods. To stabilize the flight, make plumage for them, the author used adhesive tape for this. Well, at the end of the arrow you need to install some kind of weight, the author wrapped a self-tapping screw there. If desired, you can cut off the head and sharpen the rod.


