Bicycle front wheel: how to assemble, disassemble, install
The front wheel of a bicycle is a driving unit, without which it is impossible to imagine a bike, except perhaps a unicycle. The driven wheel, synchronized with the fork, is responsible for the trajectory of the bike and, to a greater extent, rolling. Unlike the rear, the front wheel is simpler in design, but also requires timely maintenance.
A bicycle, like a car, needs regular maintenance, and the front wheel is one of those important components that should not be neglected. Let's give it some attention!
What is a wheel made of?
Bicycle wheels are the most conservative component. Of course, they appeared, all-round wheels are put on track models, but they are in the minority. Still, the majority of bicycles are equipped with spoked wheels.
The front wheel arrangement is as follows:
- the sleeve is ordinary;
- rim;
- connecting needles;
- rim protective tape (flipper);
- camera and tire;
- disc (on models with disc brakes).
Bushing - the axial part of the wheel, is an assembly of the central axis, bearings and cone clamps. Tapered bearing systems are most often mounted on bushings with open type bearings. They can also be equipped with sealed bearings or proms.
Sleeve with open bearings
The rim is a supporting structure, a metal ring. The rims are made mainly of aluminum, with carbon rims on expensive models. According to rigidity and power, they are divided into three types:
- single wall- the outer and inner surfaces have one line of contact (bridge);
- double- the inner surface is attached to the sidewalls, separated from the outer;
- triple- the strongest and most durable option: the inner wall is also attached to the sidewalls, but, unlike the double rim, the triple one has an additional wall in the middle.

Varieties of rims for bicycle wheels
Vertical bridges form channels running in the direction of rotation. According to the number of such channels, modern rims are divided into one, three- and five-piece:

The spokes are the connecting elements of the hub with the rim. They perform the functions of fastening, distributing loads along the rim and the central axis and mitigating vibrations during movement. The rim is perforated, each hole is designed to secure one spoke. A bicycle wheel has a number of spokes that is a multiple of four. Depending on the model, their number varies - from 28 to 40 on average.
The number of spokes for the front wheel is usually less than the number for the rear. This is due to the fact that the bulk of the load falls on the back of the bike, and there the wheel should be stronger.
According to the type of section, the knitting needles are divided into:
- standard (rolled) - constant circular section along the entire length from the bushing attachment to the tip;
- aerodynamic (blade-shaped) - elliptical or rectangular profile;
- variable section (drawn) - standard section at the heads and narrowing towards the middle.
The tube is the inner part of the tire that holds the pressurized air inside. The tire is the outer shell that contacts the road, absorbs bumps, and protects the camera. The tire is made of a harder rubber than the tube.
Rim tape, or flipper, is a rubber lining under the camera to protect it from breakdowns on the tips of the spokes. Dynamic loads cause the chamber walls to flex, causing them to press against the rim surface. Without the flipper, the camera can push through the hole with the tip of the needle. This problem is more pronounced on the rear wheel, where the loads are higher, but the presence of a flipper is also mandatory on the front wheel. The torn tape must be replaced with a new one. A proven homemade option is to glue the rim with several layers of electrical tape, except for the hole for the nipple.
How to remove the front wheel from the fork
Removing a wheel is the easiest bike maintenance procedure. This is done very simply:
- Turn the bike upside down.
- Release the rim brake, remove the caliper from the disc brake.
- Loosen the fasteners from the fork dropouts.
- Remove the wheel axle from the mounts.
On dropouts, fastening is nut and eccentric. In the first case, you will need two 15 mm wrenches - we hold the nut with one, carefully twist the other on the opposite side. With an eccentric, everything is easier - loosen the fixing nut and tilt the clamping lever.

Direction of rotation of the eccentric when removing
When to remove the front wheel:
- replacement of cameras / tires;
- tightening / loosening spokes;
- bushing bulkhead;
- rim painting.
Installing the front wheel on the fork is done in reverse order.
Hub overhaul, rim alignment, tube and tire replacement
The technical condition of the bike directly depends on the health of all its components, including the front wheel. There are not so many problems with it, but they visit regularly:
- wear of bushing components, lubrication;
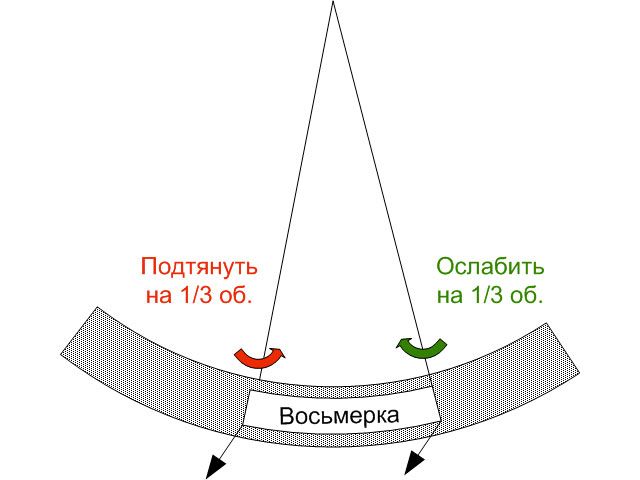
- rim curvature - "eight";
- breakdowns of the chamber, cracking of the tire.
The bushing provides a fixed fixation of the axle on the dropouts and uniform unhindered rotation of the wheel. Insufficient lubrication causes increased friction of the bearings and, as a result, their rapid wear. Symptoms - the wheel dangles, pronounced play, difficult rotation, crunch.
So, how to disassemble the sleeve:
1. Remove the axle from the dropouts (see above).

2. Loosen the mounting sleeve nut. To do this, you need two 17 mm wrenches - with one firmly fix the nut on the right, with the other twist counterclockwise on the left.

3. Screw the cone. For hooking, you will need a key for 14, then it is easily twisted by hand.
4. Pull out the axle from the opposite side. Carefully remove the left bearing from the housing cavity and pull the right bearing off the cone.

Carefully inspect everything, especially bearings. Damaged parts must be replaced with new ones.
Cleaning, lubricating and assembling the bushing:
- Blow the dirt out of the empty case.
- Using a narrow brush or cotton swab, apply a thin layer of lubricant to the inner walls of the bushing.
- Wipe the axle, cones and bearings with kerosene and allow to dry (if installing the same components).
- Lubricate the axle, bearings and cones on the inner sides that are adjacent to the bearings. We do not regret lubrication for bearings: the more, the better. Gently wipe off excess with a clean cloth.
- Put the right bearing on the corresponding cone with the same side as it was before.
- Insert the axle into the bushing and install the left bearing on it.
- Screw in the cone carefully. Its surface should touch but not pinch the bearing.
- Tighten the bushing with a nut.
- Put the wheel on the dropouts and fix.
We check the operation of the bushing - spin the wheel with force. If everything on the hub bulkhead was done correctly, the wheel will spin easily and silently. If rotation is difficult or the sleeve "walks" along the axis, it is necessary to loosen or tighten the left cone. Perhaps, for an accurate result, adjustment will be required several times, the main thing here is not to rush.
Eights are the most annoying problem with wheels. It occurs equally in front and behind. The front eight delivers less discomfort than the rear, but still it’s not fun to drive on a crooked wheel. Let's consider how. To work, you need a universal one, it looks like this:

Repair of the eight is done as follows:
- Determine the maximum convexity of the wheel. In this area, tighten the needle by an angle that is a multiple of 1 turn.
- Loosen the two knitting needles at the edges by an angle, half as much as the central knitting needle was pulled up to.
- Tighten the next extreme knitting needles to an angle half as small as those two knitting needles loosened.

If the curvature is located between the spokes, we do this:

Replacing the tubes is easier to repair rim defects, but more often required. In order to correctly and freely remove and install the tire, it is advisable to use special plastic mounts.
How to disassemble a tire:
- Remove the wheel from the fork mounts.
- Release the air from the chamber (if we only change the tire).
- Unscrew the protective cap from the nipple and slightly push it down.
- On the opposite side, hook the bead of the tire with two mounts.
- With the third assembly, hook the bead on the sides until the tire comes off the rim. Now you can get the camera.
Assemble the tire as follows:
- Pump up the camera a little so that it straightens out.
- Put the camera in the tire.
- Use the arrow to select the correct tire direction.
- Insert the nipple into the hole in the rim.
- Push the tire beads into the rim from the nipple side to the opposite end. When it becomes difficult to push, use the montages.
- Pull the nipple tube upwards (for Schrader).
- Check that the beads fit completely into the rim and put the wheel on the bike.
The front wheel on a bicycle is a simple assembly that you can do yourself at home: disassemble and assemble the hub, change the tire and eliminate the curvature on the rim. Serious problems - broken spokes, cracking of the hub shell - will require the help of a specialist.


