How to install and set up a bike computer
It is possible to achieve high results in sports only through daily improvement, surpassing previous indicators and striving for their maximum. For those who cannot imagine their life without cycling, a bike computer will help measure the results. The device is capable of measuring and storing data such as driving speed, distance, driving time and others. However, in order for the results to be true, a competent bike computer setup is necessary. You can do it on your own, based on time-tested tips and recommendations.
About device
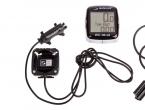
The bike computer is a device that consists of several parts. The principle of operation is simple: a magnet is attached to the spoke of the wheel, which transmits information about the rotation of the wheel to the computer itself. He makes calculations based on the data previously entered into the memory. There are two types of devices, each with its own advantages and disadvantages.
Wired bike computers
The device consists of a magnet and a reader, which are connected to each other by a wire. The advantages include high measurement accuracy and economical sensor battery consumption. On average, a wired device requires a battery change every six months. And also from the advantages it is worth noting the affordable price. As for the shortcomings, cyclists rank among them the unaesthetic nature of the connecting wire.
Wireless bike computers
They differ from the previous version only in the absence of a wire, data transmission takes place via a radio channel. On the one hand, the missing wire adds convenience to use, since there is no way to touch and damage it. On the other hand, when choosing a wireless bike computer, one should take into account the presence of third-party radio interference (especially in urban areas) and frequent battery changes. The price of a wireless meter is higher.
And there are also so-called portable devices that are made in the form of watches and other similar gadgets. They are convenient in that they do not require fastening, but they are not in great demand due to the fact that they divert attention from the road at the time when you need to see the results.

Installation
Installing a bike computer on a bike begins with attaching the monitor. The platform can be fixed:
- on the center of the steering wheel;
- steering wheel bracket;
- on the edges of the flu.
In the first case, the computer is in the greatest security, since it does not touch it when moving with your hands. On the stem, it is worth installing large-sized devices that are equipped with a large number of buttons and require attention. If the result is evaluated at short intervals, then it is recommended to install on the edges of the grips. In this case, the device is located directly under the arms, which facilitates the evaluation of performance and management.
The platform is fixed in the selected place using special harnesses. It is worth making maximum efforts when tightening them, as the monitor is subjected to heavy loads and vibrations. Harnesses are supplied by the manufacturer as a set.
Vibrations and stress while driving will eventually cause the pad to slide over the handlebars. To avoid these troubles, you should use a rubber backing under the monitor!
The bike computer is configured after all components are installed. Therefore, the next step will be to mount the magnet and sensor.

Sensor and sensor
First, you should figure out how to properly install the bike computer on a bike if it does not have a wire. With the help of all the same harnesses, the sensor is attached to the plug, turning it to the magnet. Otherwise, he will not be able to receive the signal with the required accuracy. The magnet, in turn, is attached to one of the bicycle spokes. A little trick will help determine how to put a bike computer on a bike, or rather a sensor with a magnet. To do this, it is worth making the maximum convergence of the two elements and adjusting them so that they are located at a right angle. After that, the sensor and the sensor can be permanently fixed.
Important
The wire
But how to install a bike computer on a bike if the data is transmitted over a wire? Here it is worth making a little effort in order to turn the bike over and remove the wheel. It is convenient to attach the wire with electrical tape / adhesive tape to the plug and the back side of the brake cable.
When attaching, a small allowance is left, which in the future will allow you to adjust the position of the sensor on the steering wheel.
For which wheel?
You can place the sensor and sensor on both the front and rear wheels. With a wired installation, it is the second option that is recommended, since the accuracy will be higher. If we are talking about how to install a bike computer without wires, then for better communication quality it is recommended to mount the sensor on the front wheel.

Setting
To adjust, you will need to measure the circumference of the wheel. This can be done in two ways:
- The wheel is wrapped in a thread, after which its length is measured.
- A mark is applied to the wheel, the same is applied to the road surface. Slowly rolling the bike forward, it is worth making a full turn. The distance from the start point to the finish point is measured, and the required value is obtained.
Further, the received data is entered into the computer, the time is additionally set, etc. At this point, the question of how to set up the bike computer can be considered settled. However, during operation, additional configuration related to malfunctions may be required.
Major breakdowns
If suddenly the configured bike computer stops turning on, although it has not been subjected to mechanical stress, it is worth changing the batteries. As a rule, this is the most common problem, after the elimination of which the device starts to work as before.
The second common failure is associated with obvious errors in measurements. In this case, it is necessary to adjust the magnet: the wheel rises, rotates slowly and the reading results are evaluated. If an error is present, the magnet is outweighed or tightened more firmly.
And, of course, it is necessary to note the possible damage to the wire. They are manifested by a violation of measurements when driving, while there are no flaws in a stationary position. The way out is to replace the defective element.