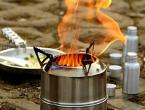
How to make a camp stove with your own hands
Resting in nature, sooner or later you will need a fire - to heat canned food, cook porridge or boil tea. Of course, you can kindle an open fire, but sometimes the lack of forest or rain does not allow you to do this. A camp stove comes to the rescue, made with your own hands and delivered by the same hands! We will talk about how to make such a design in today's article.
What are camp stoves for?
A camping stove is an effective "substitute" for a fire. But for her, unlike the same fire, you need very little fuel. It can be:
- dry branches;
- tree bark, chips, cones;
- reeds;
- coals left over from an old fire.
Note! The ratio of generated heat and loaded fuel in a camping stove is several times higher than that of a fire. In other words, with an equivalent volume of fuel, the amount of heat is not the same.

It turns out that having the same amount of firewood, you can cook dinner on the stove, but, alas, it will not work on the fire. Thanks to domestic craftsmen, today there are quite a lot of different modifications of marching structures. Conventionally, they are all divided into single- and double-walled. You can:
- build at the place of rest, having improvised materials;
- make in advance using an old pan, cans, sheet metal, etc.
At the same time, the camp stove itself should consume minimal amounts of fuel, be small-sized, light, convenient, and also heat the dishes, and not the surrounding air.
Video - Camping stove. Detailed overview
Design features and its advantages
As we found out, a camping stove is an extremely useful device, which is difficult to do without when fishing or just relaxing outside the city. If we talk about standard grate stoves, then they need large amounts of firewood due to good traction. In a word, the fuel burns out quickly.
But in structures without a bottom, where the firewood lies directly on the ground, combustion slows down, the coals smolder for a long time, and after loading a new portion, it ignites instantly. But the draft in this case is bad, and heat is practically not accumulated.

In marching structures with stands, traction is maximum. If the dish that is planned to be cooked should be cooked on low heat, then the stove should simply be put on the ground, thereby blocking the grate. In this case, the supply of oxygen deteriorates, combustion slows down, and the time, accordingly, is extended. But regardless of the design, all stoves of this type have significant advantages, including:
- profitability;
- versatility and autonomy from weather conditions;
- efficiency;
- compactness;
- long burning without smoke formation;
- ease of use and transportation;
- power adjustment;
- safety;
- performance.
We also add that due to the fact that firewood burns from the inside, the body of the stove does not heat up much. You can even hold it in your hands a little, since wood effectively insulates heat. But in working with open fire, of course, caution is always needed!

Option number 1. Miniature can stove
The most primitive single-walled option is a do-it-yourself camp stove made from a tin can. In the process of creating it, you will need an ordinary tin can or an iron mug, but always of a minimum size (about like a tall glass). In the future, you will have to take such actions.

Step 1. First, make a couple of holes in the bottom of the mug or jar to create traction (they will serve as sources for air supply to the body). It is important that these holes coincide with the internal air passage. There is another option - to make one big hole in the bottom, but in this case, the coals can fall out.

Step 2 Then fill the jar with small (about the thickness of a finger) wooden chocks so that they do not extend beyond the edges of the jar. The laying of firewood should be strictly vertical (some kind of "Indian candle").
Step 3 After that, remove the chock, which is located in the center, from the case - this way you will provide a channel for the passage of air.
Step 4 Put paper or dry grass into the formed channel, set fire to it.
Step 5 This design, the volume of which will be approximately 500 ml, will burn for about 25 minutes, which is more than enough to cook something in a hurry. The area will not smoke at the same time!

Step 6 Of course, if a lot of people take part in the campaign, then the bank should be larger - at least one or two liters. But in this case, in order to obtain stable combustion, firewood must be used thicker, and in larger quantities.
The flame, "extracted" using this design, will burn for about 60 minutes. This is enough to properly boil the potatoes and fry the barbecue on smoldering coals. This is just one of the manufacturing options. Now let's move on to the next one.
Read the same way how to make an oven yourself
Option number 2. Making a pot stove
If you plan to make a two-layer oven, you can use "stainless steel" pans, also called tanks with lids (they are quite cheap). This design is perfect for a hike, as a budget and easy to implement. The costs for her are practically zero, she will effectively replace the fire, and the fuel for her work can be found in any forest.

From a constructive point of view, a two-layer oven is two pans of different sizes inserted into each other. An opening was cut in the side wall of the outer pan approximately ? height in order to load fuel. But at the bottom there are parallel grate slots with rotating bridges or ordinary holes.
A stand is placed on this grate. Then the stand is loaded with firewood, and a second smaller container is placed on top of all this - it will be heated by the flame. The second pan will be surrounded by fire and heated walls of a larger capacity, thereby minimizing fuel consumption and saving heat generated.
Note! The bow for the bowler must be made in the form of a separate removable element.
The described design of the camping stove is extremely simple, and therefore it is compact and mobile. You can easily pick it up along with burning firewood and transfer it to another place (if, for example, it started to rain and the fire needs to be moved under a canopy).
Option number 3. DIY folding camp stove
A very effective design, which, however, requires more time and effort, as well as preliminary preparation. First you need to acquire such consumables and equipment as:
- roulette;
- Bulgarian;
- electric drill, as well as a set of drills for it;
- file;
- pliers;
- spokes from a bicycle;
- piano loops;
- metal sheet 1 mm thick.
Also note that in order to make a folding stove, you can use:
- iron sheets from the body of an old gas stove or refrigerator;
- side walls from an old computer system unit (these options can replace sheet steel).
Note! Starting the creation of a folding camping stove, be sure to familiarize yourself with its sketch, and also create templates for planned structural elements based on it.

In the course of work, you will need to perform the following algorithm of actions.
Step 1. First, mark out all the structural elements on sheet metal according to the prepared templates, and then cut these elements out with a grinder.
Step 2 In the piece that will be used to equip the bottom, make holes.
Step 3 Then file the edges of the formed holes with a file to eliminate burrs.
Step 4 Connect the side walls of the structure to each other using riveted piano loops. As a result, you should get a kind of box.
Step 5 Along the entire perimeter of the bottom, as well as on the lower edges of the side walls, special “ears” bent in one direction must be provided in advance.

Step 6 An element is placed under the formed box, which will serve as the bottom, while the "ears" of the two elements will be aligned on each side and form a tube. It is necessary to insert pins made of knitting needles into this tube. Such a little trick allows you to make the stove more stable in operation. In addition, if necessary, the structure can be easily disassembled for transportation or storage.
Step 7 On the grate, make additional protrusions installed in the holes that are cut out on the sides.
Step 8 Also in the sidewall there will be another hole through which fuel will be loaded.
Step 9 The cutouts on the top of the box not only increase traction, they can also be used to store skewers.

Option number 4. Multiple can design
First you need to prepare three cans (two smaller and one larger). After that, take these tools:
- scissors for metal;
- asbestos;
- marker.
Do the following.

Step 1. Make blanks. Take a large jar, step back from the bottom about 20 centimeters, attach a smaller jar there and circle it with a marker. An even circle should form.
Step 2 Cut a hole in this circle, make sure that the jar enters it, but with difficulty.
Step 3 Make a similar hole in a smaller jar. Place the smaller one inside the larger one.

Step 4 Make parallel cuts of about 2-3 centimeters on one side of the jar.
Step 5 Take a lid from a large jar, make a hole in it for a small one. Sand the cuts.
Step 6 On the wall of the jar, make vertical cuts of about 1.5-2 centimeters.
Step 7 Fill the voids between the banks with asbestos, then close the lid and bend the metal.
Step 8 Take a piece of tin and make a firewood shelf out of it, secure it.
Step 9 Now just attach a handle to make it convenient to carry the structure. That's it, the do-it-yourself camp stove is ready! You can color her.
Video - Making a camp stove
As a conclusion
When planning outdoor recreation, all household items must first be provided. Of course, a camp stove can be purchased at any specialized store, but it is much more pleasant to make it yourself. After all, this will provide an opportunity to save money and realize your fantasies, it is great to pass the time in the fresh air. Good luck with your work!